



- behind the left end panel of the instrument panel (fuses);
- on the left side of the engine compartment (fuses and relays);
- above and below block J519 (under the left lower instrument panel trim).
2. The location of the mounting blocks is additionally indicated in the Chapter "Electrical Equipment Schemes". The purpose of the fuses and relays is also indicated there. The purpose of the fuses is additionally indicated on the back of the cover of each mounting block. The fuse or relay number is indicated directly on the mounting block, next to the corresponding relay or fuse.
3. To gain access to the fuse box on the left side of the instrument panel, remove its left end panel (see illustration 15.5 Chapter 11), prying it from below with a key or screwdriver.
4. To gain access to the mounting block in the engine compartment, open the cover of this block by sliding the latches forward (arrows in the illustration) and pulling the lid up. When moving the latches, press the cover to avoid damaging them.
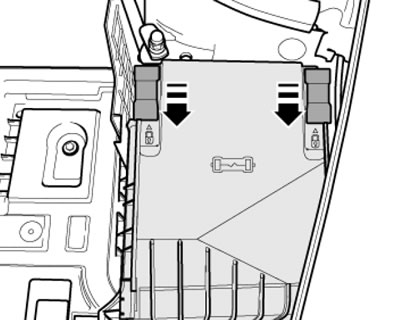
3.4. Removing the cover of the mounting block in the engine compartment
5. To access the relay mounting blocks below and above the J519 block, remove the lower left instrument panel trim and the knee airbag bracket (see Section 15 Chapter 11), and, if necessary, block J519.
Fuses
6. Each individual fuse is used to protect a specific electrical circuit or several circuits at once, and one circuit may have one or more fuses. The fuse boxes mostly use compact fuses with bayonet contacts, which, if necessary, can be easily removed from their sockets with your fingers or with pliers stored in the cover of the fuse box. To remove the fuses, use the pliers stored in the mounting block behind the left end cover. For small fuses, push the tweezers from above, and for large fuses, push them from the side.
7. If any of the electrical consumers fails, the condition of the corresponding fuse should always be checked first. Turn on the ignition and use a test lamp to probe the open terminals of each fuse. If the lamp lights when connected to each terminal, then the fuse is good. If voltage is present only on the power supply side, then the fuse has blown. Note also that the fuse body is usually made of transparent plastic, through which it is easy to determine the state of the working jumper.
8. When replacing a blown fuse, make sure that the replacement element you prepare is the same type as the one that failed. Fuses rated for different current ratings may physically be no different from each other, but are not interchangeable. Each electrical circuit has different operating parameters and requires a different degree of protection, so replacing a fuse rated for a certain current with a fuse with the wrong parameters can have the most serious consequences (until a fire breaks out). The operating parameters of the fuse are usually indicated on its plastic housing, and color identification is also used.
9. If the new fuse also fails immediately after installation, there is no point in replacing it further - first you should identify and eliminate the cause of the overload in the circuit. In most cases, this is a short circuit in the connecting wiring caused by damage to its insulation. Spare fuses are usually placed in free terminal blocks of the mounting block.
Relay
10. To supply power or control signal to some of the electrical consumers in the vehicle (such as fuel injection system components, horn, starter, cooling fan, fog lights and others) relays are used. In fact, the relay is an electrical switch that ensures the closing of the working circuit according to the control signal. If the relay fails, the corresponding consumer will not function. A description of how to check the proper functioning of the relay is given below. Failed relays must be replaced.
11. If it is not possible to find out how to connect the relay to the corresponding electrical circuit using the electrical connection diagrams (diagrams are provided at the end of the Manual), it should be remembered that the approach to testing any relay is, in principle, the same in all cases (see below).
12. In most cases, a control circuit is always connected to two of the relay contact terminals. When control voltage is applied to these terminals, current begins to circulate through the relay control winding, resulting in the closing of the contacts of the working circuit of the power consumer. The remaining terminals are working circuit terminals.
13. In order to facilitate the identification of the relay terminals, explanatory markings with an image of the key connection diagram are usually applied to its body.
View the original on the website [SkodaBook.ru]
14. Before removing the relay, make sure that the corresponding circuit is de-energized.
15. Connect a fused jumper wire between one of the relay control terminals and the positive battery terminal. Using the second jumper wire, ground the second control terminal - the relay should click. Some relays require that the polarity of the connection be strictly observed - if there is no click, try changing the polarity of the control terminals.
16. With the jumper wires connected, check for conductivity between the terminals of the working circuit.
17. If the test result is negative, replace the relay.