
Company vehicles Hyundai Company vehicles Kia Company vehicles Lada Company vehicles Mazda Company vehicles Mercedes-Benz Company vehicles Opel Company vehicles Mitsubishi
English Русский
Български
Беларускі
Український
Српски
Hrvatski
Română
Polski
Slovenský
Magyar
Articles   
Bookmark Contacts Sitemap
SkodaBook.ru


Fabia Rapid Octavia Superb Kodiaq Yeti Others
Yeti (2009-2017)

Removal and installation of front and driver knee airbags, as well as a coil spring (Skoda Yeti 5L)

  • Main
  • Yeti
  • 5L (2009-2017)
  • Electrical equipment
  • Equipment and devices
  • Removal and installation of front and driver knee airbags, as well as a coil spring
0
Contents: Driver's front airbag ⬇ Spiral spring (models before…⬇ Coil spring and steering column…⬇ Knee airbag ⬇

Driver's front airbag


Note: The description is given using models with a multi-function steering wheel as an example. To remove it, you will need a screwdriver approximately 170 mm long and with a blade width of approximately 7 mm.


1. Turn on the ignition and disconnect the negative battery cable (see Chapter 5).

2. Lower and extend the steering column to the stop.

3. Set the steering wheel to the position shown in the illustration, insert a screwdriver into the hole on the back of the steering wheel until it stops, and press the spring (A) in the direction of the arrow (B), while separating the air bag from the steering wheel. Turn the steering wheel 180° and loosen the fasteners on the other side in the same way.
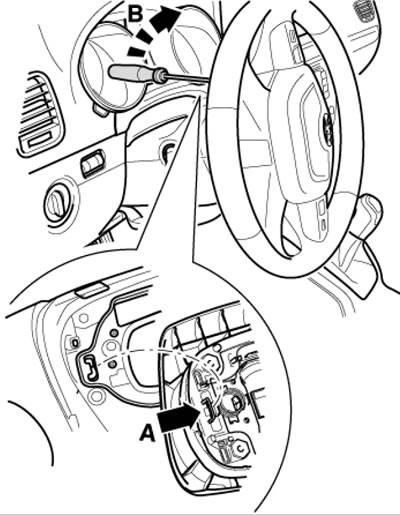
14.3. Separating the airbag from the steering…

14.3. Separating the airbag from the steering wheel


4. Separate the airbag from the steering wheel, discharge any static electricity from yourself and disconnect the connectors (1 and 2 in the illustration). Place the airbag face up.
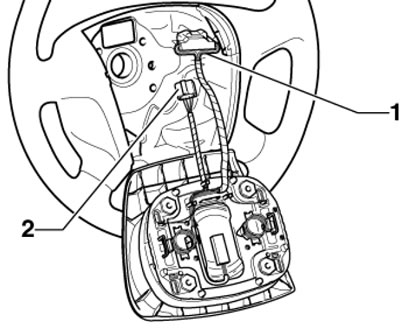
14.4. Steering wheel (2) and airbag (1) connectors

14.4. Steering wheel (2) and airbag (1) connectors


5. Installation is carried out in reverse order.

Spiral spring (models before 05.2010.)


6. Remove the steering column electronics control unit (see Section 17).

7. Carefully press the locking tabs (arrows in the illustration) and remove the coil spring (1) from the steering column paddle shifter support.
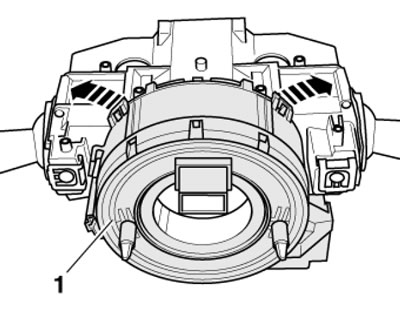
14.7. Removing the coil spring (until 05.2010.)

14.7. Removing the coil spring (until 05.2010.)


8. When installing, the coil spring should be in the central position and the front wheels should be in the straight-ahead position. If there is any doubt about the central position of the spring, adjust it as described in the next paragraph.

9. Set the front wheels to the straight-ahead position. Slowly turn the spring rotor by hand until it stops to the right, and then slowly turn it until it stops to the left, counting the revolutions. Slowly turn the spring rotor to the right by half the total number of turns - the upper connector should be horizontal. If necessary, secure the spring with adhesive tape.

Coil spring and steering column electronic control unit (models from 06.2010.)


Note: The coil spring and the steering column electronics control unit are combined into a non-separable module.


10. Remove the steering wheel and both steering column covers (see Chapter 10).

11. Using sticky tape (2 in the illustration) fix the coil spring (4) in the central position, i.e. when the connector (3) is located horizontally at the top. Remove the bolts (arrows), disconnect the connector (1) and slide the spring off the steering column.
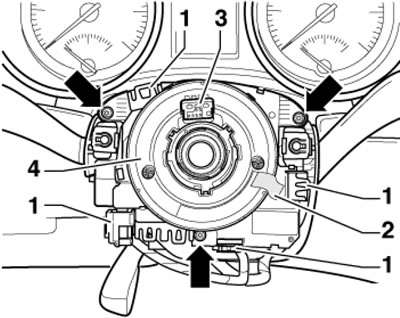
14.11. Removing the coil spring (since 06.2010.)

14.11. Removing the coil spring (since 06.2010.)


12. When installing, the coil spring should be in the central position and the front wheels should be in the straight-ahead position. If there is any doubt about the central position of the spring, set it as described in paragraph 9. The left steering column switch must be in the neutral position to avoid breaking its segment. After installing a new steering column control unit, it must be programmed.

Knee airbag


13. Turn on the ignition and disconnect the negative battery cable (see Chapter 5).

14. Remove the right lower instrument panel trim (see Chapter 11).

15. Remove the bolts (3 in the illustration), remove the knee airbag (2) from the holder on the instrument panel beam and disconnect the connector (1).
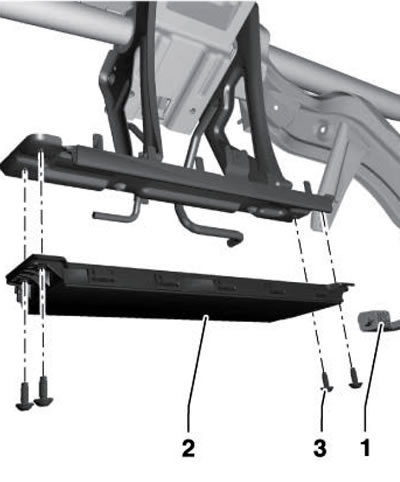


14.15. Removing the knee airbag

14.15. Removing the knee airbag


16. Installation is carried out in reverse order.
This article is available at russian, bulgarian, belarusian, ukrainian, serbian, croatian, romanian, polish, slovak, hungarian
Article verified: Timur Komissarov
Share with friends:
◀ Previous
Skoda Yeti: Equipment and devices
Next ►

Removal and installation the control unit and SRS sensors
Removal and installation parts of the washer fluid supply system
Removal and installation the rear window wiper motor and lever
Removal and installation windshield wiper components
Fuses and relays
Removal and installation the front passenger airbag
Removal and installation side airbags and inflatable curtain
Removal and installation of electrical components of the steering column
Removal and installation the instrument cluster
Removal the audio/navigation system unit
Read similar articles on other Skoda models

➧ Front airbags of the Airbag system Skoda Fabia 1 (1999-2007)
➧ Driver Front Airbag Module — Removal and Installation Skoda Rapid 1 (2012-2022)
➧ Removal and installation a coil spring Skoda Octavia 3 (2013-2019)
➧ Removal and installation of front and driver knee airbags, as well as… Skoda Superb 2 (2008-2015)
➧ Removal and installation a coil spring Skoda Kodiaq 1 (2016-2024)
➧ View of the front part of the bottom Skoda Favorit (1987-1994)
Link to this article in various formats
Reviews and comments of visitors
No comments yet


Add two numbers: 47 + 38


Yeti (2009-2017) 
  • General information
  • Introduction to manual
  • Controls and instruments
  • Maintenance
  • Power unit
  • Petrol engine 1.2 l
  • Petrol engine 1.4 l
  • Petrol engine 1.8 l
  • Diesel engine 2.0 l
  • Cooling system
  • Power and control system
  • Exhaust system
  • Ignition and preheating systems
  • Starting and charging system
  • Transmission
  • Clutch
  • Manual gearbox
  • 7-speed gearbox DSG «0AM»
  • 6-speed gearbox DSG «02E»
  • Drive shafts
  • Chassis (running gear)
  • Brake system
  • Front suspension
  • Rear suspension
  • Steering
  • Body and interior
  • Heating and air conditioning
  • Exterior (external elements)
  • Interior (internal elements)
  • Electrical equipment
  • Equipment and devices
  • Lighting and signaling
  • Electrical diagrams
SkodaBook.ru © 2018–2026 | Mobile version | Articles on Skoda | Sitemap EN BG BY UA RS HR RO PL SK HU | Feedback | Site search | Bookmark
Fabia 1 (1999-2007) | Fabia 2 (2007-2014) | Rapid 1 (2012-2022) | Octavia 1 (1996-2004) | Octavia 3 (2013-2019) | Superb 2 (2008-2015) | Kodiaq 1 (2016-2024) | Yeti (2009-2017) | Favorit (1987-1994) | Felicia (1994-2001) |
By continuing to use the site, you agree to the use of cookies.