



Contents: Manual transmission ⬇ Seals ⬇ Fixing parts ⬇ Nuts and bolts ⬇ Clutch ⬇ Bearings ⬇ Synchronizers ⬇ Other features ⬇
Manual transmission
1. When installing the manual transmission, make sure that the guide bushings between the engine and the manual transmission are correctly seated.
2. When installing support brackets or waxed components, clean mating surfaces of wax and grease.
Seals
3. After removing gaskets and seals, always check the mating surfaces of the crankcase or shaft for any irregularities that may have arisen after removal.
4. Before installing the radial seals (oil seals), fill the space between the sealing lips halfway with G 052 128 A1 grease (see illustration).
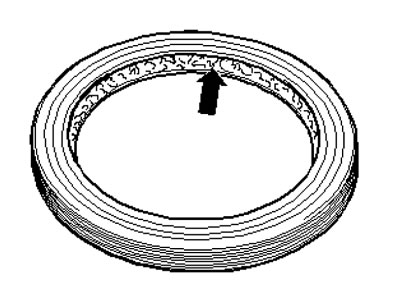
2.4. Area between the sealing lips of the gland
5. The open side of the seal must face the working fluid.
6. Lightly lubricate the sealing rings before installation to avoid damaging them during installation.
7. Thoroughly clean the separating surfaces and apply AMV 188 200 03 sealant to them.
8. Apply sealants evenly and not in too thick a layer.
9. After replacing the seal, check and adjust the working fluid level (see Chapter 1).
Fixing parts
10. Always replace snap rings and do not overtighten them.
11. The retaining rings must be positioned exactly in the grooves.
12. Always replace spring pins. Install them so that the slot is located along the line of action of the force.
Nuts and bolts
13. Loosen and tighten the threaded fasteners of the covers and housings in a diagonal order.
14. Avoid distortion of thin and fragile parts, such as the clutch pressure plate; tighten their fasteners in several approaches in a diagonal order.
15. The tightening forces indicated apply to unlubricated threaded fasteners.
16. Replace self-locking nuts and bolts. Since the manual transmission housing is made of magnesium alloy, use fasteners that will not cause contact corrosion.
17. Remove any remaining thread locking compound from the threaded holes using a tap before screwing the self-locking bolts into them. Otherwise, there is a risk of the bolts being cut off when they are subsequently unscrewed.
Clutch
18. Do not allow the pressure plate to become skewed: loosen and tighten the fasteners in several steps in a diagonal order.
19. If the clutch is burnt, thoroughly clean the clutch housing with a cloth, as well as the friction surface of the flywheel, to reduce the smell.
Bearings
20. Install new tapered roller bearings as supplied; do not apply additional lubricant.
21. Install needle bearings so that the side with the letters (thicker layer of metal) was turned towards the installation device.
22. Tapered roller bearings mounted on one shaft must be replaced as an assembly.
23. Before installation, heat the inner bearing races to approximately 100°C.
24. Do not interchange the outer and inner races of bearings of the same size, as they are matched in pairs.
Synchronizers
25. Do not interchange the synchronizer rings. When reusing them, always install the same rings.
26. Replace worn synchronizers.
27. Check the grooves (1 in the illustration) toothed rings (A) and inner rings for absence of flat spots (worn grooves). Ring coating (if available) should not be erased.
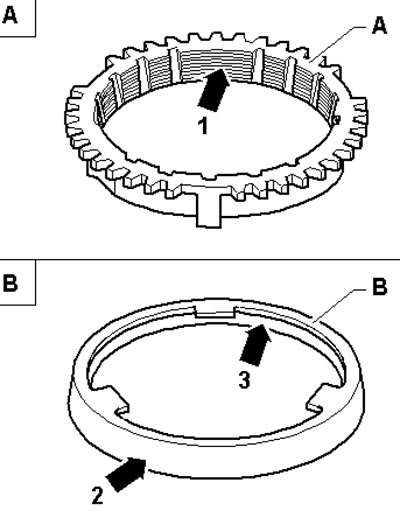
2.27. Checking the synchronizer
28. If an intermediate ring is installed (In illustration 2.27), check its outer friction surface (2) and inner friction surface (3) for scoring, signs of abnormal wear and discoloration due to overheating.
29. Check the synchronizer cone for scoring and signs of abnormal wear.
30. Before installation, lubricate the synchronizers with transmission oil.
Other features
31. Use only suitable fasteners, do not allow contact corrosion to develop.
32. Before installing gears, clean them and heat them to no more than 100°C.
33. After installing the synchronized gears, check that they run smoothly.