



Note. Valid for vehicles with tire repair kit.
Location in the car and the composition of the kit
The tire repair kit is located in the luggage compartment under the raised floor.
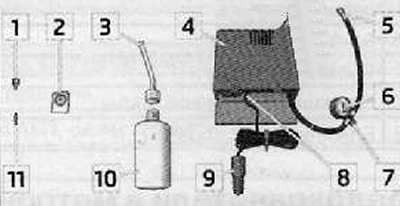
Elements of a tire repair kit
1. Device for turning out the spool.
2. Decal sticker «max 80 km/h» or «max 50 mA/h».
3. Hose with screw plug.
4. Compressor.
5. Hose for tire inflation.
6. Pressure gauge.
7. Screw plug for air release.
8. Switch.
9. 12V cable plug.
10. Container with sealant.
11. Spare spool.
At the lower end of the spool extractor (1) there is a slot for the spoohp this device, the spool is unscrewed from the wheel valve and screwed back. The tool also fits the spare spool (11).
Check the expiration date of the sealant. The sealant must not be used after the expiration date. A new container of sealant can be purchased from a Volkswagen workshop.
Dispose of the sealant container properly.
When using the tire repair kit, also follow the manufacturer's instructions.
Preliminary preparation of the tire repair kit
small punctures (diameter up to 4 mm), especially in a treadmill, can be sealed with a tire repair kit.
In the event of a tire puncture, park the vehicle as far away from the road as possible. If necessary, turn on the hazard warning lights and set the warning triangle as required by the traffic regulations.
- Remove the compressor and sealant bottle from the luggage compartment
- Take out the sticker and stick it on the front panel in front of the driver.
- Do not remove the foreign body (e.g. screw or nail) from the tire.
- Remove the spool from the tire valve.
- Using the provided spool removal tool, unscrew the spool and place it on a clean surface.
- Shake the contents of the container with sealant.
Tire sealing and inflation
With the help of a tire repair kit, you can repair the air leak from a leaky tire and inflate it.
Tire sealing
wind the hose (3) to a container of sealant. The protective film on the cork will be pushed through.
Remove the plug from the hose (3) and put the open end of the hose on the valve.
Inject all the sealant from the container into the tire. Keep the container upside down while doing this.
Remove the empty container from the valve and use the tool (1) screw the spool back into the valve.
Tire inflation
screw on the hose (5) on the valve.
Check if the air bleed screw is screwed on (7).
Start the engine and let it run.
Insert the plug (9) into the car's 12 volt socket.
Turn on the compressor with the switch (8) for a maximum of six minutes.
The compressor must inflate the tire to a pressure of 2.0 to 2.5 bar. This should take no more than eight minutes.
When the tire pressure reaches 2.0-2.5 bar, turn off the compressor.
If this pressure cannot be obtained, disconnect the hose from the valve and place the compressor in the car.
Move the vehicle about ten meters forward or backward so that the sealant is evenly distributed around the circumference of the tire.
Remove the compressor, screw the hose to the valve and try to inflate the wheel again.
If this time it was not possible to achieve the required pressure, then the damage to the tire is too great. It will not be possible to make the tire airtight again. Stay where you are and wait for help.
Disconnect the compressor and disconnect the hose from the wheel valve.
If you managed to create a tire pressure of 2.0 to 2.5 bar, immediately start driving, but the speed should not exceed 80 km / h.
After ten minutes of driving, check the tire pressure. Connect the hose (5) and read the pressure reading on the pressure gauge (6).
If, after ten minutes of driving, the pressure is below 1.3 bar, do not move further. It was not possible to re-tighten the tire. Wait for help.
If, after ten minutes of driving, the pressure is higher than 1.3 bar, adjust the tire pressure to the nominal (see sticker on fuel filler cap).
Drive to the nearest tire repair shop at speeds up to 80 km/h.
Repair or replace the damaged tire.
Note
- The tire repair kit is intended only for getting to the nearest workshop in case of tire damage. Repair or replace the damaged tire. Read and follow the instructions supplied with the tire repair kit. foreign body (e.g. screw or nail) do not remove from the tire.
- The tire repair kit can be used at temperatures down to -20°C.
- Check the expiration date of the sealant. Replace the sealant after the expiration date or after using the tire repair kit.
A container of sealant can be purchased from a Volkswagen workshop.
Attention.
In the event of a tire puncture, park the vehicle as far away from the road as possible. If necessary, turn on the hazard warning lights and set the warning triangle as required by traffic regulations.
- Tire cuts and punctures larger than 4 mm, tire damage due to too low tire pressure, damage to the rim are extremely dangerous! Stay where you are and look for help.
- When inflating a tire, the hose may become hot.
- If, after inflating the tire, the air pressure has not risen to at least 2.0 bar, you can’t move on - look for help.
- If, after ten minutes of driving, the tire pressure has dropped below 1.3 bar, you can not move further - you should contact the nearest tire repair shop.
- With a tire sealed in this way, you must not drive faster than 80 km/h - risk of accident!
- You should refrain from rapid acceleration, sudden braking and high-speed cornering.
- Make sure that the sealant does not get on the skin or in the eyes - this is dangerous!
- Keep the sealant out of the reach of children!
- Switch off the compressor no later than after 8 minutes of operation, otherwise there is a risk of overheating! Allow the compressor a couple of minutes to cool down before turning it on again.