



Cylinder diameter measurement diagram
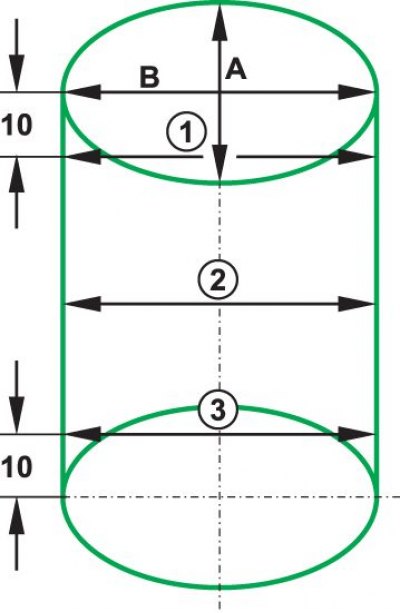
A, B – directions of measurements; 1, 2, 3 – belt numbers
Measuring the preload of connecting rod bearings of 1.4 l, 55 and 74 kW engines
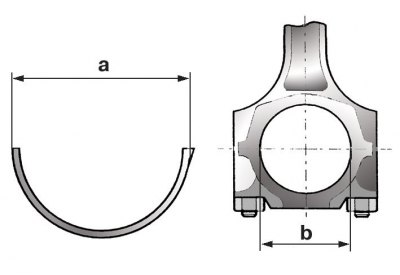
a – outer diameter; b – diameter of the lower connecting rod head
Measuring the protrusion of the dowel pin of a 1.9L 74kW diesel engine
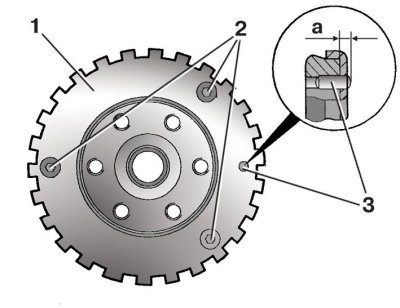
1 – crankshaft speed sensor disk; 2 – bolt; 3 – mounting pin; a – pin protrusion
The details of the connecting rod and piston group are shown in the figures (see figure Parts of the connecting rod and piston group of the 1.4 liter, 55 and 74 kW engine, drawing Connecting rod and piston group parts for 1.0 l, 37 kW and 1.4 l, 50 kW engines and drawing Connecting rod and piston group parts of a 1.9 l, 74 kW diesel engine).
1. Clean the piston heads from carbon deposits. Clean the grooves for the piston rings; it is convenient to do this with a piece of an old piston ring.
2. Inspect the pistons: if they have scoring, burn marks, deep scratches, or cracks, the pistons need to be replaced.
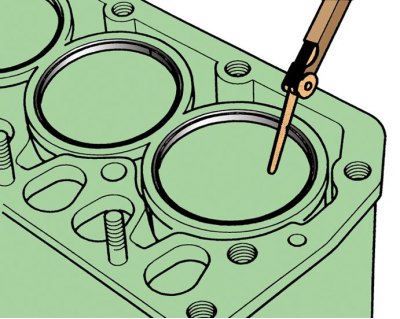
3. Measure the gaps in the piston ring joints. To do this, insert the ring into the cylinder in which it worked (for 1.0 l, 37 kW and 1.4 l, 50 kW engines on top, for the remaining engines on the bottom). Then push the ring into the cylinder using the piston as a mandrel, so that it fits in without distortion at a distance of approximately 15 mm from the edge of the cylinder. Measure the gap in the ring lock with a feeler gauge as shown in the figure. The clearance values are given in the table. Piston ring gap.
4. If the measured gap exceeds the maximum allowable value, replace the ring. If the gap is less than the nominal value, carefully file down the ends of the ring.
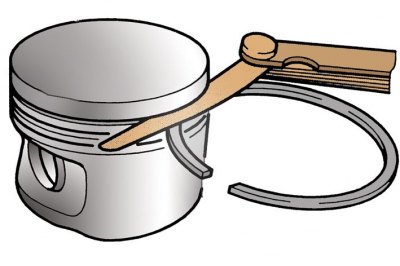
5. Check the clearances between the rings and the grooves on the piston. To do this, insert the ring into the groove in which it stood, as shown in the figure, and measure the gap with a feeler gauge.
6. The nominal clearance for gasoline engines is 0.04–0.08 mm, the maximum permissible is 0.15 mm (clearances are given for compression rings only), for diesel engines, the nominal clearance for the upper compression ring should be 0.06–0.09 mm, the lower – 0.05–0.08 mm, the maximum permissible clearance for compression rings is 0.25 mm; for oil scraper rings, the nominal clearance is 0.03–0.06 mm, while the maximum allowable clearance is 0.15 mm. If any of the clearances exceeds the maximum allowable clearance, replace the piston and rings.
7. Inspect the cylinders. If there are scratches, burrs, pits, etc. on the cylinder mirror, bore the cylinders to the repair size (see table. Cylinder and piston dimensions) or replace the cylinder block, for 1.0 l, 37 kW and 1.4 l, 50 kW engines replace the cylinder liners. If the mentioned defects are more than 0.5 mm deep, the block cannot be repaired and must be replaced.
8. Clean off any carbon deposits from the top of the cylinders. If a belt has formed there due to wear on the cylinders, remove it with a scraper.
9. Measure the cylinder diameters using a bore gauge. The diameter of a cylinder is measured in two perpendicular directions A and B (see figure Diagram of measuring cylinder diameter) and three belts, where belt 2 runs along the middle of the cylinder, and belts 1 and 3 are 10 mm from the edge of the cylinder at the top and bottom. If the measured diameter in at least one cylinder exceeds the nominal diameter by more than 0.08 mm for gasoline engines and by 0.1 mm for diesel engines, the cylinders must be bored to the next repair size or the cylinder block must be replaced.
Caution! Do not measure cylinder diameters in a block secured to the engine assembly stand using the powertrain support bracket, as this may produce inaccurate results.
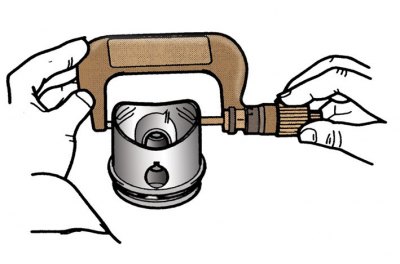
10. Measure the piston diameter at a distance of 10 mm from the lower edge in a plane perpendicular to the piston pin, as shown in the figure. If the obtained value differs from the nominal value by more than 0.04 mm, the piston must be replaced.
11. Inspect the main and connecting rod bearing shells: if they have cracks, scoring, chips, flaking, etc., replace the shells. It is prohibited to carry out any adjustment work on the liners.
12. Inspect the crankshaft thrust half rings: if any scoring, scratches, or delamination is found on them, the half rings must be replaced. It is prohibited to carry out any adjustment work on the half rings.
13. If there are deep grooves, scratches, nicks, or scuffs on the surfaces of the crankshaft on which the seals operate, the crankshaft must be replaced.
14. If there are minor nicks, scratches, or burrs on the main and connecting rod journals, they need to be ground down to the nearest repair size. This work must be performed at a service station. After this, polish the journals and dull the sharp edges of the oil passages with an abrasive cone. Then rinse the shaft and blow out the oil passages with compressed air. After grinding the journals, install the repair size liners. The dimensions of the crankshaft journals are given in the table. Dimensions of crankshaft journals.
15. Measure the crankshaft axial clearance. To do this, install the crankshaft with thrust half rings and main bearing caps into the cylinder block. Tighten the cover mounting bolts to a torque of 75 N·m for the 1.0 l, 37 kW and 1.4 l, 50 kW engines and 65 N·m for the 1.9 l, 74 kW diesel engine. Secure the indicator so that its leg rests against the end of the crankshaft. Move the crankshaft away from the indicator until it stops and set the indicator to zero, then move the crankshaft in the opposite direction until it stops. The indicator will show the size of the gap. If the gap exceeds the maximum permissible value, the thrust half rings must be replaced. The nominal axial clearance for 1.0 l, 37 kW and 1.4 l, 50 kW engines is: 0.03–0.13 mm, the maximum permissible is 0.26 mm; for a 1.9 l, 74 kW diesel engine, the nominal gap is 0.07–0.17 mm, the maximum permissible gap is 0.37 mm.
16. Check the clearances between the crankshaft journals and the main and connecting rod bearing shells. Clearances can be calculated by measuring the crankshaft journal diameters and the main and connecting rod bearing diameters, installing the bearing caps with liners in place and tightening their mounting bolts to the appropriate torques. The manufacturer recommends measuring gaps using a plastic calibrated wire as follows:
- thoroughly clean the bearings, crankshaft journals and liners from oil deposits;
- place the crankshaft on the main bearing beds with the bearing shells installed;
- place pieces of calibrated plastic wire on the crankshaft journals;
- install the bearing caps with the liners installed in them and tighten the bolts to the appropriate torques. Do not turn the crankshaft while doing this;
- remove the bearing caps. The gap is determined by the degree of flattening of the wire using the scale on the wire packaging.
For a 1.9 l, 74 kW diesel engine, the nominal clearance in the main bearings is 0.03–0.08 mm, the maximum permissible clearance is 0.17 mm, and in the connecting rod bearings, the maximum permissible clearance is 0.08 mm.
For 1.4 L, 55 kW, and 74 kW engines, the nominal connecting rod bearing clearance is 0.020–0.061 mm, with a maximum allowable clearance of 0.091 mm. If the clearances exceed the maximum allowable clearance, the crankshaft must be ground to the next correct oversize.
17. Inspect the flywheel; if the teeth of its ring gear are damaged, replace the flywheel or its ring gear. To replace the ring gear, knock the old ring gear off the flywheel; to make the operation easier, you can heat the ring gear. Then heat the new crown to 150°C, put it on the flywheel, if necessary, hitting it evenly along the entire perimeter of the crown, and press it down until it stops. If there are discolourations visible on the mating surface of the driven clutch disc (the flywheel was overheated), then it is possible that the fit of the ring gear on the flywheel has become loose. The defect is detected at a service station. A flywheel with a loose ring gear fit must be replaced.
18. Replace the connecting rods if they are bent or if there is scoring in the small end. Connecting rods should only be replaced as a complete assembly with caps, as they are machined together.
19. For 1.4 l, 55 and 74 kW engines, check the preload of the connecting rod bearings. To do this, measure the outer diameter a in mm (see figure Measuring the preload of connecting rod bearings of 1.4 l, 55 and 74 kW engines) the bearing shell and the diameter b of the lower connecting rod head, having first installed its cover and tightened its mounting bolts to the appropriate torque. Then, using the formula c = a - b, calculate the amount of preload. The minimum allowable interference fit should be 1.5 mm. If the measured interference fit is less than the minimum, replace the bearings.
20. For a diesel engine, check the protrusion of the dowel pin. To do this, unscrew three bolts 2 on the crankshaft (see figure Measuring the protrusion of the dowel pin of the 1.9L, 74 kW diesel engine) fasteners and remove disk 1. Measure the protrusion of the pin above the end of the crankshaft, it should be 2.5–3.0 mm.
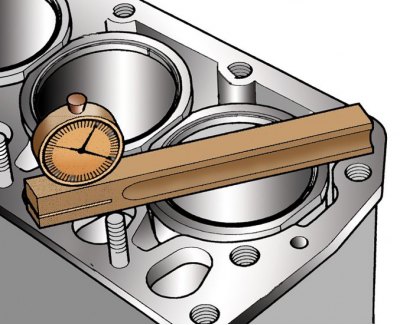
21. For 1.0 l, 37 kW and 1.4 l, 50 kW engines, check the protrusion of the cylinder liners above the upper plane of the cylinder block, as shown in the figure. In this case, the sleeve with the gasket 12 put on it (see figure Connecting rod and piston group parts for 1.0 l, 37 kW and 1.4 l, 50 kW engines) must be pressed tightly against the block. The protrusion should be 0.07–0.12 mm.
22. If the measured value does not fall within the specified limits, a new sleeve gasket must be selected. Spare parts supplied include 0.10 thickness gaskets; 0,12; and 0.14 mm. The difference in the protrusion values of the cartridge cases is allowed to be no more than 0.04 mm.
Piston ring gap
Piston ring | Engines | |||
1.0 l, 37 kW | 1.4 l, 50 kW | 1.4 l, 55 and 74 kW | Diesel 1.9 l, 74 kW | |
| Nominal, mm: | ||||
| - upper compression | 0,2 – 0,5 | 0,4 – 0,72 | 0,2 – 0,5 | 0,2 – 0,4 |
| - lower compression | 0,2 – 0,5 | 0,3 – 0,62 | 0,4 – 0,7 | 0,2 – 0,4 |
| - oil scraper | 0,4 – 1,4 | 0,4 – 1,4 | 0,4 – 1,4 | 0,25 – 0,5 |
| Maximum allowable, mm: | ||||
| - upper compression | 1,0 | 1,0 | 1,0 | 1,0 |
| - lower compression | 1,0 | 1,0 | 1,0 | 1,0 |
| - oil scraper | – | – | – | 1,0 |
Cylinder and piston sizes
Diameter, mm | Engine 1.4 l, 55 and 74 kW | Diesel 1.9 l, 74 kW | ||
Piston | Cylinder | Piston | Cylinder | |
| Nominal | 76,47 | 76,51 | 79,47 | 79,51 |
| First repair | 76,72 | 76,76 | 79,72 | 79,76 |
| Second repair | 76,97 | 77,01 | 79,97 | 80,01 |
Crankshaft journal dimensions
Neck size | Engine 1.4 l, 55 and 74 kW | Diesel 1.9 l, 74 kW | ||||||||||||||||||
Main journal diameter, mm | Crankpin diameter, mm | Main journal diameter, mm | Crankpin diameter, mm | |||||||||||||||||
| Nominal |
|
|
|
| ||||||||||||||||
| First repair |
|
|
|
| ||||||||||||||||
| Second repair |
|
|
|
| ||||||||||||||||
| Third repair |
|
|
|
| ||||||||||||||||