
Note: When replacing an auxiliary/additional heater, the Tester must first be connected and, in the Guided functions mode, call up the function for the relevant control unit "Heater replacement". Cable ties and other means of fastening electrical wiring harnesses, removed or cut off during dismantling, must be installed in their original places during assembly.
Disconnect the battery cable to ground with the ignition off. Remove the front right fender liner.
Attention! The liquid in the cooling system is under pressure, the coolant temperature when the engine is warm can exceed 100°C - risk of burns. Relieve pressure and allow coolant to cool before starting repair work. Parts of the exhaust system can become very hot. Let the exhaust system cool before removing it.
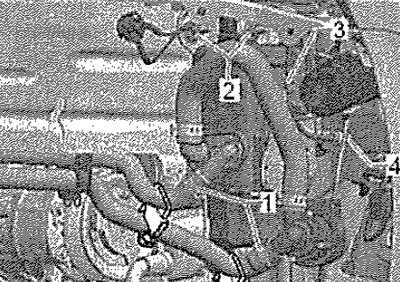
Remove the exhaust gas outlet of the auxiliary/auxiliary heater. Place a tray under the heater. Clamp the hoses of the cooling system with clamps -MP7-602 (3094) -. Loosen clamps -1- and detach coolant hoses from connectors. Remove fuel line from brackets -3- and -4-.
Attention! Possible fuel leakage. The fuel in the power system is under pressure! To relieve pressure in the fuel system, cover the connector area with a clean rag and carefully loosen the connection.
Seal the disconnected fuel line with a suitable plug. Unscrew securing nuts -2- and remove auxiliary/additional heater from side member.
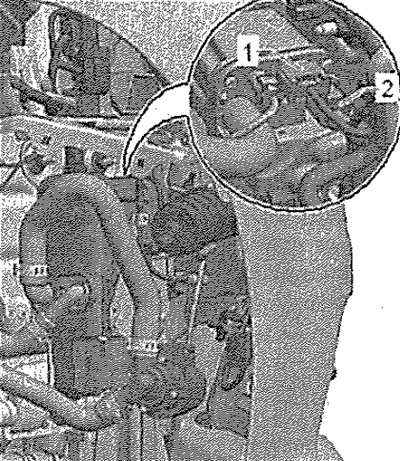
Carefully! The wires may be strained and the heater control unit -J3S4- may be damaged. Disconnect the 6-pin connector first.
Carefully turn auxiliary/auxiliary heater back, unlock and disconnect connector -1- (6 pin), and then connector -2-. Remove auxiliary/additional heater.
Installation
Installation in reverse order.
Carefully! When carrying out assembly work, especially in the engine compartment due to its dense layout, the following regulations must be observed. Highways of all types (fuel, coolant, climate control) and wires should be routed in the original factory order (using appropriate fasteners). Ensure adequate clearance to any moving or hot parts.
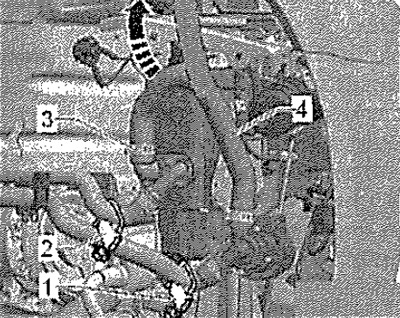
Install the auxiliary heater and connect the hoses, securing them with clamps -1 - and -2-. Do not open clamps. Open the clamp -3-, disconnect the hose -4- and move it vertically upwards. Only when coolant starts to flow out, open clamp -2-. Tighten clamp -2- again. Only when coolant starts to flow out of hose -4-, open clamp -1-. Tighten clamp -1- again. Fit hose -4- and remove clamps -1- and -2-.
Bleed the coolant circuit of the auxiliary/auxiliary heater. Interrogate the event recorder, remove errors if necessary.
Note: If a large amount of air enters the system during installation, the cooling system must be bled. Follow the procedure for connecting the negative battery terminal. If the heater is replaced with a new one, before the vehicle is handed over to the customer, the heater must operate at full load for 10 minutes. In parts and assemblies of the heater, after the first start-up, grease remaining from the factory may evaporate. The resulting odor may disturb the customer, and he will consider that the heater is faulty.