
Company vehicles Hyundai Company vehicles Kia Company vehicles Lada Company vehicles Mazda Company vehicles Mercedes-Benz Company vehicles Opel Company vehicles Mitsubishi
English Русский
Български
Беларускі
Український
Српски
Hrvatski
Română
Polski
Slovenský
Magyar
Articles   
Bookmark Contacts Sitemap
SkodaBook.ru


Fabia Rapid Octavia Superb Kodiaq Yeti Others
Octavia 1 (1996-2004) Octavia 3 (2013-2019)

Description of the operation and adjustment of an additional or autonomous heater (Skoda Octavia 5E)

  • Main
  • Octavia
  • 5E (2013-2019)
  • Body and interior
  • Ventilation and air conditioning
  • Description of the operation and adjustment of an additional or autonomous heater
0
Contents: Turning on ⬇ Shutdown ⬇ Removal and installation of the…⬇

Turning on


The additional or independent heater can be switched on optionally, using the remote control. The "E537" instant heating button, if programmed accordingly in the information and command system menu, or directly on the air conditioning control panel. The car's electronics automatically start the additional or independent heater if all the necessary conditions are met. First, the operation of the fresh air fan "V2" H of the combined glow plug with the ignition control system "Q8" is checked, after which the glow plug with the ignition control system "Q8" goes through the pre-start heating phase. The subsequent start-up process depends on the coolant temperature and may vary in duration. Then: fuel is supplied, the glow plug with the ignition control system "Q8" is gradually switched off and the combustion control sensor is activated. After the pre-start light is completed, the device starts at full power and further load control (combustion mode, full load, partial load and pause adjustment) is carried out using coolant temperature threshold values: switching from full to partial load: approx. 82°C; switchover from partial load to control pause: approx. 88°C. If the coolant temperature falls below 71°C during the control pause for 15 minutes, the heater switches back to full load mode. To compensate for changes due to ageing, the reference resistance of the ignition-controlled glow plug "Q8" is determined automatically at regular intervals, depending on the device, during the starting phase or the overrun. During these calibration processes, the corresponding functions can also take a long time.


Shutdown


The additional or independent heater switches off after the maximum possible operating period of 60 minutes or when switched off manually using the remote control or the "E537" instant heating button. The additional or independent heater switches off if at least one of the set switching conditions is not met. After switching off, the operation of the dosing pump "V54" is directly adjusted. The operation of the combustion air fan "V6" and the glow plug with ignition control "Q8" is temporarily limited to allow the remaining fuel in the system to burn out completely and for the burner components to cool down. The inertial run-on of the circulation pump "V55" lasts. The inertial run-on of the heater may vary, depending on the software version and the load level at the time of switching off: 175 seconds when switching off from full load mode, 110 seconds when switching off from partial load mode. Depending on the software version in the ECU, there may be deviations in the given durations of the operating phase after switching off.

[Data copied from the portal: SkodaBook.ru]

Removal and installation of the radio signal receiving device of the additional liquid heater "R149"


The radio signal receiver of the additional heater "R149" is located behind the left side trim of the luggage compartment. Remove the left trim of the luggage compartment. Disconnect the antenna connector "1" and connector "2". Press the tab of the lock "3" and push the radio signal receiver out of the bracket "arrow".
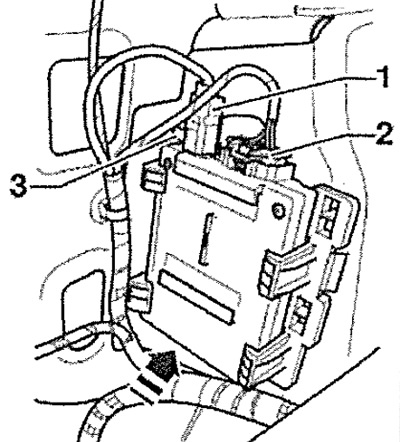


The radio signal receiver of the additional…


Installation in reverse order.

Note: When replacing the receiver, adapt the new receiver to the heater using the Tester in "Guided Fault Finding" mode.
This article is available at russian, bulgarian, belarusian, ukrainian, serbian, croatian, romanian, polish, slovak, hungarian
Article verified: Anatoly Ovchinnikov
Share with friends:
◀ Previous
Skoda Octavia 3: Ventilation and air conditioning
Next ►

Location of refrigerant pipes on the heat exchanger
Heater control panel diagram «J65»
Parts and components of the interior heating system
Replacing the battery in the remote control
Parts and units — autonomous and additional heater
Removal and installation the outside temperature sensor «G17»
Removal and installation of an independent/additional heater
Attachments for independent and additional heaters
Read similar articles on other Skoda models

➧ Seat adjustment Skoda Fabia 1 (1999-2007)
➧ Operation of the car in winter Skoda Rapid 1 (2012-2022)
➧ Autonomous heater Skoda Superb 2 (2008-2015)
➧ Table of causes of malfunctions in vehicle operation Skoda Kodiaq 1 (2016-2024)
➧ Work with additional heater Skoda Yeti (2009-2017)
➧ Checking the operation of lights, horn and direction indicators Skoda Favorit (1987-1994)
Link to this article in various formats
Reviews and comments of visitors
No comments yet


Add two numbers: 27 + 13


Octavia 3 (2013-2019) 
  • General information
  • User manual
  • Car driving
  • Maintenance
  • Petrol engines 1.2 l
  • Engine repair
  • Cooling system
  • Supply system
  • Petrol engines 1.4 l
  • Engine repair
  • Supply system
  • Petrol engines 1.8/2.0 l
  • Engine repair
  • Cooling system
  • Supply system
  • Diesel engines 1.6/2.0 l
  • Engine repair
  • Cooling system
  • Supply system
  • Transmission
  • Mechanical gearbox 02S
  • Automatic gearbox 0CW
  • Automatic gearbox 0D9
  • Chassis (running gear)
  • Front suspension
  • Rear suspension
  • Brake system
  • Steering
  • Body and interior
  • Doors, locks and windows
  • Exterior (external elements)
  • Interior (internal elements)
  • Ventilation and air conditioning
  • Electrical equipment
  • Equipment and devices
  • Headlights and lighting
  • Wiring diagrams (basic)
  • Wiring diagrams (comfort)
Octavia 1 (1996-2004) 
  • General information
  • Vehicle details
  • Maintenance
  • Power unit
  • Petrol engines 1.6 l AEE
  • Petrol engines 1.8 l AGN
  • Diesel engines 1.9 l AGR
  • Fuel system
  • Exhaust system
  • Cooling system
  • Transmission
  • Clutch
  • Car gearbox
  • Gearbox repair 02J
  • Gearbox repair 02K
  • Chassis (running gear)
  • Wheels and tires
  • Suspension and axles
  • Brake system
  • Body and interior
  • Exterior (external elements)
  • Interior (internal elements)
  • Doors, locks and windows
  • Electrical equipment
  • Equipment and devices
  • Electrical circuits
SkodaBook.ru © 2018–2026 | Mobile version | Articles on Skoda | Sitemap EN BG BY UA RS HR RO PL SK HU | Feedback | Site search | Bookmark
Fabia 1 (1999-2007) | Fabia 2 (2007-2014) | Rapid 1 (2012-2022) | Octavia 1 (1996-2004) | Octavia 3 (2013-2019) | Superb 2 (2008-2015) | Kodiaq 1 (2016-2024) | Yeti (2009-2017) | Favorit (1987-1994) | Felicia (1994-2001) |
By continuing to use the site, you agree to the use of cookies.