Company vehicles Hyundai Company vehicles Kia Company vehicles Lada Company vehicles Mazda Company vehicles Mercedes-Benz Company vehicles Opel Company vehicles Mitsubishi
English Русский
Български
Беларускі
Український
Српски
Hrvatski
Română
Polski
Slovenský
Magyar
Articles   
Bookmark Contacts Sitemap
SkodaBook.ru


Fabia Rapid Octavia Superb Kodiaq Yeti Others
Octavia 1 (1996-2004) Octavia 3 (2013-2019)

Removal and installation of the circulation pump «V55» (Skoda Octavia 5E)

  • Main
  • Octavia
  • 5E (2013-2019)
  • Body and interior
  • Ventilation and air conditioning
  • Removal and installation of the circulation pump «V55»
0
Warning! The liquid in the cooling system is under pressure, the coolant temperature with a warm engine can exceed 90 V - risk of burns. Before starting repair work, release the pressure and let the coolant cool down.


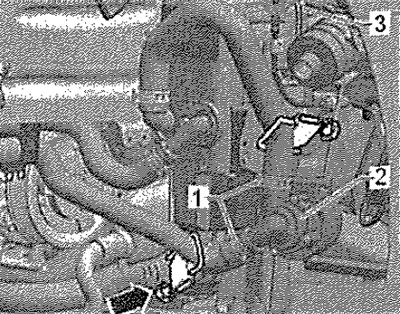
Remove the front and right wing slats. Clamp the cooling system hoses with "MP7-602 (3094)" clamps. Open the clamps "1" and disconnect the cooling system hoses from the circulation pump "V55". Disconnect the connector "3" and remove the circulation pump "V55" pos. "2" from the bracket.

Remove the front and right wing slats. Clamp the…


Installation


Slide the circulation pump onto the bracket. Connect connector "3" to the independent heater or circulation pump (depending on the design). Make sure it is securely fastened. Install the lower coolant hose. Keep the lower clamp "arrow" open until the coolant is filled to the top edge of the circulation pump "V55". Install the upper coolant hose and remove the clamp.

Data taken from an online portal [www.SkodaBook.ru]

Note: Make sure the cable is laid correctly. Avoid getting water into the connector housing. Protect the housing from impacts and jolts.


Installation in reverse order. If a large amount of air has entered the cooling system during installation work, it must be removed from the coolant circulation circuit. Interrogate and delete errors from the event recorder. Start the independent/additional heater and operate it for at least 10 minutes at full load to ensure complete removal of air from the fuel line and check the functioning of the independent/additional heater.
This article is available at russian, bulgarian, belarusian, ukrainian, serbian, croatian, romanian, polish, slovak, hungarian
Article verified: Anatoly Ovchinnikov
Share with friends:
◀ Previous
Skoda Octavia 3: Ventilation and air conditioning
Next ►

Removal and installation the intake muffler
Removal and installation the bracket for the independent/additional heater
Removal and installation of the exhaust system
Attachments for independent and additional heaters
Removal and installation of an independent/additional heater
Removal and installation, checking the glow plug with the flame sensor «Q8»
Cooling system hose connection diagram
Bleeding air from the coolant circulation circuit of the…
Fuel system module for independent/additional heater
Parts and assemblies — dosing pump «V54» with attachments
Read similar articles on other Skoda models

➧ Repair of oil pump on 1.0L and 1.4L engines Skoda Fabia 1 (1999-2007)
➧ Engine oil level and temperature sensor, coolant circulation pump 2 Skoda Rapid 1 (2012-2022)
➧ Removal and installation the coolant circulation pump Skoda Superb 2 (2008-2015)
➧ Oil separator and vacuum pump Skoda Kodiaq 1 (2016-2024)
➧ Removal and installation the coolant circulation pump Skoda Yeti (2009-2017)
➧ Oil pump — removal, inspection and installation Skoda Favorit (1987-1994)
Link to this article in various formats
Reviews and comments of visitors
No comments yet


Add two numbers: 16 + 48


Octavia 3 (2013-2019) 
  • General information
  • User manual
  • Car driving
  • Maintenance
  • Petrol engines 1.2 l
  • Engine repair
  • Cooling system
  • Supply system
  • Petrol engines 1.4 l
  • Engine repair
  • Supply system
  • Petrol engines 1.8/2.0 l
  • Engine repair
  • Cooling system
  • Supply system
  • Diesel engines 1.6/2.0 l
  • Engine repair
  • Cooling system
  • Supply system
  • Transmission
  • Mechanical gearbox 02S
  • Automatic gearbox 0CW
  • Automatic gearbox 0D9
  • Chassis (running gear)
  • Front suspension
  • Rear suspension
  • Brake system
  • Steering
  • Body and interior
  • Doors, locks and windows
  • Exterior (external elements)
  • Interior (internal elements)
  • Ventilation and air conditioning
  • Electrical equipment
  • Equipment and devices
  • Headlights and lighting
  • Wiring diagrams (basic)
  • Wiring diagrams (comfort)
Octavia 1 (1996-2004) 
  • General information
  • Vehicle details
  • Maintenance
  • Power unit
  • Petrol engines 1.6 l AEE
  • Petrol engines 1.8 l AGN
  • Diesel engines 1.9 l AGR
  • Fuel system
  • Exhaust system
  • Cooling system
  • Transmission
  • Clutch
  • Car gearbox
  • Gearbox repair 02J
  • Gearbox repair 02K
  • Chassis (running gear)
  • Wheels and tires
  • Suspension and axles
  • Brake system
  • Body and interior
  • Exterior (external elements)
  • Interior (internal elements)
  • Doors, locks and windows
  • Electrical equipment
  • Equipment and devices
  • Electrical circuits
SkodaBook.ru © 2018–2026 | Mobile version | Articles on Skoda | Sitemap EN BG BY UA RS HR RO PL SK HU | Feedback | Site search | Bookmark
Fabia 1 (1999-2007) | Fabia 2 (2007-2014) | Rapid 1 (2012-2022) | Octavia 1 (1996-2004) | Octavia 3 (2013-2019) | Superb 2 (2008-2015) | Kodiaq 1 (2016-2024) | Yeti (2009-2017) | Favorit (1987-1994) | Felicia (1994-2001) |
By continuing to use the site, you agree to the use of cookies.