
Removal and installation of the center console with armrest
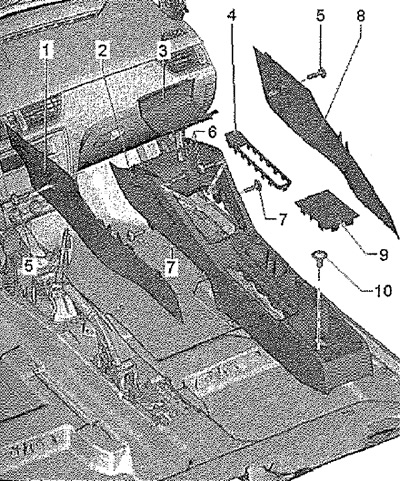
1. Left facing
2. Center console
3. Noise isolation
4. Handbrake lever pad
5. Screw - 1.5 Nm
6. Screw - 1.5 Nm
7. Screw - 1.5 Nm
8. Right facing
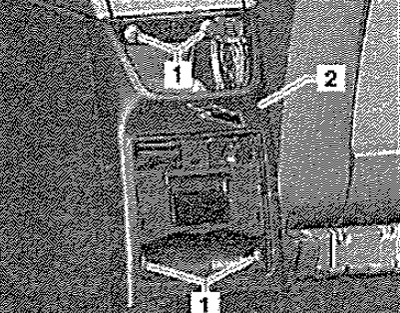
9. Cap: Under the trim there is a screw securing the center console.
10. Screw - 1.5 Nm
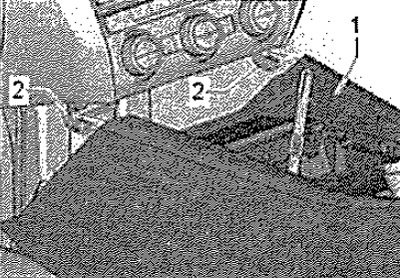
Switch off the ignition and all electrical consumers. Remove screws (pos. 5) fastenings of the trim of the center console in the footwell and remove both trims towards the bottom. Remove screws (pos. 7). Disconnect and remove the gearshift lever cover trim. Remove screws (vines 6), Detach the plug (pos. 9) and remove the screw (pos, 10). Apply the parking brake fully. Disconnect the parking brake lever plug (pos. 4). If there is a compartment for a mobile phone, disconnect the antenna. Partially raise the rear center console, disconnect the cigarette lighter plug (sockets). Pivot rear center console -1- upwards and pull backwards to detach from dash panel mountings -2-. If there is a stowage compartment with a lid, disconnect the light connector. Remove the center console from the vehicle.
Installation in reverse order.
Removal and installation of the center console with armrest
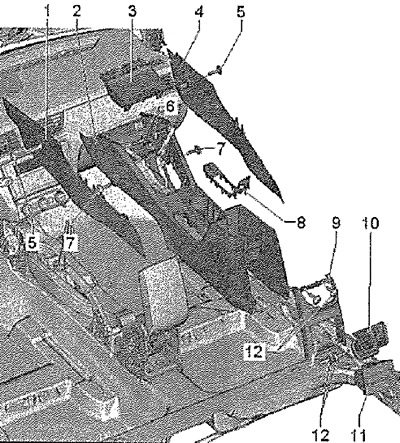
1. Left facing
2. Center console
3. Compartment for small things. Removal: Remove side trim (pos. 4). Disconnect the gearshift cover. Disconnect the antenna connector from the right side through the hole in the center console (depending on configuration). Detach the storage compartment at the front and slide upwards slightly. Close storage compartment lid and gradually move forward. When gradually pulling out the storage compartment, also gradually open its cover, thus making space above the storage compartment available. After pulling out, disconnect the connector for the dome light in the storage compartment. Detach storage compartment from center console. Installation in reverse order.
4. Right facing
5. Screw - 1.5 Nm
6. Screw - 1.5 Nm
7. Screw - 1.5 Nm
8. Handbrake lever trim: Connects to the center console with clips.
9. Rear bracket. The design of the rear bracket depends on the configuration,
10. Rear nozzle: Mounted on the rear bracket.
11. Rear storage compartment/ashtray: Mounted on the rear bracket.
Switch off the ignition and all electrical consumers.
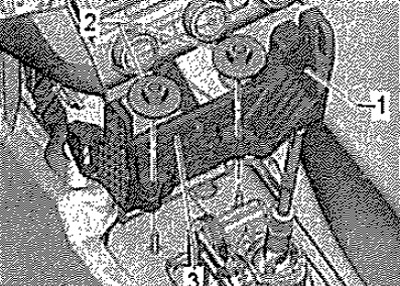
Note: The design of the rear bracket depends on the equipment. Detach rear nozzle -1- from rear bracket.
Remove entire rear storage compartment/ashtray -2-, while disconnecting lamp wire. Remove the rear seat heating switch and disconnect the connector. Remove the inverter housing. Remove screws -1- of rear bracket -2- and remove bracket in -arrow-.
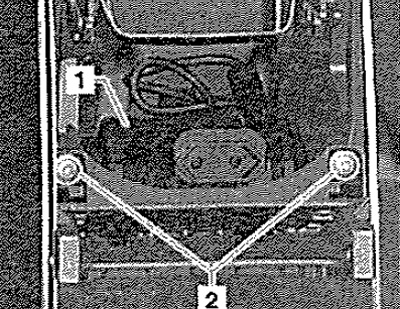
Remove the retaining spring and disconnect the socket from the rear bracket (230 V). Unscrew screws -5- for center console trim in footwell and detach both trims towards bottom. Release screws -7-. Disconnect and remove the gearshift lever cover trim. Release screws -6-. If there is a compartment for a mobile phone, disconnect the antenna. Partially raise the rear center console, disconnect the cigarette lighter plug (sockets 12 V). Apply the parking brake fully. Detach the parking brake collar -8- from the center console. Pivot rear center console -1- upwards and pull backwards to detach from dash panel mountings -2-. If there is a stowage compartment with a lid, disconnect the light connector. Remove the center console from the vehicle.
Installation in reverse order.
Removal and installation of an arm of the central console
Remove center console. Loosen the nuts (pos. 2). If present, detach retainers for Kessy antenna -3-. Take out the holder (pos. 1) from a / m.
Installation in reverse order.
Removal and installation of an armrest
Remove center console.
Vehicles with inverter 230 V
Release screws -2-, unplug connector and remove inverter -1-.
Further for all vehicles
Release screws -2-. Remove armrest -1-.

Installation
Fit armrest -1- and fit screws -2-. Insert the center console, but do not screw in the fixing screws yet. Align the armrest with the center console and tighten the rear screws -2- of the armrest (2.3 Nm). Raise the center console and tighten the front screws -2- of the armrest.
Vehicles with inverter 230 V
Connect the inverter connector and fix the inverter with screws (1.5 Nm).
Further for all vehicles
Complete the installation of the center console.