



Note: Before removing the joint and its boot, thoroughly clean the adjacent parts. When disassembling the joint, remove old grease and dirt. Clean the joint thoroughly. Dispose of old grease in accordance with applicable regulations. Place the removed and cleaned parts on a clean surface and cover. Do not use fibrous rags! If repairs are postponed, the removed parts must be carefully covered or put away. Only install clean parts: remove spare parts from their packaging immediately before installation. Do not use parts that have been stored without packaging (for example, on shelves or in toolboxes, etc.).
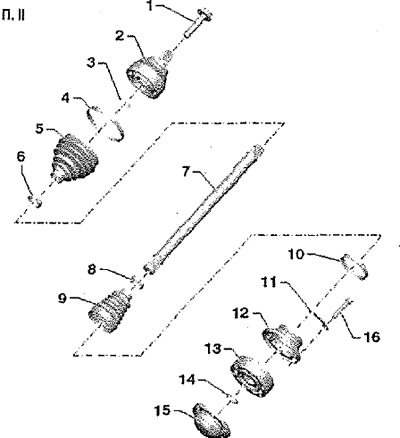
1. Bolt: Replace after each removal
2. Outer CV joint assembly: can only be replaced as an assembly
3. Retaining ring: replace after each removal; install into the shaft groove
4. Clamp: replace after each removal
5. CV joint boot: check for cracks and wear
6. Clamp: replace after each removal
7. Drive shaft
8. Clamp: replace after each removal
9. Inner CV joint boot: without ventilation hole; check for cracks and abrasion
10. Clamp: replace after each removal
11. Washer
12. Cap: carefully remove with a punch; before installing on the CV joint, apply "D 454 300 A2" to the mating surface; the surface of the CV joint to which the casing is glued must be degreased!
13. Inner CV joint: can only be replaced as an assembly
14. Retaining ring: replace after each removal; install into the shaft groove
15. Cover: Replace after each removal; press out of the CV joint using a punch
16. Bolt, 70 Nm: replace after each removal; first tighten all the bolts crosswise with a torque of 10 Nm, then tighten them crosswise finally; M10x52