



Contents: Manual adjustment of front seats ⬇ Adjusting the longitudinal position…⬇ Seat height adjustment (1) ⬇ Adjusting the seat backrest tilt ⬇ Adjusting the lumbar support ⬇ Electrically adjustable front seats ⬇ Adjusting the longitudinal position…⬇ Adjusting the tilt of the seat…⬇ Seat cushion height adjustment ⬇ Headrests: front/rear ⬇ Memory function for electric seats ⬇ Programming the position of the…⬇
Attention! The electric adjustment of the front seats also works when the ignition is off (including with the ignition key removed). Therefore, do not leave children unattended in the car. When driving, the seat backs should not be reclined too far back, as this will negatively affect the effectiveness of the seat belts and airbags! Never take more passengers than there are seats. Each passenger must properly fasten the seat belt in their seat. Children must be fastened using special restraint systems. For maximum passenger protection, the front seats and all headrests must be adjusted to the height of the occupants, and the seat belts must always be properly fastened. Do not carry any objects on the front passenger seat other than those intended for this purpose (for example, a child seat). Adjust the driver's seat only when the vehicle is stationary. The seat back tilt adjustment mechanism may develop play after a while. For safety reasons, the driver's seat and radio key position memory cannot store a seat position in which the seat back tilt angle relative to the seat cushion exceeds 102°. When you save a new position for the driver's seat and exterior mirrors, the previously saved position is deleted.
Manual adjustment of front seats
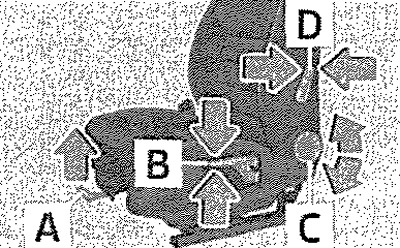
A. Adjusting the longitudinal position of the seat
B. Seat height adjustment (1)
C. Adjusting the seat backrest angle
D. Adjusting the lumbar support
Adjusting the longitudinal position of the seat
Pull the lever A in the direction of the arrow and move the seat to the desired position. After releasing the lever, the seat should lock with a distinct sound!
Seat height adjustment (1)
Pull or press lever B in the direction of one of the arrows in succession.
Adjusting the seat backrest tilt
Unload the seat back (don't lean against her) and rotate the handwheel C in the direction of one of the arrows.
Adjusting the lumbar support
Press the lever D in the direction of one of the arrows,
(1) For some countries only.
Electrically adjustable front seats
Seat cushion controls/adjustment
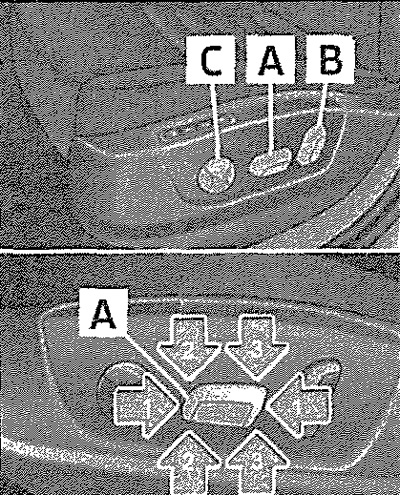
Seat back/lumbar support adjustment
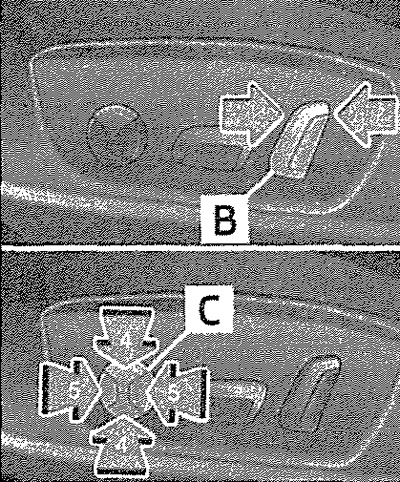
A. Seat cushion adjustment
B. Adjusting the seat backrest angle
C. Adjusting the lumbar support
Adjusting the longitudinal position of the seat
Press switch A in the direction of one of the arrows 1.
Adjusting the tilt of the seat cushion
Press switch A in the direction of one of the arrows 2.
Seat cushion height adjustment
Press switch A in the direction of one of the arrows 3.
Adjusting the seat backrest tilt
Press switch B in the direction of one of the arrows.
Height adjustable lumbar support
Press switch C in the area of one of the arrows 4.
Increasing or decreasing the convexity of the lumbar support
Press switch C in the area of one of the arrows 5. The adjusted position of the driver's seat can be stored in the seat position memory or in the memory of the radio key.
Note: If the adjustment process is interrupted, you must press the corresponding switch again.
Headrests: front/rear
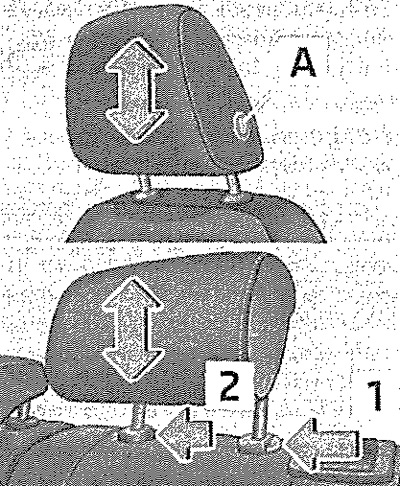
The best protection is provided when the top edge of the head restraint is at the same height as the top of the head.
Source of the article web resource www.skodabook.ru
Height adjustment
Grasp the front seat head restraint with both hands at the side, press and hold release button A and slide the head restraint to the desired position. Grasp the rear seat head restraint with both hands at the side and pull it up. To lower the rear head restraint, press and hold release button 1 with one hand and push the head restraint down with the other. For maximum occupant protection, the head restraints and front seats must be adjusted to the occupants' height and the seat belts must always be properly fastened.
Removal and installation
Only the rear seat head restraints can be removed. Pull the head restraint out of the seat back as far as it will go. Press the release button in the direction of arrow 1, while using a flat-head screwdriver max. 5 mm wide, press the release button in the hole 2 and remove the head restraint. To install the head restraint, insert it into the seat back until it locks into place with a distinctive click.
Note: The front sports seats have head restraints integrated into the seat backs, they are not height adjustable and cannot be removed. The rear center head restraint has only 2 adjustment positions.
Memory function for electric seats
Memory keys and SET key
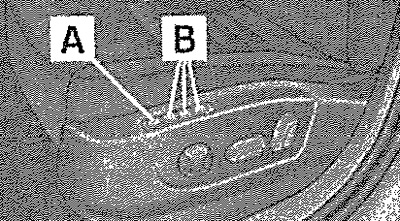
The driver's seat memory function allows you to save individual seat and exterior mirror positions. Each of the three memory buttons B can be assigned one adjusted seat position.
Saving the seat and outside mirror position settings for forward movement
Turn on the ignition. Set the seat to the desired position. Adjust both outside rearview mirrors. Press the SET button (A). Within 10 seconds of pressing the SET button, press the desired memory button B. Saving the setting in memory is confirmed by an audible signal.
Memorizing the position of the outside mirror on the front passenger side for reversing
Turn on the ignition. Press the desired memory key B. Set the outside mirror position control to position R. Engage reverse gear, Adjust the position of the outside mirror on the front passenger side, Disengage reverse gear. The adjusted position of the outside mirror is saved.
Recalling saved settings
Briefly press the required memory button B with the ignition off and the driver's door open. Long press the required memory button B with the ignition on or the driver's door closed.
Termination of the regulation that has begun
Press any key on the driver's seat or button
 on the radio key.
Note: Each time you re-save the seat and outside mirror settings for forward travel, you must also re-save the individual setting of the outside mirror on the front passenger side for reverse travel.
Memory function in the radio key
The function of automatically memorising the position of the driver's seat and exterior mirrors when locking the car (hereinafter referred to as the automatic memorisation function) can be activated in the radio key memory. This function can also be activated or deactivated in the Infotainment system.
Saving the seat and outside mirror position settings for forward movement
Activate the automatic storage function. When this function is activated, each time the vehicle is locked, the current position of the driver's seat and the position of the outside rearview mirrors for forward movement will be stored in the memory of the radio key. The next time the vehicle is unlocked with the same key, the driver's seat and outside rearview mirrors will be set to the position stored in the memory of this key (1).
(1) To maintain the position of the seats and outside mirrors, the car must be unlocked and locked with the same key.
Programming the position of the front passenger side mirror for reversing
Unlock the car with the remote control key. Turn on the ignition. Set the outside mirror position control to position R. Engage reverse gear. Adjust the position of the outside mirror on the front passenger side. Disengage reverse gear. The adjusted position of the outside mirror will be saved in the memory of this remote control key.
Activating the auto-save function
Unlock the car with the remote control key. Press and hold any memory button B. After the seat is set to the position saved for the corresponding button, simultaneously press the button on the remote control key for 10 seconds. Successful activation of the automatic storage function for this key is confirmed by an audible signal. The position of the driver's seat and outside mirrors saved for the memory button is not saved in the key memory. If necessary, the seat can be set to the desired position. After locking the car, the current position of the driver's seat and outside mirrors is saved in the memory of the remote control key.
Disabling the auto-save feature
Unlock the car with the remote control key. Press and hold the SET (A) button. At the same time, press the button on the remote control key within 10 seconds. Successful deactivation of the automatic storage function for this key is confirmed by an audible signal.
Termination of the regulation that has begun
Press any button on the driver's seat or the button on the remote key.