



Front seat adjustment
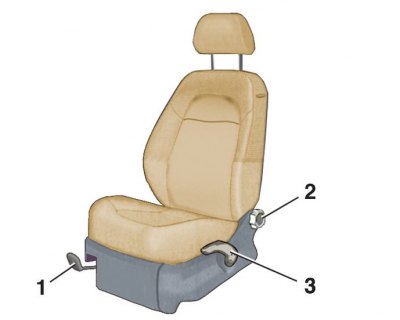
1 – locking lever handle; 2 – hinge handle; 3 – height adjustment lever
Before your trip, adjust your seat position so that you feel comfortable behind the wheel. An uncomfortable seating position increases fatigue, which can negatively impact driving safety.
Caution! Do not adjust the seat position while driving, as you may lose control of the vehicle.
1. To adjust the seat in the longitudinal direction, lift the handle 1 of the locking lever, move together with the seat to the desired position and release the handle. Then move the seat slightly forward and backward to lock it in the selected position (a click will be heard).
2. Lever 3 is used to adjust the seat height. To raise (lower) the seat, swing the lever, having first set it to the upper (lower) position.
3. To adjust the seatback angle, turn the handle 2 on the hinge. The seatback rises or falls when you turn the handle in the appropriate direction.
Caution! Do not recline the seatback too far back while driving, otherwise the seat belts will become less effective.
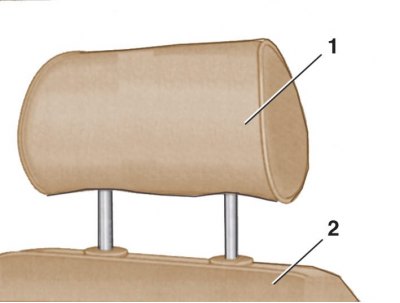
4. To adjust the height of headrest 1, lift it up or lower it down. Spring clamps will hold the headrest in the selected position. The head restraint is correctly adjusted when its top edge is at or above the seated person's eye level. On some models, the headrest tilt can be adjusted (only in the front seat) (2 – seat back).
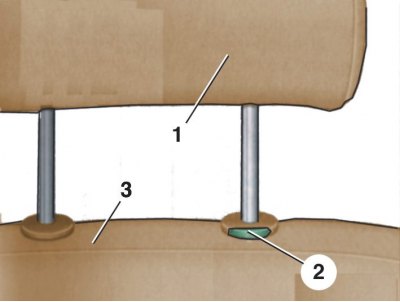
5. To remove headrest 1, lift it up as far as it will go, then press the latch 2 and remove the headrest from the backrest 3. When installing the headrest, a click should be heard when it locks into place.