



Attention: Block "Mechatronic" is under high pressure and must not be disassembled.
1. Block location "Mechatronic" shown in Illustration 1.5 (item 5). The description of removal/installation is given for the case when the DSG is removed.
2. Remove the breather cap (4 in illustration 1.5) and seal it with a suitable plug so that the working fluid of the block does not leak out "Mechatronic".
3. Position the DSG on the mounting stand so that the unit "Mechatronic" located on top. If necessary, drain the transmission oil (see Section 6).
4. Using a screwdriver, carefully remove the lock on the "G182" speed sensor at the DSG input and pull this sensor out of the DSG housing in the direction of the arrow (see accompanying illustration).
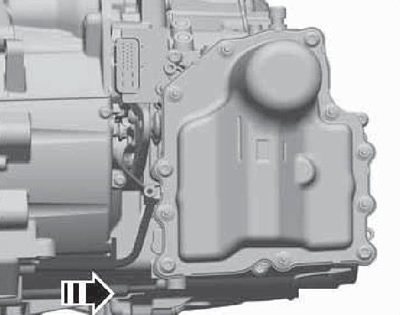
8.4 Removing the sensor "G641" No.3 of the input shaft speed
5. Press both clutch engagement levers away from the plungers of the block "Mechatronic", otherwise the levers will jam the block on the plungers and it will not be possible to remove it. Insert the T10407 lever between both levers and the DSG housing so that the slight bend in the lever is opposite the block cover mounting nut "Mechatronic" (see accompanying illustration). Do not insert the lever all the way. The lever must contact the DSG housing with its entire rear surface.
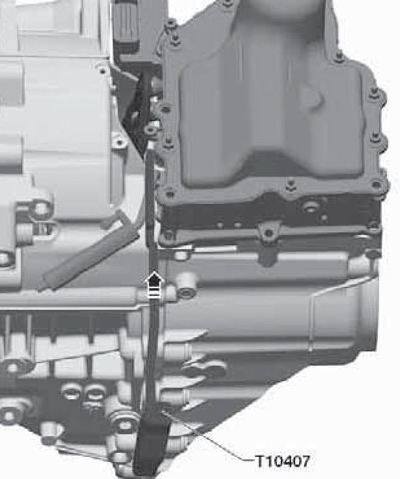
8.5 Installing the lever to release the clutch engagement lever
6. Turn the lever counterclockwise (see accompanying illustration), while simultaneously applying force to its end to prevent the lever from slipping. In this way, the levers are pressed away from the plungers.
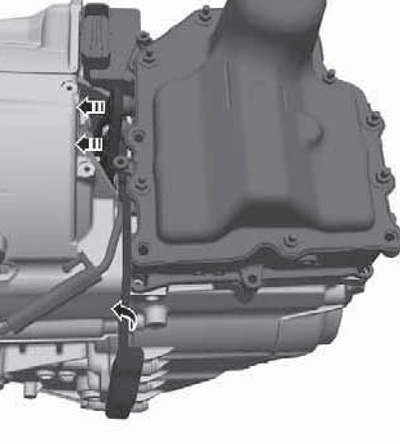
8.6 Squeezing the levers from the plungers
7. The lever must remain installed between the lever and the DSG housing throughout the removal process.
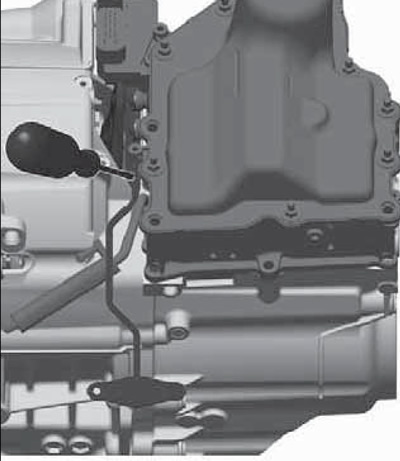
8.7 Fixing the levers in the depressed position
If necessary, press the lever away from the DSG with a screwdriver (see accompanying illustration). Be careful not to damage the rubber seals on the plungers.
8. Remove 7 bolts (A and B in the accompanying illustration) in a diagonal order, remove the electrostatic charge from yourself and remove the block "Mechatronic".
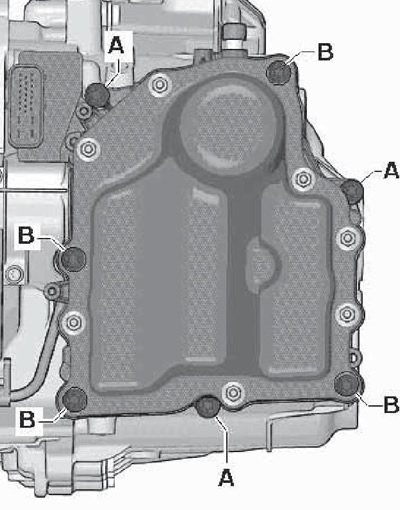
8.8 Block mounting bolts "Mechatronic"
A Bolts M8x35, 3 pcs., subject to replacement, 10 Nm
Bolts M8x90, 4 pcs., subject to replacement, 10 Nm
Caution: Do not loosen the cover mounting nuts!
Do not drain the working fluid from it, and also make sure that the fluid does not flow out through the ventilation hole. If the unit needs to be repaired, send it to the workshop filled with fuel.
9. If the block "Mechatronic" jammed and can't be removed, then the activator (arrow on the accompanying illustration) reverse gear is jammed in the upper left part of the DSG housing. In this case, do not apply excessive force to remove. The correct way is to reinstall the unit "Mechatronic", secure it with one bolt and bring it to the hand-removable position as described in the subsection below.
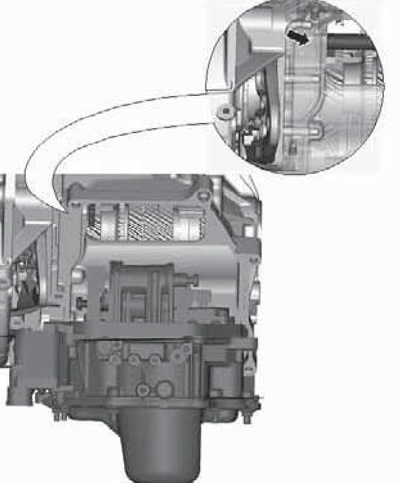
8.9 Stuck activator
10. View of the selector forks with the unit removed "Mechatronic" is indicated on the accompanying illustration. Before installation, make sure (check with your hand), that all four forks are in the central position, i.e. all pairs of gears are in neutral position (in extreme positions one of the gears is engaged). If necessary, the gear can be slightly turned to facilitate fork movement.
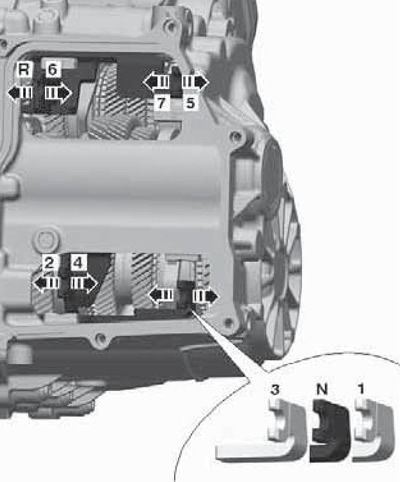
8.10 View of the selector forks with the unit removed "Mechatronic"
N Neutral position (in the middle)
R Reverse gear, when it is engaged, the protruding plunger of the block "Mechatronic" engages on the DSG housing
1-7 1st - 7th gears
11. New block "Mechatronic" supplied filled, do not drain the working fluid from it. Clean the seal with the block "Mechatronic" surface from dirt and grease/oil.
12. Screw in the guide pins T10406 by hand (see accompanying illustration).
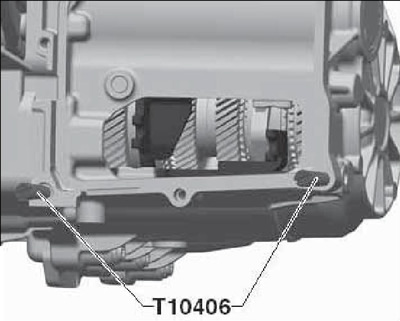
8.12 Guide pins
13. Make sure all activators protrude by 25 mm (and in the accompanying illustrations).
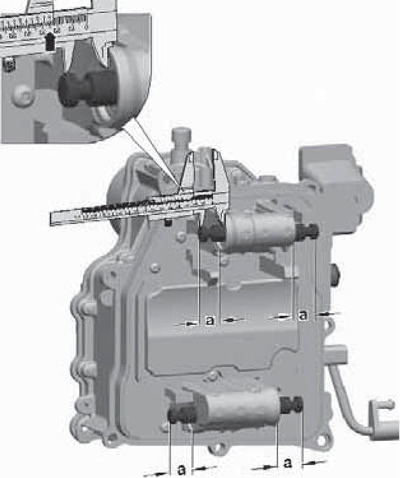
8.13 Plunger protrusion
14. Clean the mating surfaces of the block from oil and grease "Mechatronic" and DSG. Pay attention to the block gasket - it should be seated correctly around the entire perimeter. Make sure that the sensor retainer is not damaged.
15. Install the block "Mechatronic", without allowing the selector forks to move from the neutral position. Also monitor the position of the plungers and clutch engagement levers. Tighten the new block mounting bolts "Mechatronic" by hand, turning the guide pins T10406 as necessary.
16. Make sure the plungers fit evenly into the lever cups (see accompanying illustration), by pulling the plungers with your hands or, for example, with a curved electrode.
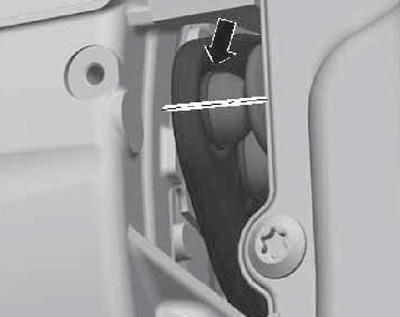
8.16 Smooth entry of the plunger into the lever cup
Note: Incorrectly seated plungers will cause damage to the block "Mechatronic".
Tighten the block bolts "Mechatronic" with a force of 10 Nm in a diagonal order.
17. Turn the T10407 lever clockwise and remove it.
18. Install the "G182" sensor into the DSG housing. If the sensor retainer is damaged, the unit must be replaced "Mechatronic".
19. Remove the plug and install the cap on the breather.
Installing the block "Mechatronic" into the removal position
20. Installing the block "Mechatronic" into the manual release position may be necessary when it is not possible to set it into this position using the diagnostic tool. The essence of the procedure is to press the jammed activator by hand (arrow in illustration 8.9) reverse gear to the position for removal. To do this, press the selector fork behind the locking cover in the "P" position.
21. Set the selector lever on the DSG to the "P" position by moving it all the way towards the cable holder, as shown in Illustration 6.6.
[Article posted on the website: SKODABOOK]
22. Remember the installation position of the lever and remove it from the selector shaft, then remove the cover (see illustration 6.7).
Note: After this block "Mechatronic" will not jam and may fall out, so it must be secured with at least one bolt.
The leaking cap should be replaced.
23. Through the resulting gap, press the selector fork to the left, looking in the direction of travel (see accompanying illustration). This will push back the jammed activator and the block "Mechatronic" it will be possible to remove it.
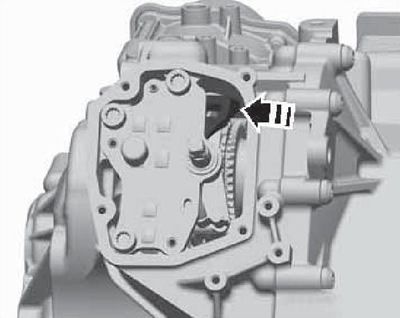
8.23 Pressing the selector fork
24. The cover should be installed only after filling with transmission oil.