



General information
Precise adjustment of the direction of the optical axis of the headlamps can only be performed using special optical equipment in a service station.
Approximate adjustment of the headlights can be made using the adjusting assemblies installed at the top of each headlight unit. The outer wheel serves to adjust the position of the headlight unit in the vertical plane, the inner one - in the horizontal plane.
Note: Before making any adjustments, make sure the control is set to position 0.
Replacing the regulator mechanism
1. The headlight optical axis direction hydrocorrector consists of two regulators (one for each headlight), connected to the main mechanism by means of hoses. Note that all components of the assembly (regulators, mechanism and hoses) must be tightly connected to each other. In case of failure, the hydraulic mechanism must be replaced (see below).
2. Remove the instrument panel (see section Removal and installation the instrument panel).
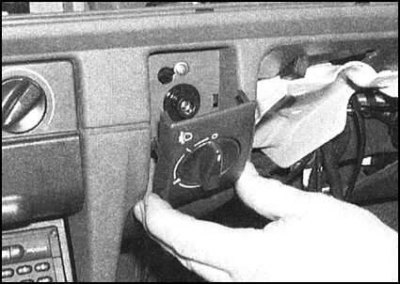
3. Carefully pry up and remove the hydraulic corrector control switch handle assembly.
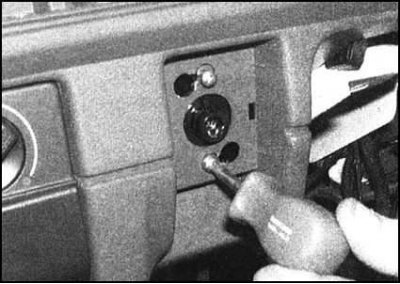
4. Loosen the mounting screws a couple of turns, then turn the mechanism slightly counterclockwise and push it into the instrument panel.
5. In the engine compartment, locate the adjusters on the back of the headlamp assemblies. To disconnect the adjuster from the headlamp, turn it counterclockwise and carefully release the spherical joint from the headlamp reflector.
6. Moving along the hoses, release them from all intermediate clamps (try to remember the routes of the hoses).
7. Release the rubber bushing of the hydraulic corrector installation from the engine compartment bulkhead and remove the corrector assembly from the vehicle.
8. When installing, insert the assembly into the hole in the engine compartment bulkhead and position it correctly in the instrument panel. Tighten the mounting screws securely, then install the handle in place.
9. Place the rubber bushing into the bulkhead, route the hoses correctly and secure them in all the provided intermediate fasteners.
10. Firmly snap the spherical joints of the adjusters into the reflectors, then firmly fix the adjusters into the headlight units.
11. Reinstall the instrument panel (see section Removal and installation the instrument panel).
12. Check the proper functioning of the hydraulic corrector; if necessary, adjust the direction of the optical axes of the headlights.