
Company vehicles Hyundai Company vehicles Kia Company vehicles Lada Company vehicles Mazda Company vehicles Mercedes-Benz Company vehicles Opel Company vehicles Mitsubishi
English Русский
Български
Беларускі
Український
Српски
Hrvatski
Română
Polski
Slovenský
Magyar
Articles   
Bookmark Contacts Sitemap
SkodaBook.ru


Fabia Rapid Octavia Superb Kodiaq Yeti Others
Kodiaq 1 (2016-2024)

Sunroof assembly (Skoda Kodiaq NS7)

  • Main
  • Kodiaq
  • NS7 (2016-2024)
  • Body and interior
  • Exterior (external elements)
  • Sunroof assembly
0

General appearance


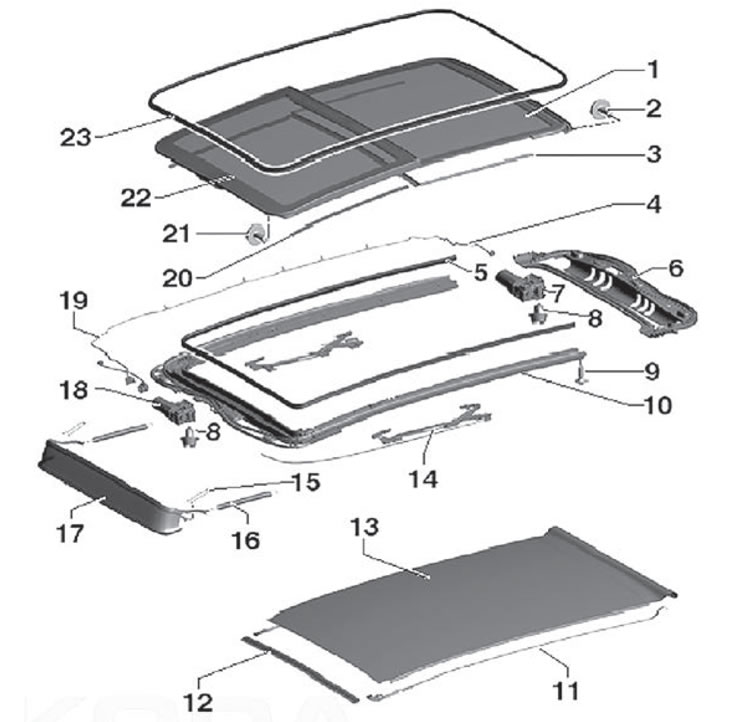
1. Rear sunroof panel; 2. Fastening screw,…

1. Rear sunroof panel; 2. Fastening screw, tightening torque during installation 7 Nm; 3. Gasket; 4. Wiring harness; 5. Inner seal; 6. Rear section; 7. Curtain control module; 8. Fastening screw, tightening torque during installation 8 Nm; 9. Fastening screw, tightening torque during installation 8 Nm; 10. Sunroof frame; 11. Wiring harness; 12. Arched support; 13. Sunshade; 14. Guide mechanism; 15. Support clamp; 16. Spring; 17. Deflector; 18. Sunroof opening control unit; 19. Wiring harness connectors; 20. Facing; 21. Fastening screw, tightening torque during installation 7 Nm; 22. Sliding roof hatch panel; 23. External seal.


Please note: The ceiling panel cannot be repaired or modified in any way. In case of damage, even minor, the panel must be replaced with a new one.


Caution: If the vehicle is equipped with curtain airbags, inspect them for damage and replace them if necessary.


Caution: Do not connect electrical measuring instruments to the airbag terminals. It is possible that the pyropatron may spontaneously trigger, resulting in serious injuries.


Caution: To prevent accidental airbag deployment, do not use any storage devices. Failure to follow this instruction may result in serious injury or death.


Attention. Always replace the ceiling trim panel, as well as the front, center, intermediate and rear pillar trim panels, after the curtain airbag is activated. Remove all damaged interior trim elements and replace them with new ones. Failure to follow this instruction may result in the curtain airbag and side airbag not deploying correctly in the event of an accident.


Caution: When installing a new headliner panel, ensure that the AIRBAG inscriptions are applied to its surface where they contact the center pillar trim panels. Failure to follow this instruction may result in the curtain airbag and side airbag not deploying correctly in the event of an accident.


Caution: Check the technical condition of the curtain airbag before installation. The module cannot be repaired, so it must be replaced as a whole.


Caution: Do not install any objects that could prevent the airbag from deploying.


Note: After removing the Supplemental Restraint Control Module (RCM) fuse from the fuse box, the SRS malfunction warning indicator will illuminate when the ignition is turned on. This is normal and does not indicate a malfunction in the SRS.


Note: Repair of passive safety system components is not provided. In case of failure, the damaged element is replaced as an assembly.


Note: The procedure for removing the curtain airbag from the passenger side is described below. On the driver's side, the work is performed similarly.
This article is available at russian, bulgarian, belarusian, ukrainian, serbian, croatian, romanian, polish, slovak, hungarian
Article verified: Eleonora Afanasyeva
Share with friends:
◀ Previous
Skoda Kodiaq 1: Exterior (external elements)
Next ►

Outside rearview mirror
Rear bumper — removal and installation
Front bumper — removal and installation
Hood Lock — removal and installation
Hood cover — removal and installation
Front wheel arch liner
Body dimensions — body restoration work
Body dimensions
Read similar articles on other Skoda models

➧ Electric sunroof Skoda Fabia 1 (1999-2007)
➧ Panoramic roof with sunroof — exterior Skoda Rapid 1 (2012-2022)
➧ Assembly diagram of the folding glass sunroof Skoda Octavia 1 (1996-2004)
➧ Sunroof and roof rails Skoda Superb 2 (2008-2015)
➧ Removal and installation the upper sunroof assembly and roof rails Skoda Yeti (2009-2017)
Link to this article in various formats
Reviews and comments of visitors
No comments yet


Add two numbers: 23 + 15


Kodiaq 1 (2016-2024) 
  • General information
  • User manual
  • Controls and instruments
  • Maintenance
  • Power unit
  • Petrol engine 1.4 l
  • Petrol engine 2.0 l
  • Diesel engine 2.0 l
  • Fuel and control (petrol)
  • Fuel and control (diesel)
  • Cooling system (petrol 1.4 l)
  • Cooling system (petrol 2.0 l)
  • Cooling system (diesel 2.0 l)
  • Lubrication system (petrol)
  • Lubrication system (diesel)
  • Intake and exhaust (petrol 1.4 l)
  • Intake and exhaust (petrol 2.0 l)
  • Intake and exhaust (diesel 2.0 l)
  • Transmission
  • Clutch
  • Manual gearbox
  • Automatic gearbox
  • Drive shafts
  • Chassis (running gear)
  • Front suspension
  • Rear suspension
  • Wheels and tires
  • Brake system
  • Steering system
  • Body and interior
  • Exterior (external elements)
  • Interior (internal elements)
  • Doors, locks and windows
  • Heating and air conditioning
  • Security systems
  • Electrical equipment
  • Power devices
  • Equipment and devices
  • Electrical circuits
  • Electrical circuits (petrol 2.0 l)
  • Electrical circuits (halogen headlights)
  • Electrical circuits (LED headlights)
  • Electrical circuits (Climatronic)
SkodaBook.ru © 2018–2026 | Mobile version | Articles on Skoda | Sitemap EN BG BY UA RS HR RO PL SK HU | Feedback | Site search | Bookmark
Fabia 1 (1999-2007) | Fabia 2 (2007-2014) | Rapid 1 (2012-2022) | Octavia 1 (1996-2004) | Octavia 3 (2013-2019) | Superb 2 (2008-2015) | Kodiaq 1 (2016-2024) | Yeti (2009-2017) | Favorit (1987-1994) | Felicia (1994-2001) |
By continuing to use the site, you agree to the use of cookies.