Removing
1. Remove rear door trim panel (For details, see the relevant section in this chapter).
2. Remove the rear door inner seal.
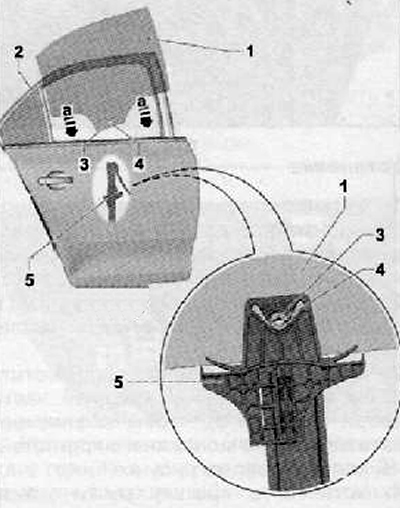
3. Remove cover (5), shown in the figure below.
4. Lower glass (S) rear door just enough to allow access to the finger (4) and pin (3), through the service hole in the door body (2), as shown in the figure below.
Note. If, due to a breakdown of the electric motor of the servo drive of the window lifter mechanism, it is not possible to lower the glass to the required position, it is necessary to dismantle the electric motor (7) After that, manually move the window to the desired position.
5. Screw in the screw (5 mm in diameter and approx. 70 mm long) into the adjusting pin (4), then pull and remove the adjusting pin from the anchor dowel (3), as shown in the figure below.
6. Screw in the screw (8 mm in diameter and approx. 80 mm long) in anchor dowel (3), then extract it as shown in the figure below.
Note. When screwing in the fastening screw, do not apply excessive load to it.
7. Remove the anchor dowel (3) from the door window guide (1), as shown in the figure below, and, respectively, of glass.
Note. Hold the glass when removing the anchor dowels to prevent it from falling inside the door body.
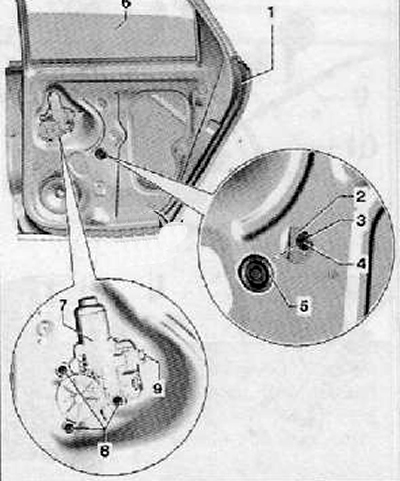
8. Pull back the glass guide (2) from the supports as shown in the figure below.
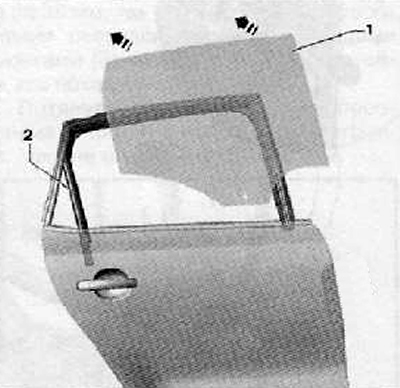
9. Pull the tailgate glass (1) up, in the direction of the arrows (toward the inside of the car), as shown in the figure below. Remove glass from door.
Installation
Note. Before installing anchor dowels (3) and fixing finger (4), check the tailgate glass (1) for damage.
1. Take the central anchor dowel (3) and install it when the glass is not yet installed (1), as shown in the figure below.
2. Press in locking pin (4) in anchor dowel (3), shown in the figure below.
3. Install glass (1) in the door frame (2), moving in the direction of the arrow «A», then insert the window lifter guide (5), as shown in the figure below.
4. Gently tap on the glass (1), so that it locks into the power window mechanism (5), as shown in the figure below.
5. The glass must be pressed until it is fixed in the fastening elements with a characteristic click.
6. Further installation is carried out in the reverse order of removal.