
Attention: The sealant from the tire repair kit is harmful to health, if the sealant comes into contact with the skin, immediately wash it off with plenty of water. When driving with a tire repaired using the kit, do not exceed 80 km/h, avoid sudden acceleration/deceleration and fast cornering.
The tire repair kit is located under the luggage compartment floor covering (see illustration 4).
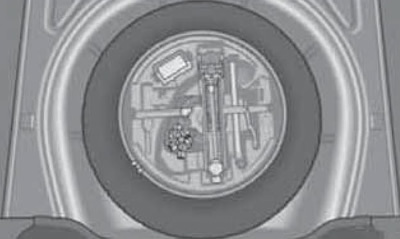
4 On-board tool kit in the spare wheel
The purpose of the kit is only to give the driver the opportunity to get to the nearest service station, because. a tire retreaded in this way does not provide the vehicle's previous driving performance and must be replaced or, if possible, repaired as soon as possible. With this kit, you can plug punctures up to 4 mm in diameter in one tire, while removing the damaged tire should not be removed.
The sealant included in the kit should not be used in the following cases:
- in case of damage to the rim;
- at an outside temperature below -20°C;
- with cuts or punctures over 4 mm;
- damage to the sidewall of the tire;
- after driving on a badly flat tire;
- after the expiration date of the sealant;
The contents of the tire repair kit are shown in Figure 8.
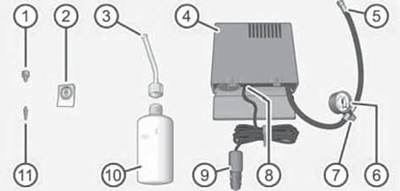
8 Contents of the tire repair kit
1 Tool for reversing the spool
2 sticker with the inscription "max. 80 km/h " or "max. 50 mph "
3 Hose with plug
4 Compressor
5 Hose for tire inflation
6 Pressure gauge
7 Pressure relief screw (air outlet)
8 Switch
9 Cable connector for 12 Volt socket
10 Sealant container
11 Spare spool
Before using the kit, stop the vehicle in a safe place on a flat, level surface, if possible with a hard surface. If necessary, turn on the hazard warning lights and set the warning triangle. Set the front wheels to straight ahead and apply the parking brake. On models with DSG, set the selector lever to position "R", and on models with manual transmission, place the shift lever in 1st gear or reverse gear. Switch off the ignition and ask the passengers to get out of the vehicle. If the luggage compartment is loaded, remove the load. If you have a trailer, uncouple it and make sure it does not pose a threat or obstruction to other road users.
Make sure the tire repair can be done with the repair kit and get the tire repair kit. Stick the sticker from the kit so that it can be seen from the driver's seat. Support with wheel chocks on both sides (see subsection above) or other suitable items, a wheel located diagonally from the one to be replaced. Do not remove a foreign object that damaged the tire, do not raise the car on a jack!
The following describes the sequence of steps for repairing a tire. Also, instructions for using the tire repair kit are included with the kit itself.
Note: Numbers in parentheses indicate positions in Figure 8.
1 Remove the nipple cap and use the tool (1) unscrew the spool from it. Lay the spool on a clean surface.
2 Shake container 110 vigorously several times) with sealant.
3 Screw the hose tightly onto the cylinder (3) clockwise - the hose pierces the sealing foil. Remove the plug from the other end of the hose and put it on the tire nipple.
4 Holding the sealant bottle upside down, pour all the sealant into the tire, then remove the empty bottle from the nipple.
5 Using the tool (1) screw the spool back into the nipple and tightly screw the hose onto it (5) compressor.
6 Make sure the plug (7) tightened for air release.
7 Start the engine, insert the connector (9) into a 12 volt socket and turn on the compressor using the switch (8).
8 Inflate the tire to 2.0-2.5 bar and turn off the compressor.
Note: Do not allow the compressor to run continuously for more than 8 minutes; let it cool down for a few minutes before turning it on again. Do not burn yourself on the compressor or its hose heating up during operation.
9 If it is not possible to inflate the tire to the specified pressure, disconnect the hose from it, move the car 10 meters forward or backward so that the sealant is distributed over the tire, screw the compressor hose onto the nipple again and try to inflate the tire again.
10 If the tire again fails to inflate to the required pressure, then the puncture is too large, and the use of the kit is pointless. In this case, install a spare wheel or call technical assistance.
11 Disconnect the compressor hose and connector from the tire/socket, then drive off as soon as possible without exceeding 80 km/h.
12 After 10 minutes of driving with the tire repaired using the kit, check its condition again: reconnect the compressor hose and check the pressure on the pressure gauge. If the pressure is 1.3 bar or less, you should stop driving, because. failed to repair the tire. If the pressure is 1.4 bar or more, go to step 7 to adjust the pressure to the desired value (see sticker on the back of the fuel filler cap).
13 Go to the nearest service station to replace the tire repaired with the kit. The container with used or expired sealant should be disposed of; a new container of sealant can be purchased from a Skoda dealer.