



Contents: Sealing ⬇ Pumping up ⬇ If the pressure is 1.3 bar and below ⬇ If the pressure is 1.3 bar and above ⬇
The tyre repair kit can be used to reliably repair a tyre damaged by a foreign object or with a puncture of up to approximately 4 mm in diameter. Tyre repair using the tyre repair kit is in no way a substitute for a real tyre repair. It is only intended to enable you to drive to the nearest service centre. The repair does not require removing the wheel. Foreign objects such as screws or nails should not be removed from the damaged tyre! It is prohibited to use the tyre repair kit in the following cases: if the wheel rim is damaged, if the outside temperature is below -20°C, if the puncture is larger than 4 mm, if the sidewall of the tyre is damaged, if you are driving with very low tyre pressure or if the tyre is flat, if the sealant has expired (see marking on the cylinder). The tire repair kit is located in a container under the trunk floor covering.
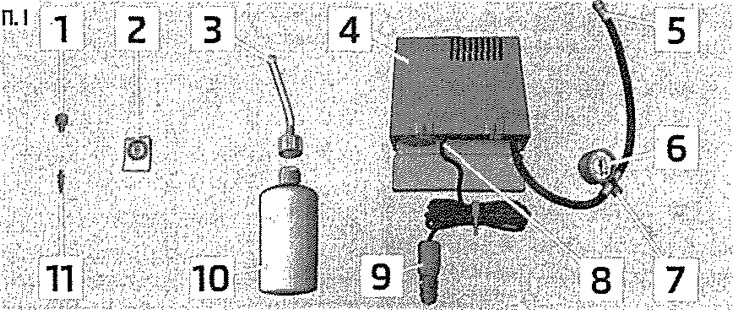
Composition of the tire repair kit
1. Tool for removing/installing the valve core
2. A sticker that says "max 80 km/h" or "max 50 mph"
3. Filling hose with plug
4. Compressor
5. Tire inflation hose
6. Tire pressure indication
7. Air bleed screw plug
8. Switch
9. Cable connector for 12V socket
10. Can of sealant
11. Spare valve
At the lower end of the unscrewing device 1 there is a groove for the valve spool. The valve spool can only be unscrewed and screwed back in using this device. This also applies to the spare spool 11.
Sealing
Shake the bottle of sealant 10 vigorously several times. Screw hose 3 clockwise tightly onto cylinder 10. The hose pierces the sealing foil. Remove the plug from hose 3 and put the free end all the way onto the tire valve. Holding cylinder 10 upside down, pour all the sealant into the tire. Disconnect the empty cylinder from the valve. Using tool 1, screw the valve core back into the valve.
Pumping up
Screw compressor hose 5 tightly onto the tire valve. Check that air bleed plug 7 is screwed in. Start the engine and let it idle. Insert connector 9 into a 12-volt socket. Turn on the compressor with switch 8. Inflate the tire to 2.0-2.5 bar. The maximum permissible compressor operating time is 8 minutes! Turn off the compressor. If you cannot inflate the tire to 2.0-2.5 bar, unscrew hose 5 from the tire valve. Move the car 10 meters forward or backward so that the sealant "spreads" over the tire. Screw hose 5 back onto the valve and repeat the inflation. If you still cannot inflate the tire to the required pressure, the puncture is too big. You cannot seal the tire using the repair kit. Turn off the compressor. Unscrew hose 5 from the tire valve. If the tire has been inflated to a pressure of 2.0-2.5 bar, you can continue driving at a speed of no more than 80 km/h. Check the tire pressure 10 minutes after starting to drive.
Warning! The hose and compressor may become hot during inflation! Do not cover the hot hose and compressor with flammable materials! If the tire is not inflated to at least 2.0 bar, the puncture is too large. The sealant will not be able to seal such a tire. Stop driving! Contact a service station. Switch off the compressor no later than after 8 minutes of operation - overheating is possible! Allow the compressor to cool down for several minutes before switching it on again. Check the tire pressure 10 minutes after starting to drive!
If the pressure is 1.3 bar and below
Do not continue driving, stay where you are! The kit failed to seal the tire.
If the pressure is 1.3 bar and above
Raise your blood pressure to normal (see sticker on inside of fuel filler flap). Drive carefully to the nearest service center at a speed of no more than 80 km/h.