
Company vehicles Hyundai Company vehicles Kia Company vehicles Lada Company vehicles Mazda Company vehicles Mercedes-Benz Company vehicles Opel Company vehicles Mitsubishi
English Русский
Български
Беларускі
Український
Српски
Hrvatski
Română
Polski
Slovenský
Magyar
Articles   
Bookmark Contacts Sitemap
SkodaBook.ru


Fabia Rapid Octavia Superb Kodiaq Yeti Others
Yeti (2009-2017)

Removal and installation of some parts related to the crankshaft (Skoda Yeti 5L)

  • Main
  • Yeti
  • 5L (2009-2017)
  • Power unit
  • Diesel engine 2.0 l
  • Removal and installation of some parts related to the crankshaft
0
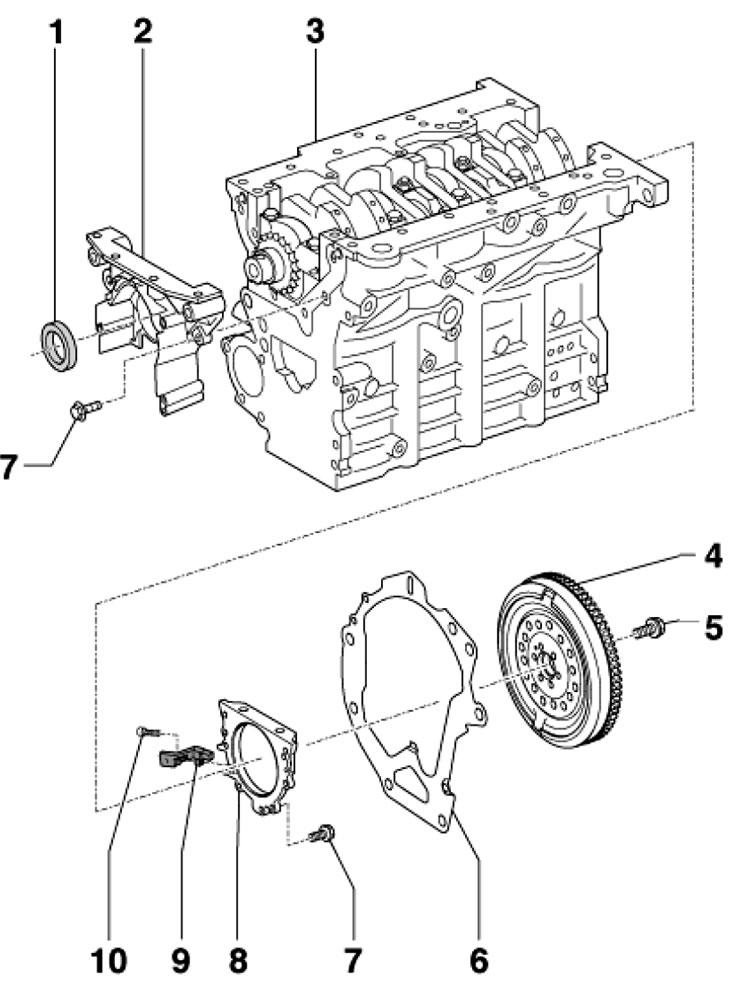
1. The installation details of the crankshaft oil seals, their sealing flanges and some related components are shown in the illustration.

37.1. Installation details of crankshaft oil…

37.1. Installation details of crankshaft oil seals, their sealing flanges and some related components 1. Front oil seal; 2. Front sealing flange, installed on centering bushings with silicone sealant D 176 404 A2; 3. Cylinder block; 4. 2-mass flywheel; 5. Bolt, subject to replacement, 60 Nm, then tighten to an angle of 90°; 6. Intermediate plate, installed on centering bushings; 7. Bolt, subject to replacement, 15 Nm; 8. Rear sealing flange with rear oil seal and CKP sensor rotor, replaceable only as an assembly; 9. Sensor SKR "G28"; 10. Bolt, 5 Nm


Note: Do not apply additional lubricant to the crankshaft oil seal lips. Before installing the oil seal, remove any remaining oil from the crankshaft with a clean cloth.


2. To remove the front oil seal, it is necessary to remove the timing belt (see Section 36), and the crankshaft gear. To remove/press on the oil seal, use a suitable puller and mandrel. Press the seal onto the shaft flush with the edges of the hole in the sealing flange.


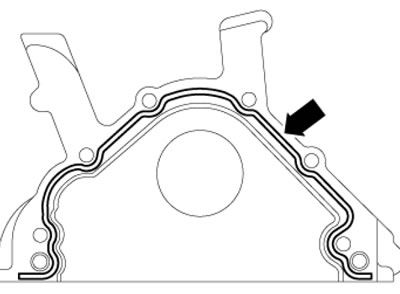
3. To remove the front sealing flange, it is necessary to remove the timing belt (see Section 36), crankshaft gear and engine oil pan (see Section 41). When installing, apply a bead of silicone sealant D176 404A2 with a diameter of 2-3 mm to the flange, as shown in the illustration.
37.3. Scheme of applying sealant to the front…

37.3. Scheme of applying sealant to the front sealing flange


4. Removal and installation of the flywheel and rear sealing flange are carried out in the same way as on the 1.2 l engine (see Section 8). The only difference is in the use of the guide pin (F, with black handle) instead of a guide pin (G, with red handle), - see illustration 8.25.
This article is available at russian, bulgarian, belarusian, ukrainian, serbian, croatian, romanian, polish, slovak, hungarian
Article verified: Timur Komissarov
Share with friends:
◀ Previous
Skoda Yeti: Diesel engine 2.0 l
Next ►

Removal and installation the timing belt, setting the timing phases
Removal and installation the accessory drive belt, its tensioner,…
Removal and installation of the engine and powertrain supports
Removal and installation the cylinder head cover
Removal and installation the cylinder head, vacuum pump and CMP sensor
Work with the gas distribution mechanism
Work with lubrication system and balance shafts
Features of engine overhaul
Read similar articles on other Skoda models

➧ Selection of crankshaft timing gear Skoda Fabia 1 (1999-2007)
➧ Crankshaft pulley — removal and installation Skoda Rapid 1 (2012-2022)
➧ Parts and assemblies of the crankshaft cover from the pulley side Skoda Octavia 3 (2013-2019)
➧ Removal and installation of some parts related to the crankshaft Skoda Superb 2 (2008-2015)
➧ Crankshaft — tightening torques Skoda Kodiaq 1 (2016-2024)
➧ Crankshaft, camshaft and related components Skoda Favorit (1987-1994)
Link to this article in various formats
Reviews and comments of visitors
No comments yet


Add two numbers: 33 + 17


Yeti (2009-2017) 
  • General information
  • Introduction to manual
  • Controls and instruments
  • Maintenance
  • Power unit
  • Petrol engine 1.2 l
  • Petrol engine 1.4 l
  • Petrol engine 1.8 l
  • Diesel engine 2.0 l
  • Cooling system
  • Power and control system
  • Exhaust system
  • Ignition and preheating systems
  • Starting and charging system
  • Transmission
  • Clutch
  • Manual gearbox
  • 7-speed gearbox DSG «0AM»
  • 6-speed gearbox DSG «02E»
  • Drive shafts
  • Chassis (running gear)
  • Brake system
  • Front suspension
  • Rear suspension
  • Steering
  • Body and interior
  • Heating and air conditioning
  • Exterior (external elements)
  • Interior (internal elements)
  • Electrical equipment
  • Equipment and devices
  • Lighting and signaling
  • Electrical diagrams
SkodaBook.ru © 2018–2026 | Mobile version | Articles on Skoda | Sitemap EN BG BY UA RS HR RO PL SK HU | Feedback | Site search | Bookmark
Fabia 1 (1999-2007) | Fabia 2 (2007-2014) | Rapid 1 (2012-2022) | Octavia 1 (1996-2004) | Octavia 3 (2013-2019) | Superb 2 (2008-2015) | Kodiaq 1 (2016-2024) | Yeti (2009-2017) | Favorit (1987-1994) | Felicia (1994-2001) |
By continuing to use the site, you agree to the use of cookies.