
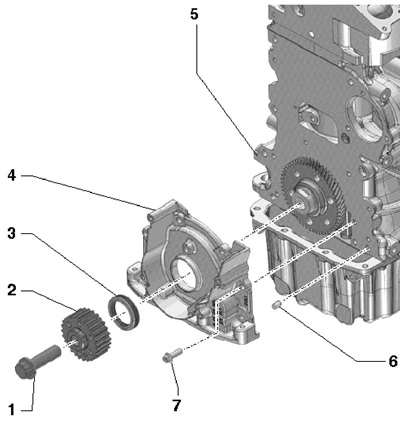
37.1a Installation details of crankshaft oil seals, their sealing flanges and some related components
1 Bolt, to be replaced, 120 Nm, then retighten 90°
2 Crankshaft gear
3 Front oil seal
4 Front sealing flange, mounted on centering bushings on silicone sealant D176 404A2
5 Cylinder block
6 Centering sleeve, 2 pcs.
7 Flange bolt 4, 15 Nm
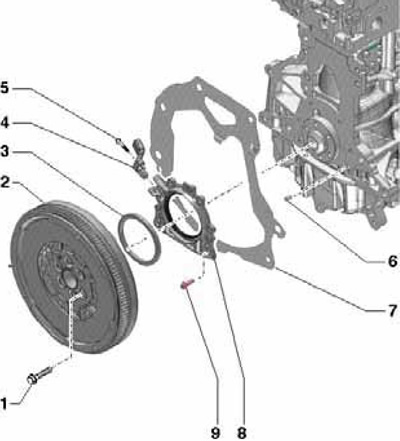
37.1b Installation details of crankshaft oil seals, their sealing flanges and some related components
1 Bolt, to be replaced, 60 Nm, then retighten 90°
2 2-mass flywheel
3 SKR sensor rotor
4 SKR sensor "G28"
5 Bolt, 5 Nm
6 Centering sleeve, 2 pcs.
7 Intermediate plate, mounted on centering sleeves
8 Rear sealing flange with rear seal, replaceable only as a whole
9 Bolt, 15 Nm
Note: Do not apply additional grease to the crankshaft oil seal lips. Before installing the oil seal, wipe off any remaining oil from the crankshaft with a clean cloth.
2. To remove the front oil seal, you must remove the timing belt (see Section 36) and crankshaft gear. Use a suitable puller and mandrel to extract/press on the oil seal. Press the stuffing box onto the shaft flush with the edges of the hole in the sealing flange. When installed, there must be no grease between the crankshaft and its gear. Use a new bolt to fasten the gear; screw it in without lubrication.
3. To remove the front sealing flange, you must remove the timing belt (see Section 36), crankshaft gear and oil pan (see Section 41). When installing, apply a bead of silicone sealant D176 404A2 with a diameter of 2-3 mm to the flange, as indicated in illustration 7.8.
4. Removal and installation of the flywheel are carried out in the same way as on the 3.6 l engine (see Section 8).
5. Replacing the rear sealing flange assembly is the same as on the 1.4L engine (see Section 18). The difference is only in the use of the guide pin (F, with black handle) instead of a guide pin (G, with red handle), - see illustration 18.15.