
Company vehicles Hyundai Company vehicles Kia Company vehicles Lada Company vehicles Mazda Company vehicles Mercedes-Benz Company vehicles Opel Company vehicles Mitsubishi
English Русский
Български
Беларускі
Український
Српски
Hrvatski
Română
Polski
Slovenský
Magyar
Articles   
Bookmark Contacts Sitemap
SkodaBook.ru


Fabia Rapid Octavia Superb Kodiaq Yeti Others
Yeti (2009-2017)

Checking engine oil pressure and the corresponding sensor (Skoda Yeti 5L)

  • Main
  • Yeti
  • 5L (2009-2017)
  • Power unit
  • Petrol engine 1.2 l
  • Checking engine oil pressure and the corresponding sensor
0
Note: Before checking, correct the engine oil level if necessary (see Chapter 1). Engine oil pressure depends on many factors, such as its temperature and viscosity, crankshaft speed and the condition of the oil filter, so measurements should be taken strictly at the specified Specifications crankshaft speed and engine temperature.


1. Disconnect the engine oil pressure D/V connector (see illustrations).
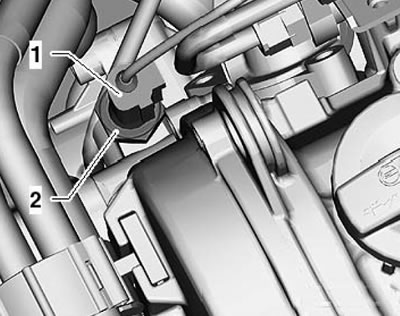
4.1a. Connector (1) D/V engine oil pressure (2)…

4.1a. Connector (1) D/V engine oil pressure (2) 1.2 l engine
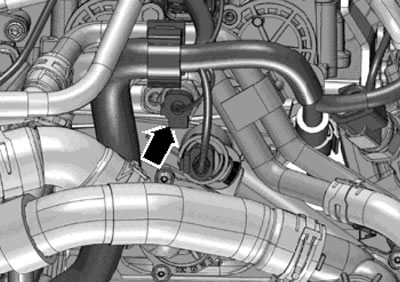

4.1b. Engine oil pressure sensor 1.4 l (on the…

4.1b. Engine oil pressure sensor 1.4 l (on the left side of the cylinder head, use the ball joint to turn it out)
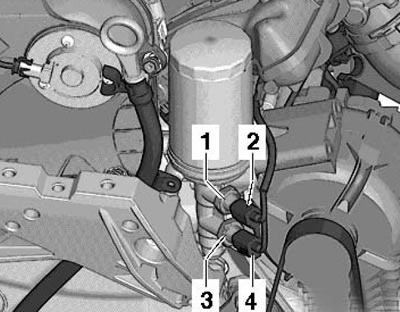

4.1s. 1.8L engines: Low pressure engine oil…

4.1s. 1.8L engines: Low pressure engine oil pressure switch (1) with connector (2) and Low pressure engine oil pressure switch (3) with connector (4)


Note: On 1.8L engines two sensors are used; they should be checked separately. Description of removal/installation or location of engine oil pressure switch on diesel engines is given in the relevant parts of Chapter 2.


[Information taken from this resource: SKODABOOK.ru]

2. Unscrew the engine oil pressure sensor and screw it into the VAG1342 pressure gauge (2 in the illustration), and screw the pressure gauge hose into the cylinder head instead of the sensor. Connect the negative wire of the pressure gauge to the vehicle ground to ensure that the oil pressure D/V connection is connected to ground.
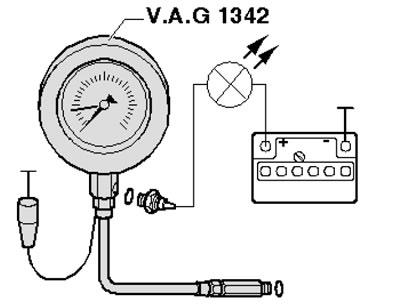
4.2. Engine oil pressure test diagram

4.2. Engine oil pressure test diagram


3. Connect the voltage indicator VAG1527B (test lamp) to the positive terminal of the battery and to the oil pressure indicator - the indicator should not light. Otherwise, the oil pressure switch should be replaced.

4. Start the engine and, if necessary, slowly increase the crankshaft speed. The voltage indicator should come on when the oil pressure reaches the value at which the engine oil pressure D/V should operate (see Specifications). Otherwise, the oil pressure switch should be replaced.


If the Specifications include data for checking idle oil pressure, take the appropriate measurement and compare with the Specifications.

5. Increase the crankshaft speed to 2000 rpm and check the engine oil pressure at a temperature of 80°C - the pressure must comply with the requirements of the Specifications). For 1.8 l engines, the pressure can also be checked at 3700 rpm. With a further increase in speed, the oil pressure should not increase to more than 7 bar. If the required values are not achieved, check the engine (for example, the crankshaft main bearings may be damaged or the oil intake may be clogged), or replace the pressure relief valve, bypass valve or oil pump. Before installing the new oil pump, make sure the oil lines in the upper section of the oil pan are not contaminated.

6. Disconnect and unscrew the pressure gauge and voltage indicator. Screw the engine oil pressure sensor back into place. Tighten the engine oil pressure D/V with a torque of 20 Nm (except 2.0L diesel engines) or 22 Nm (for diesel engines 2.0 l). On diesel engines, use a new sensor O-ring.
This article is available at russian, bulgarian, belarusian, ukrainian, serbian, croatian, romanian, polish, slovak, hungarian
Article verified: Timur Komissarov
Share with friends:
◀ Previous
Skoda Yeti: Petrol engine 1.2 l
Next ►

Checking the engine with a vacuum gauge
Checking the compression pressure
General information and preparatory operations
Engine — Specifications
Removal and installation of the engine and its supports
Removal and installation the accessory drive belt and auxiliary brackets
Removal and installation timing belt covers
Replacing crankshaft seals, removing and installing flywheel and…
Removal and installation the cylinder head, its cover and camshaft
Read similar articles on other Skoda models

➧ Checking the engine air temperature sensor Skoda Fabia 1 (1999-2007)
➧ Checking oil pressure and hydraulic oil pressure drop switch-sensor… Skoda Rapid 1 (2012-2022)
➧ Engine AEE: Control unit 1AV, lambda probe, temperature sensor, air… Skoda Octavia 1 (1996-2004)
➧ Checking engine oil pressure and the corresponding sensor Skoda Superb 2 (2008-2015)
➧ Intake manifold sensor, Boost pressure sensor, Engine control unit Skoda Kodiaq 1 (2016-2024)
➧ Checking the engine oil level Skoda Favorit (1987-1994)
Link to this article in various formats
Reviews and comments of visitors
No comments yet


Add two numbers: 48 + 25


Yeti (2009-2017) 
  • General information
  • Introduction to manual
  • Controls and instruments
  • Maintenance
  • Power unit
  • Petrol engine 1.2 l
  • Petrol engine 1.4 l
  • Petrol engine 1.8 l
  • Diesel engine 2.0 l
  • Cooling system
  • Power and control system
  • Exhaust system
  • Ignition and preheating systems
  • Starting and charging system
  • Transmission
  • Clutch
  • Manual gearbox
  • 7-speed gearbox DSG «0AM»
  • 6-speed gearbox DSG «02E»
  • Drive shafts
  • Chassis (running gear)
  • Brake system
  • Front suspension
  • Rear suspension
  • Steering
  • Body and interior
  • Heating and air conditioning
  • Exterior (external elements)
  • Interior (internal elements)
  • Electrical equipment
  • Equipment and devices
  • Lighting and signaling
  • Electrical diagrams
SkodaBook.ru © 2018–2026 | Mobile version | Articles on Skoda | Sitemap EN BG BY UA RS HR RO PL SK HU | Feedback | Site search | Bookmark
Fabia 1 (1999-2007) | Fabia 2 (2007-2014) | Rapid 1 (2012-2022) | Octavia 1 (1996-2004) | Octavia 3 (2013-2019) | Superb 2 (2008-2015) | Kodiaq 1 (2016-2024) | Yeti (2009-2017) | Favorit (1987-1994) | Felicia (1994-2001) |
By continuing to use the site, you agree to the use of cookies.