



Note: An assistant will be required to check the compression pressure. If the engine is started with the fuses removed or the wiring disconnected, a corresponding fault code may be stored in the ECM memory and should then be cleared (see Chapter 5). Different designs of compression gauges and fluctuations in the starter speed usually only allow us to compare the compression in all cylinders.
1. Measuring the compression pressure allows you to get a general idea of the current condition of engine components such as the cylinder head gasket, valve train components, pistons and piston rings. Analysis of the test results allows you to determine whether the engine needs a major overhaul or whether it is sufficient to replace only the cylinder head gasket. The measurement is carried out using a compression gauge.
2. Warm up the engine to a temperature of at least 30°C and turn it off.
3. Make sure that the battery is fully charged and that the valve clearances are adjusted correctly.
For petrol models only
4. Remove the spark plugs (see Section 14 Chapter 1).
5. Remove the fuel pump control unit fuse from the mounting block in the engine compartment (on a 1.2 l engine) or fuse relay "J271" power supply ECM (on 1.4 and 1.8 l engines).
6. Screw in the VAG1763 compression tester instead of one spark plug.
For diesel models only
7. Prevent fuel supply, unscrew the corresponding glow plug (see Chapter 5). screw the VAG1381/12 adapter in its place and connect the VAG1763 compression tester to it. To prevent fuel supply on the CBDB engine, first disconnect the injector connectors, the connector of the exhaust gas pressure sensor No. 1 and the connector of the fuel pressure sensor, and on the CFHA/CFHC/CFHF, CFJA and CLCB engines, disconnect the connector of the fuel pressure regulating valve (see illustration).
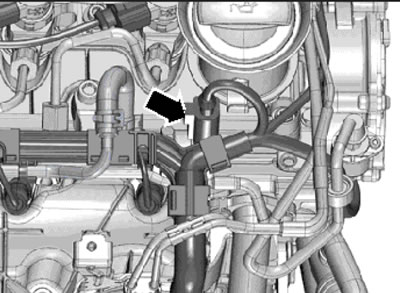
2.7. Fuel pressure control valve connector
All models
8. Fully depress the gas pedal and. cranking the engine with the starter, read and record the compression gauge readings when they stabilize (will stop increasing).
Note: The measurement time should be as short as possible.
9. Check the compression pressure in the remaining engine cylinders and compare the measurement results with the Specification requirements.
10. Compression in a healthy engine increases very quickly. A low value shown after the first cycle, increasing with subsequent cycles, indicates worn piston rings. A low reading after the first cycle that does not increase after the following cycles indicates valve leaks or a blown cylinder head gasket (the cause could also be a crack in the head). The presence of carbon deposits on the valve plates can lead to a decrease in compression.
11. The results obtained from measuring compression should be approximately the same for all cylinders. If the pressure in any cylinder is at the minimum permissible level (see Specifications) and even lower, then to find out the reason, pour a teaspoon of engine oil into the cylinder through the spark plug hole and repeat the measurement.
12. If adding oil temporarily improves compression, the cause of its decrease is most likely wear of the piston, rings or cylinder. If there is no increase in compression, then we can assume that the cause is a loose valve fit or a broken cylinder head gasket.
13. Low compression in two adjacent cylinders is almost certainly the result of a blown head gasket. The presence of coolant in the combustion chambers or in the engine crankcase will confirm this assumption.
14. If the compression in one of the cylinders differs from the others by more than 1 bar, and the idle speed is unstable, then the reason may be excessive wear of the camshaft cam.
15. After completing the check, disconnect the compression gauge with the adapter (if used), install the removed components and connect the electrical wiring.
16. Finally, use a diagnostic tool to clear the errors from the ECM memory.