Company vehicles Hyundai Company vehicles Kia Company vehicles Lada Company vehicles Mazda Company vehicles Mercedes-Benz Company vehicles Opel Company vehicles Mitsubishi
English Русский
Български
Беларускі
Український
Српски
Hrvatski
Română
Polski
Slovenský
Magyar
Articles   
Bookmark Contacts Sitemap
SkodaBook.ru


Fabia Rapid Octavia Superb Kodiaq Yeti Others
Kodiaq 1 (2016-2024)

Methods of working with measuring instruments — calipers (Skoda Kodiaq NS7)

  • Main
  • Kodiaq
  • NS7 (2016-2024)
  • General information
  • Maintenance
  • Methods of working with measuring instruments — calipers
0
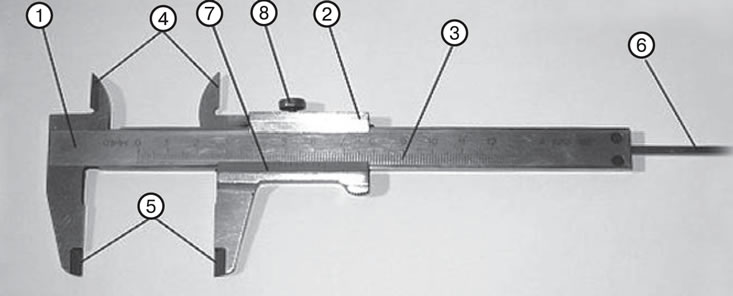
1. Bar. 2. Movable frame. 3. Barbell scale. 4.…

1. Bar. 2. Movable frame. 3. Barbell scale. 4. Sponges for internal measurements. 5. Sponges for external measurements. 6. Depth gauge ruler. 7. Vernier. 8. Screw for clamping the frame


A caliper is a universal tool designed for high-precision measurements of external and internal dimensions. In addition, a caliper can be used to determine the depth of holes and protrusions.

The measuring jaws of the caliper can also be used to measure the parallelism of the sides of workpieces.

Calipers have measurement limits of 0-125 mm (SHC-1), 0-160 mm (SHC-2) and 0-400 mm (SHC-3).

The most commonly used caliper is ShTs-1.

To measure external dimensions and check parallelism, the main measuring jaws of the tool are used, and to measure internal dimensions and mark them, auxiliary pointed jaws are used.

Using a depth gauge, determine the depth of holes and protrusions.

The caliper's design is based on a graduated ruler (bar) and an auxiliary vernier scale that moves along the main ruler/bar. This auxiliary scale can be used to count fractions of a division on the main scale.

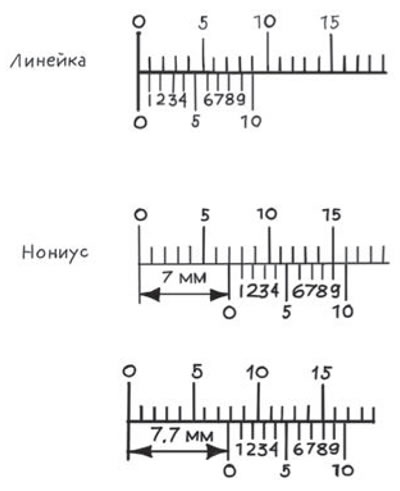
The vernier scale operates on the difference in the division intervals between the main scale and the vernier scale. This difference is equal to the vernier scale division value, and the number of divisions depends on the division value.


If the scale division interval is 1 mm, and the vernier division interval is 0.9 mm, then the vernier division value is 0.1 mm.

Thus, if you combine the zero division of the vernier with the zero division of the main scale of the caliper, then the first division of the vernier will "lag" behind the first division of the main scale by the amount of the difference in the intervals of the scales, i.e. by 0.1 mm, the second division - by 0.2 mm, etc.

The tenth division of the vernier, having shifted by 1 mm, coincides with the ninth division of the main scale of the rod, that is, if the division value of 1 mm is divided by the number of divisions of the vernier (by 10), we get 0.1 mm (see picture)

Example:
  • If the zero mark of the vernier coincides with any mark on the ruler, then this division indicates the size in whole millimeters.
  • If the zero mark of the vernier does not coincide with the mark on the main scale, then the division on the ruler closest to the left shows a whole number of millimeters, and tenths are counted according to the vernier.
  • To the whole number of millimetres are added as many tenths of a millimetre as there are vernier strokes until any vernier stroke completely coincides with one of the ruler strokes. The figure shows an example of reading 7 mm and 7.7 mm.
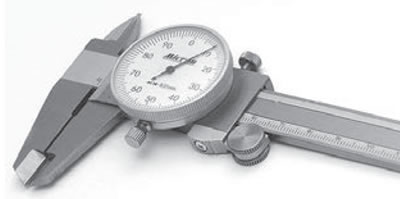
  • Some calipers are equipped with a dial indicator. The indicator scale allows you to adjust the zero setting and control tolerances.
  • During and after work, it is necessary to wipe the caliper with a napkin soaked in an aqueous alkaline solution, then dry it with a clean napkin. After finishing work, cover the surfaces of the caliper with a thin layer of any technical oil and place it in the case. Avoid harsh impacts or falls during operation to avoid bending of the rod and other damage, scratches on the measuring surfaces, and friction of the measuring surfaces against the controlled part.

Text taken from this website [SKODABOOK.RU]


During and after work, it is necessary to wipe…


During and after work, it is necessary to wipe…
This article is available at russian, bulgarian, belarusian, ukrainian, serbian, croatian, romanian, polish, slovak, hungarian
Article verified: Eleonora Afanasyeva
Share with friends:
◀ Previous
Skoda Kodiaq 1: Maintenance
Next ►

Methods of working with measuring instruments — micrometers
Methods of working with measuring instruments — flat probes
Basic set of necessary tools
Safety precautions and rules when working on a vehicle
Brake fluid
Methods of working with measuring instruments — dial indicator
Methods of working with measuring instruments — bore gauge
Read similar articles on other Skoda models

➧ Checking the working fluid level Skoda Fabia 1 (1999-2007)
➧ Methods of working with micrometers Skoda Rapid 1 (2012-2022)
➧ Instruments and control lamps Skoda Octavia 3 (2013-2019)
➧ Replacement of working fluid Skoda Superb 2 (2008-2015)
➧ Replacement of working fluid Skoda Yeti (2009-2017)
➧ Measuring the brake fluid level Skoda Favorit (1987-1994)
Link to this article in various formats
Reviews and comments of visitors
No comments yet


Add two numbers: 47 + 10


Kodiaq 1 (2016-2024) 
  • General information
  • User manual
  • Controls and instruments
  • Maintenance
  • Power unit
  • Petrol engine 1.4 l
  • Petrol engine 2.0 l
  • Diesel engine 2.0 l
  • Fuel and control (petrol)
  • Fuel and control (diesel)
  • Cooling system (petrol 1.4 l)
  • Cooling system (petrol 2.0 l)
  • Cooling system (diesel 2.0 l)
  • Lubrication system (petrol)
  • Lubrication system (diesel)
  • Intake and exhaust (petrol 1.4 l)
  • Intake and exhaust (petrol 2.0 l)
  • Intake and exhaust (diesel 2.0 l)
  • Transmission
  • Clutch
  • Manual gearbox
  • Automatic gearbox
  • Drive shafts
  • Chassis (running gear)
  • Front suspension
  • Rear suspension
  • Wheels and tires
  • Brake system
  • Steering system
  • Body and interior
  • Exterior (external elements)
  • Interior (internal elements)
  • Doors, locks and windows
  • Heating and air conditioning
  • Security systems
  • Electrical equipment
  • Power devices
  • Equipment and devices
  • Electrical circuits
  • Electrical circuits (petrol 2.0 l)
  • Electrical circuits (halogen headlights)
  • Electrical circuits (LED headlights)
  • Electrical circuits (Climatronic)
SkodaBook.ru © 2018–2026 | Mobile version | Articles on Skoda | Sitemap EN BG BY UA RS HR RO PL SK HU | Feedback | Site search | Bookmark
Fabia 1 (1999-2007) | Fabia 2 (2007-2014) | Rapid 1 (2012-2022) | Octavia 1 (1996-2004) | Octavia 3 (2013-2019) | Superb 2 (2008-2015) | Kodiaq 1 (2016-2024) | Yeti (2009-2017) | Favorit (1987-1994) | Felicia (1994-2001) |
By continuing to use the site, you agree to the use of cookies.