Company vehicles Hyundai Company vehicles Kia Company vehicles Lada Company vehicles Mazda Company vehicles Mercedes-Benz Company vehicles Opel Company vehicles Mitsubishi
English Русский
Български
Беларускі
Український
Српски
Hrvatski
Română
Polski
Slovenský
Magyar
Articles   
Bookmark Contacts Sitemap
SkodaBook.ru


Fabia Rapid Octavia Superb Kodiaq Yeti Others
Octavia 1 (1996-2004) Octavia 3 (2013-2019)

Removal and installation the high pressure fuel pump (Skoda Octavia 5E)

  • Main
  • Octavia
  • 5E (2013-2019)
  • Petrol engines 1.8/2.0 l
  • Supply system
  • Removal and installation the high pressure fuel pump
0
Note: The high-pressure fuel pump may only be removed and installed on a cold engine. When installing the high-pressure pump, ensure that no dirt gets into the fuel system. Collect any leaking fuel with a rag. The sealing ring and nipple must be replaced. High-pressure fuel lines must be tightened without stress. The fuel in the fuel system is under pressure! Before opening the high-pressure circuit of the injection system, the fuel pressure must be released to residual pressure.


Remove the engine casing. Remove the air filter housing. Unscrew screw "1" and push the air duct to the left.
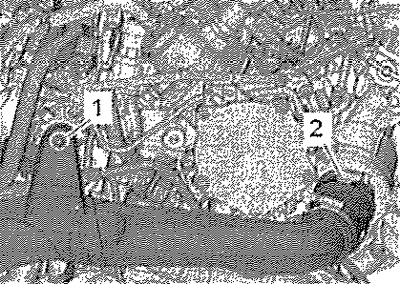
Remove the engine casing. Remove the air filter…


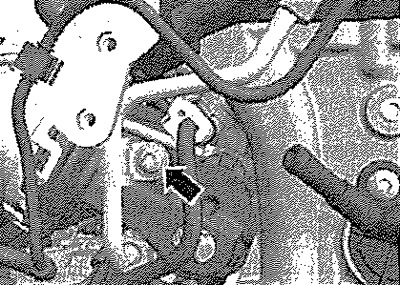
Unscrew the fixing clamp "arrow".

Unscrew the fixing clamp «arrow».


Disconnect connector "2" from fuel pressure regulating valve "M276". Remove fuel lines -3, 4 and 5-. Unscrew the screws "arrows". Carefully remove the high-pressure pump. The roller tappet may remain in the vacuum pump.
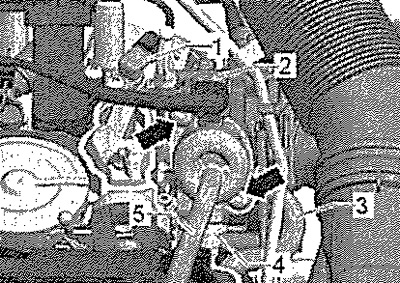


Disconnect connector «2» from fuel pressure…


Installation


Replace the sealing ring of the high-pressure pump. Before installation, check the roller tappet for damage, replace if necessary. Insert the roller tappet into the vacuum pump (taking into account the rotation lock).

Note: When installing the high-pressure pump, the roller tappet must be as cold as possible. When installing the same or a used high-pressure pump, the fuel pressure line nipple must be replaced (from the high pressure zone). See High Pressure Pump Parts and Assemblies, "item 9".


Turn the crankshaft until the roller tappet is at its lowest position. Replace the high-pressure pump nipple. Insert the high-pressure pump into the vacuum pump and secure with screws. Tighten the screws by hand. Then tighten the screws crosswise to the specified torque. Insert both fuel lines and secure with spring clamps. Tighten the union nut of the pressure fuel line by hand. Reconnect connector "2" to the fuel pressure regulating valve "N₂76".

Note: Check the fuel system for leaks.
This article is available at russian, bulgarian, belarusian, ukrainian, serbian, croatian, romanian, polish, slovak, hungarian
Article verified: Anatoly Ovchinnikov
Share with friends:
◀ Previous
Skoda Octavia 3: Supply system
Next ►

Parts and units of high pressure pump
Removal and installation the low fuel pressure sensor «G410»
Removal and installation the fuel pressure sensor «G247»
Removal and installation of MPI injectors
Removal and installation of FSI injectors
Removal and installation of lambda probes «G39» and «G130»
Removal and installation the engine control unit «J623»
Front Exhaust System — General Installation Diagram
Removal and installation the intake pipe
Parts and assemblies of the middle and rear sections of the exhaust system…
Read similar articles on other Skoda models

➧ Instrument panel, indicator lights, oil pressure sensor, fuel pump,… Skoda Fabia 1 (1999-2007)
➧ High pressure fuel pump — external view (1.2 l TSI engine) Skoda Rapid 1 (2012-2022)
➧ Removal and installation of fuel injection system parts, except for… Skoda Superb 2 (2008-2015)
➧ High pressure fuel pump (1.4 TSI) Skoda Kodiaq 1 (2016-2024)
➧ Removal and installation of fuel injection system parts, except for… Skoda Yeti (2009-2017)
➧ Checking and adjusting the injection phase setting of the… Skoda Felicia (1994-2001)
Link to this article in various formats
Reviews and comments of visitors
No comments yet


Add two numbers: 36 + 31


Octavia 3 (2013-2019) 
  • General information
  • User manual
  • Car driving
  • Maintenance
  • Petrol engines 1.2 l
  • Engine repair
  • Cooling system
  • Supply system
  • Petrol engines 1.4 l
  • Engine repair
  • Supply system
  • Petrol engines 1.8/2.0 l
  • Engine repair
  • Cooling system
  • Supply system
  • Diesel engines 1.6/2.0 l
  • Engine repair
  • Cooling system
  • Supply system
  • Transmission
  • Mechanical gearbox 02S
  • Automatic gearbox 0CW
  • Automatic gearbox 0D9
  • Chassis (running gear)
  • Front suspension
  • Rear suspension
  • Brake system
  • Steering
  • Body and interior
  • Doors, locks and windows
  • Exterior (external elements)
  • Interior (internal elements)
  • Ventilation and air conditioning
  • Electrical equipment
  • Equipment and devices
  • Headlights and lighting
  • Wiring diagrams (basic)
  • Wiring diagrams (comfort)
Octavia 1 (1996-2004) 
  • General information
  • Vehicle details
  • Maintenance
  • Power unit
  • Petrol engines 1.6 l AEE
  • Petrol engines 1.8 l AGN
  • Diesel engines 1.9 l AGR
  • Fuel system
  • Exhaust system
  • Cooling system
  • Transmission
  • Clutch
  • Car gearbox
  • Gearbox repair 02J
  • Gearbox repair 02K
  • Chassis (running gear)
  • Wheels and tires
  • Suspension and axles
  • Brake system
  • Body and interior
  • Exterior (external elements)
  • Interior (internal elements)
  • Doors, locks and windows
  • Electrical equipment
  • Equipment and devices
  • Electrical circuits
SkodaBook.ru © 2018–2026 | Mobile version | Articles on Skoda | Sitemap EN BG BY UA RS HR RO PL SK HU | Feedback | Site search | Bookmark
Fabia 1 (1999-2007) | Fabia 2 (2007-2014) | Rapid 1 (2012-2022) | Octavia 1 (1996-2004) | Octavia 3 (2013-2019) | Superb 2 (2008-2015) | Kodiaq 1 (2016-2024) | Yeti (2009-2017) | Favorit (1987-1994) | Felicia (1994-2001) |
By continuing to use the site, you agree to the use of cookies.