
Company vehicles Hyundai Company vehicles Kia Company vehicles Lada Company vehicles Mazda Company vehicles Mercedes-Benz Company vehicles Opel Company vehicles Mitsubishi
English Русский
Български
Беларускі
Український
Српски
Hrvatski
Română
Polski
Slovenský
Magyar
Articles   
Bookmark Contacts Sitemap
SkodaBook.ru


Fabia Rapid Octavia Superb Kodiaq Yeti Others
Yeti (2009-2017)

Removal and installation the anti-roll bar (Skoda Yeti 5L)

  • Main
  • Yeti
  • 5L (2009-2017)
  • Chassis (running gear)
  • Front suspension
  • Removal and installation the anti-roll bar
0
1. Remove the front wheels.

2. Remove the screws (see illustration) and remove the cover behind the pedals.
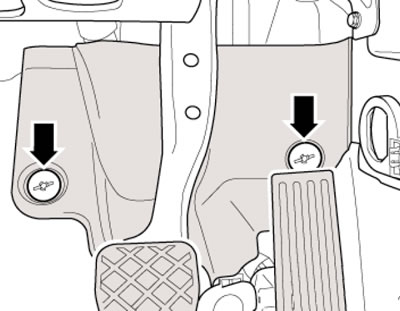
5.2. Fastening the pad behind the pedals

5.2. Fastening the pad behind the pedals


3. Unscrew the bolt (1 in the illustration) and disconnect the joint (2) from the steering gear.
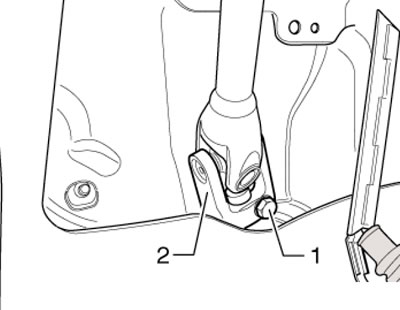
5.3. Steering gear hinge bolt

5.3. Steering gear hinge bolt


4. Remove the sound insulation under the engine compartment (see Chapter 11).

5. Disconnect the anti-roll bar from its struts.

6. Give the nuts (see illustration 4.5 Chapter 8).

7. Loosen the tie rod end nut on the steering knuckle, leaving it screwed on a few turns. Then press the tie rod end joint out of the steering knuckle using tool #3287A (see illustration), finally loosen the nut and separate the tie rod end from the steering knuckle.
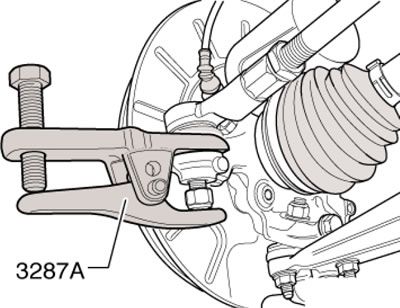


5.7. Separating the steering rod end from the…

5.7. Separating the steering rod end from the steering knuckle


8. Fix the position of the subframe with consoles (see Section 3).

9. Remove the bolts (11 and 16 in illustration 3.11) fastenings of the anti-roll bar on the subframe, unscrew the bolts (14) and remove the rocking support from the transmission.

10. Support the subframe with the VAG1383A transmission jack, placing a wooden block between them (1 in illustration 3.12).

12. Remove the bolts (1 in the illustration) exhaust system holder. Loosen the bolts (2) and lower the subframe slightly, paying attention to the electrical wiring.
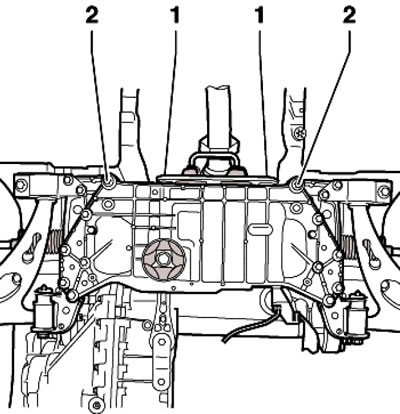
5.12. Fastening the subframe and exhaust system…

5.12. Fastening the subframe and exhaust system bracket


13. Raise the stabilizer (1 in the illustration) forward through the console (2) and remove from the subframe.
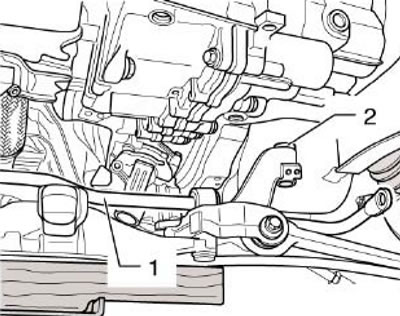


5.13. Removing the stabilizer

5.13. Removing the stabilizer


Data copied from the portal (www.skodabook.ru)

14. Installation is carried out in reverse order. After installation, apply the basic settings for the front suspension height sensor (using the diagnostic tool, see Chapter 5) and conduct a road test (see Chapter 1), during which check the position of the steering wheel. Finally, adjust the front wheel alignment angles (see Part D).
This article is available at russian, bulgarian, belarusian, ukrainian, serbian, croatian, romanian, polish, slovak, hungarian
Article verified: Timur Komissarov
Share with friends:
◀ Previous
Skoda Yeti: Front suspension
Next ►

Removal and installation the ball joint and suspension arm
Work with the front suspension subframe
Unloading the suspension
General information, recommendations and safety measures
Suspension and steering — specifications
Removal and installation the steering knuckle
Removal and installation the front suspension strut
Removal and installation front adaptive suspension parts
Car Wheel Alignment Angles — General Information
Adjusting the camber and toe-in of the front wheels
Read similar articles on other Skoda models

➧ Removal and installation the anti-roll bar Skoda Fabia 1 (1999-2007)
➧ Anti-roll bar — removal and installation Skoda Rapid 1 (2012-2022)
➧ Description of the design of the anti-lock braking system ABS Skoda Octavia 1 (1996-2004)
➧ Removal and installation the anti-roll bar Skoda Superb 2 (2008-2015)
➧ Anti-roll bar — removal and installation Skoda Kodiaq 1 (2016-2024)
➧ Removal and installation the rear anti-roll bar Skoda Felicia (1994-2001)
Link to this article in various formats
Reviews and comments of visitors
No comments yet


Add two numbers: 31 + 45


Yeti (2009-2017) 
  • General information
  • Introduction to manual
  • Controls and instruments
  • Maintenance
  • Power unit
  • Petrol engine 1.2 l
  • Petrol engine 1.4 l
  • Petrol engine 1.8 l
  • Diesel engine 2.0 l
  • Cooling system
  • Power and control system
  • Exhaust system
  • Ignition and preheating systems
  • Starting and charging system
  • Transmission
  • Clutch
  • Manual gearbox
  • 7-speed gearbox DSG «0AM»
  • 6-speed gearbox DSG «02E»
  • Drive shafts
  • Chassis (running gear)
  • Brake system
  • Front suspension
  • Rear suspension
  • Steering
  • Body and interior
  • Heating and air conditioning
  • Exterior (external elements)
  • Interior (internal elements)
  • Electrical equipment
  • Equipment and devices
  • Lighting and signaling
  • Electrical diagrams
SkodaBook.ru © 2018–2026 | Mobile version | Articles on Skoda | Sitemap EN BG BY UA RS HR RO PL SK HU | Feedback | Site search | Bookmark
Fabia 1 (1999-2007) | Fabia 2 (2007-2014) | Rapid 1 (2012-2022) | Octavia 1 (1996-2004) | Octavia 3 (2013-2019) | Superb 2 (2008-2015) | Kodiaq 1 (2016-2024) | Yeti (2009-2017) | Favorit (1987-1994) | Felicia (1994-2001) |
By continuing to use the site, you agree to the use of cookies.