



Models with DSG "02E"
1. Remove the DSG (see Chapter 7) together with the angular transmission, fix it on the mounting stand.
2. Unscrew the conical bolt securing the right flange shaft using the T10107A head. In this case, to prevent the shaft from turning, screw two bolts into the flange, insert a metal rod between them and hold the flange by it. Do not remove the right flange shaft.
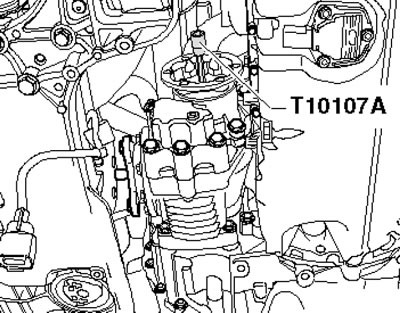
6.2. Unscrewing the bolt of the right flange shaft
3. Remove the bolts (see illustration) and carefully separate the angular gear from the DSG.
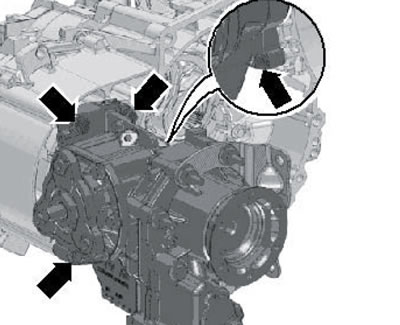
6.3. Angle gear mounting bolts
4. Lubricate the differential splines with G 000 100 clutch spline grease. Install the angular gear and slide it onto the DSG until it stops. If the splines do not match, turn the flange shaft. Only when the angular gear is pressed against the DSG, tighten the new bolts securing it in a diagonal order.
5. Tighten the right flange shaft bolt.
6. Install the DSG assembly. Finally, check and, if necessary, adjust the oil level in the angular gear.
Models with manual transmission "02Q"
7. Loosen the front wheel mounting bolts and front hub bolts (see Section 2).
8. Jack up the car and place it on reliable supports. Remove the front wheels.
9. Remove the sound insulation under the engine compartment (see chapter 11).
10. Perform the actions described in paragraphs 14-20 Section 5 Chapter 6.
11. If present, remove the bolts (1 in illustration 4.40 Chapter 1) and remove the heat shield (A) of the drive shaft. On models with additional heater, remove coolant pipes (B) from angular gear and engine (2) without opening the coolant circuit. Disconnect left drive shaft (C) from manual transmission flange shaft and tie up drive shaft as far as possible without damaging protective coating of shaft.
12. Unscrew the bolt (1 in the illustration) fastening the right flange shaft using the T10107A head. On models without a particulate filter, the right flange shaft remains in the angular transmission. On models with a diesel particulate filter, remove it together with the bracket (see Chapter 4).
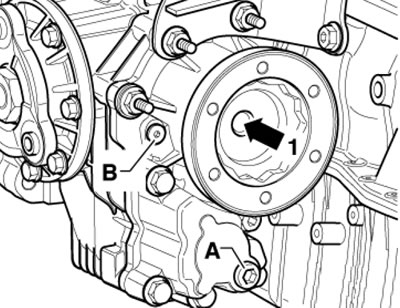
6.12. Bolt (1) of the right flange shaft
13. Install a container for collecting oil under the angular transmission, screw the T10037 puller into the right flange shaft. Insert the MP3-410 support part between the manual transmission support and the T10037/1 nut, position the puller with the support (A) parallel to the flange and remove the flange shaft.
Note: The puller is used to prevent damage to the multi-faceted bearings when removing the flange shaft.
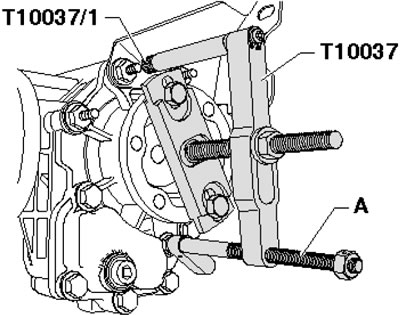
6.13. Removing the right flange shaft
14. Remove the turbocharger support (And in illustration 5.22 Chapter 6). Unscrew the hollow bolt (B) and remove the support. Remove the bolts (1-3) of the manual transmission support. On models without a particulate filter, remove the bolts securing the manual transmission support to the engine and to the angular gear, and then remove the manual transmission support.
15. Unscrew the lower bolts securing the manual transmission to the engine (see illustration).
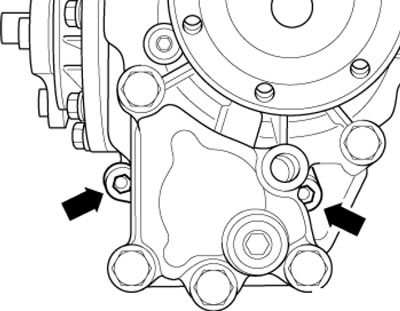
6.15. Lower bolts for fastening the angular transmission to the manual transmission
16. Some models have a heat shield on the top side of the angular gear (And in the illustration). Remove bolt (B) from below and bolt (C) from above and carefully separate the angular gear from the manual transmission.
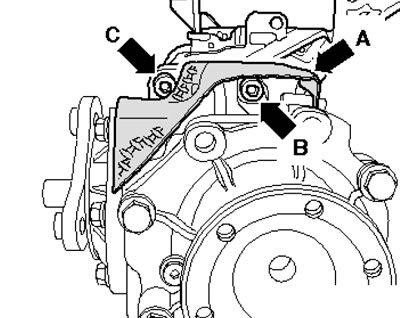
6.16. Angle gear fasteners
17. If a new angular gear is installed, relocate the heat shield to it (see illustration).
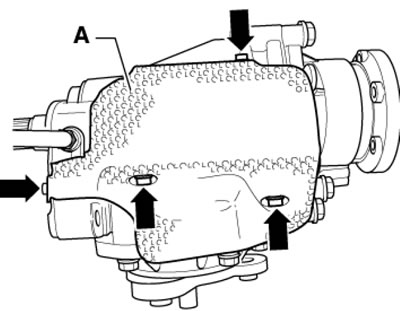
6.17. Fastening the heat shield to the angular transmission
18. Lubricate the differential splines with G 000 100 grease for clutch splines. Install the angular gear and slide it onto the DSG until it stops. If the splines do not match, turn the flange shaft. Only when the angular gear is pressed against the DSG, tighten the new bolts securing it in a diagonal order.
19. Further installation is carried out in reverse order. Finally, check and, if necessary, adjust the oil level in the angular gear.