



Attention:
- After an accident, it is always necessary to perform a complete technical check of the passive safety system components described below.
- Inertia seat belt tensioners.
- Seat belt locks (buckles).
- Seat belt tension sensor (if the car is equipped).
- Front seat belt buckle support.
- Seat belt height adjuster.
- Child seat mounting bracket.
- Automatic belt tensioner locking device when a child seat is installed.
If any faults or malfunctions are detected in the operation of the seat belts and their components, the entire seat belt system must be replaced. Failure to comply with these instructions may result in serious consequences in the event of an accident.
After an accident in which the automatic seat belt pretensioners are deployed, the pretensioner assemblies must be replaced.
Attention:
- When carrying a non-deployed inflator module, hold it so that the opening from which the airbag deploys is facing away from you. This will help avoid serious injury in the event of an unexpected activation of the squib. Do not carry the gas generator module by the wires. Do not carry the gas generator module by holding the connector on the bottom of the module.
- When leaving a non-working gas generator module on any surface, it should be placed so that the cushion and its facing cover are facing upwards. This is necessary so that in the event of an unexpected activation, the airbag can deploy freely.
- Do not place the steering column in a vertical position resting on the steering wheel if the airbag module has not deployed. This may result in injury.
Removal
1. Set the front seat to the forwardmost position using the adjusters.
2. Remove the rear mounting screws (3) and (4) shown in the figure below.
3. Move the front seat to its rearmost position using the adjusters as shown in the figure below.
4. Remove the front seat mounting screws (1) and (2) as shown in the figure below.
5. Remove the front seat (5) from the vehicle interior as a unit
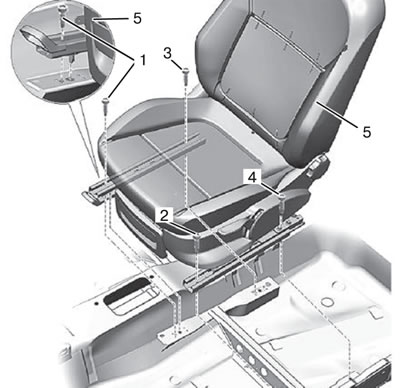
Caution: To avoid damage to the seat adjustment lever, seat trim, or seat belt buckle, be extremely careful when removing the seat from the vehicle.
Installation
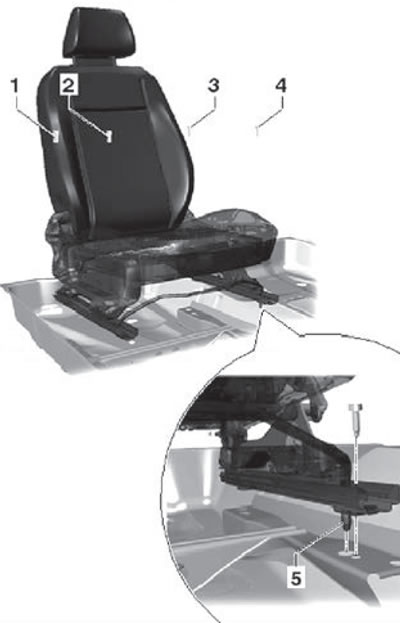
1. Install the seat (5) into the vehicle interior as a whole. Align the seat posts with the holes in the underbody of the vehicle using the guide pin shown in the figure below.
2. Move the front seat to the rearmost position using the adjuster.
3. Install and tighten the front mounting screw (4) shown in the figure below on the center tunnel side. Tightening torque of the mounting screw during installation: 40 Nm.
4. Install and tighten the front mounting screw (2) shown in the figure below from the door opening side. Tightening torque of the mounting screw during installation: 40 Nm.
5. Move the front seat to the forwardmost position using the adjuster.
6. Install and tighten the rear mounting screw (3) shown in the figure below on the center tunnel side. Tightening torque of the mounting screw during installation: 40 Nm.
7. Install and tighten the rear mounting screw (1) shown in the figure below on the door opening side. Tightening torque of the mounting screw during installation: 40 Nm.
Removal and installation headrest guides
Removal
1. Remove the front seat assembly.
2. Remove the front seat belt buckle (for more details, see the relevant section in the chapter "Passive safety").
3. Remove the front seat side cover assembly.
4. Remove the front seat side cover assembly.
5. Remove the front seat back trim panel assembly.
6. Unlock the locking mechanism of the front seat headrest guide by pressing the button.
7. Pull to remove the guide from the seat back, above the button.
8. Unlock the locking mechanism of the front seat headrest guide.
9. Pull the headrest guide to remove it from the front seat back.