
Installing the front turn signal lamp
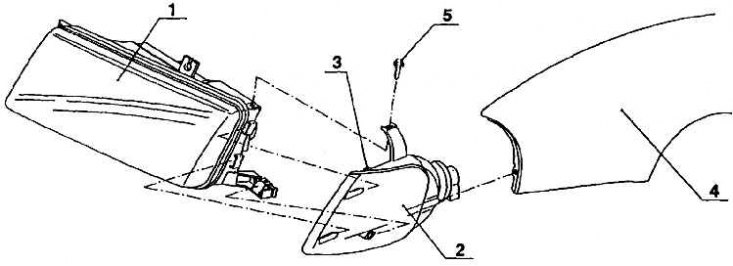
1 - headlight; 2 - lamp of the front direction indicator; 3 - emphasis; 4 - wing; 5 - bolt
Main headlight - mounting reamer
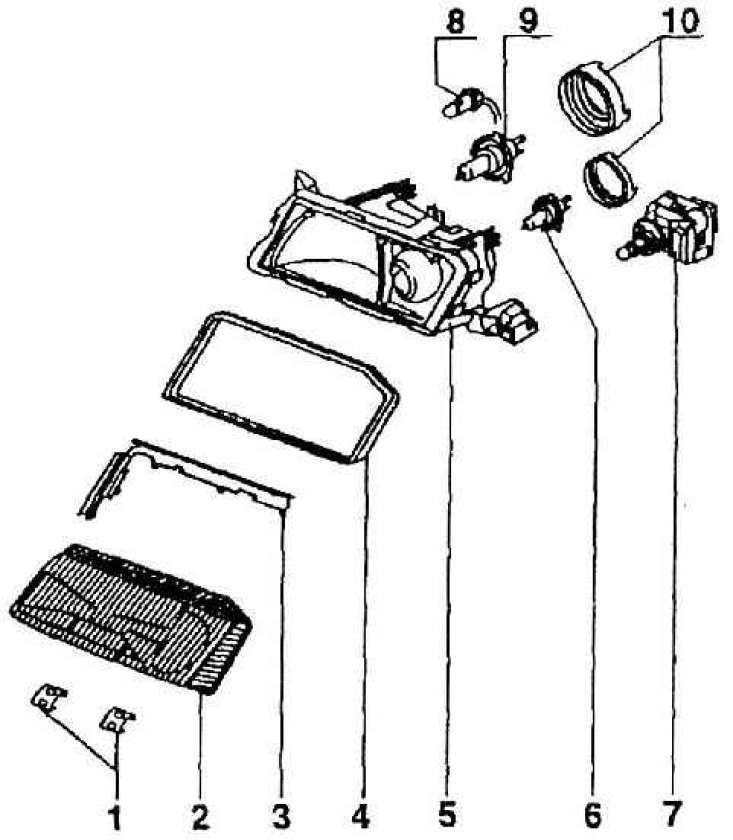
1 - bracket; 2 - light-scattering glass; 3 - headlamp seal; 4 - glass seal; 5 – insert body; 6 - lamp H4 (12V, 60/65W); 7 - the engine of the command device for tilting the headlights; 8 - side light lamp W5W (12V, 5W); 9 - fog lamp lamp NC (12V, 55W); 10 - cover
Headlight adjustment (right headlight)
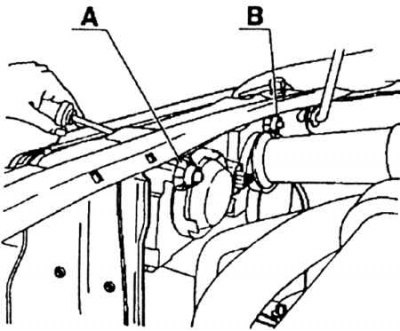
A - adjustment in the vertical direction;
B - adjustment in the horizontal direction
Values and method of headlight adjustment
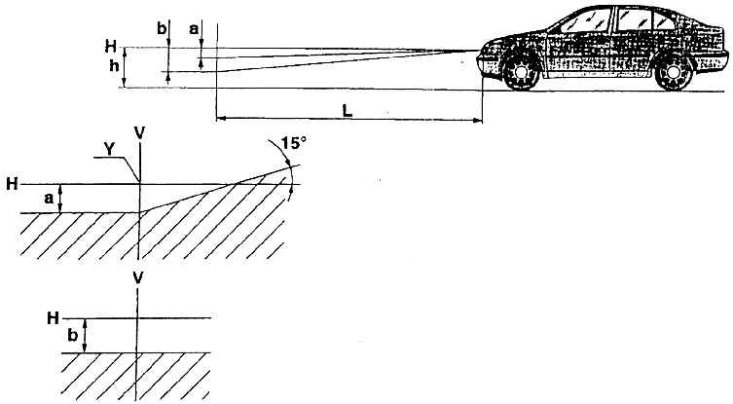
y - optical axis of the headlight L -10 m h - the middle point of the headlight a - low beam setting 1.2% b - fog lamp setting 2%
In addition to versions of the vehicle with steering on the left or right side, the headlights are also available in double version (see fig. Installation of the lamp of the forward indicator of turn, fig. Main headlight - mounting reamer). Headlights without a built-in fog lamp are intended for the LX modification car. GLX and SLX vehicles have an integrated fog lamp. The headlight housings, which either have or do not have an opening for a fog lamp socket, also correspond to these two versions. The optical insert is also different, having (in version with fog lamp) on the side of the lens of this headlight. The relief on the glass depends on the design of the headlight.
The glass along the contour is laid on a rubber seal and pressed against the optical insert by seven elastic brackets. This allows the glass to be replaced independently. Lamps of the main headlights - H4, fog lamps - H3. The headlight also houses the front position light (5 W).
The plastic housing of the headlight is fixed on the front wall of the body (in pre-assembly) four bolts. The lamp sockets can be accessed from the engine compartment after removing the rubber plugs.
Connection to the electrical wiring is carried out using a six-pole connector inserted into the headlight housing. The headlights are set to the main position by two swivel plastic gears of the tilt mechanisms. They are located on the sides of the upper face of the optical insert. One mechanism tilts the optical insert in its longitudinal axis, the second one in the direction of the vertical axis. Adjusting elements can be turned either from the outside with a screwdriver inserted into the slots on the optical insert, or by hand from the engine compartment (see fig. Headlight adjustment (right headlight)).
Installation parameters are shown in fig. Values and method of headlight adjustment.
Adjustment Conditions:
- the car is installed on a horizontal surface;
- the fuel tank is filled to 90%, not less;
- tire pressure according to manufacturer's setting (loaded vehicle condition);
- load 75 kg on the driver's seat;
- broken chassis.
The headlights also have tilt adjustment from the main position, namely with the help of an electric servomotor (activated by pressing a button on the dashboard). The range of this adjustment does not exceed the limits of the permitted headlight installation tolerance specified in the transport instructions. There are also two brackets on the headlight housing for mounting a separate front turn signal lamp and a flat steel spring for fixing the lamp.