



Auxiliary engine parts and units
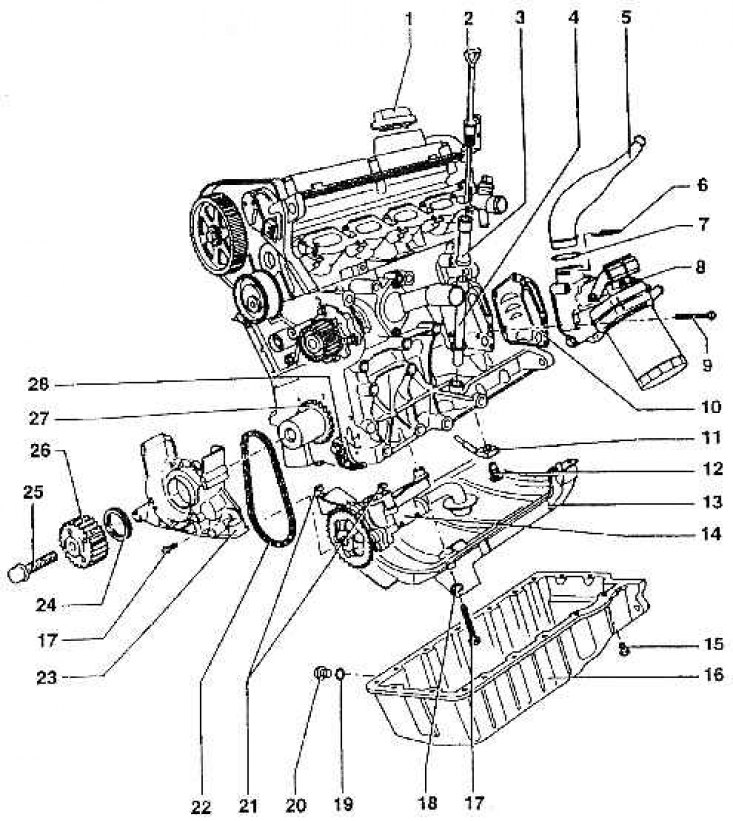
1 – filler cap; 2 – oil dipstick; 3 – oil dipstick guide pipe; 4 – oil dipstick guide tube; 5 – connecting tube for deaeration of the engine crankcase; 6 – bracket; 7 – sealing washer; 8 – oil filter bracket; 9 – bracket bolt; 10 – partition in the oil flow; 11 – excess pressure valve (opens at excess pressure of 0.25–0.32 MPa); 12 – oil nozzle; 13 – oil overflow barrier; 14 – chain driven oil pump; 15 – lower engine cover mounting bolt; 16 – lower engine cover; 17 – oil pump mounting bolt; 18 – compensating insert; 19 – sealing washer; 20 – oil drain bolt (M = 30 Nm); 21 – centering inserts; 22 – oil pump drive chain; 23 – front sealing cover; 24 – crankshaft sealing washer – gufero; 25 – belt drive pulley mounting bolt; 26 – timing mechanism drive pulley; 27 – oil pump drive sprocket; 28 – chain tensioner
Generator, power steering pump and air conditioning pump bracket
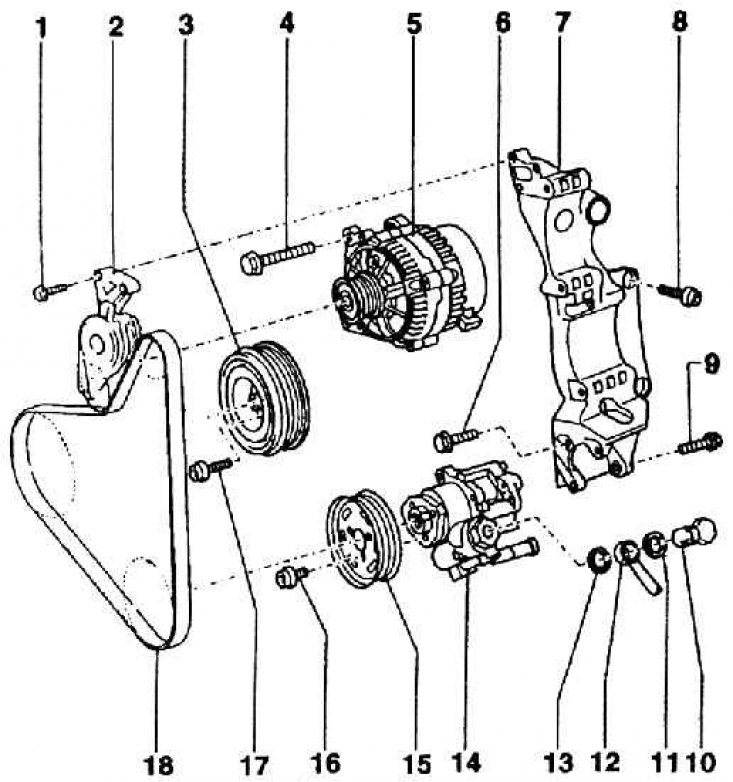
1 – tensioner mounting bolt for multi-ribbed belt; 2 – tensioner for multi-groove belt; 3 – pulley with vibration damper; 4 – generator mounting bolt; 5 – generator; 6 – bolt; 7 – bracket; 8 – bracket mounting bolt; 9 – power steering pump mounting bolt; 10 – flow bolt; 11 – sealing washer; 12 – eye of the supply pipeline; 13 – sealing washer; 14 – pump (vane pump) power steering; 15 – pump pulley; 16 – pulley bolt; 17 – pulley bolt; 18 – multi-groove belt
Oil filter bracket with deaeration and auxiliary parts
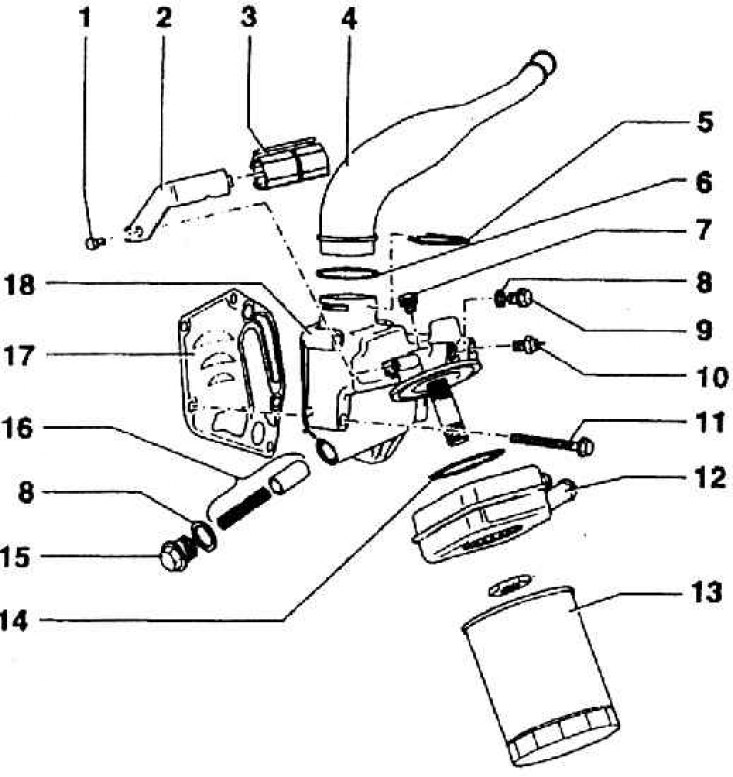
1 – bracket bolt; 2 – bracket; 3 – guides; 4 – connecting tube; 5 – bracket; 6 – sealing washer; 7 – locking screw; 8 – sealing ring; 9 – locking screw; 10 – baroscope (turns on at 0.14 MPa); 11 – oil filter bracket bolt; 12 – oil radiator; 13 – oil filter; 14 – sealing washer; 15 – locking screw; 16 – excess pressure valve (opens at a pressure of 0.35–0.45 MPa); 17 – partition in the oil flow; 18 – oil filter bracket
Installation of an oil pump and a partition preventing rapid oil overflow
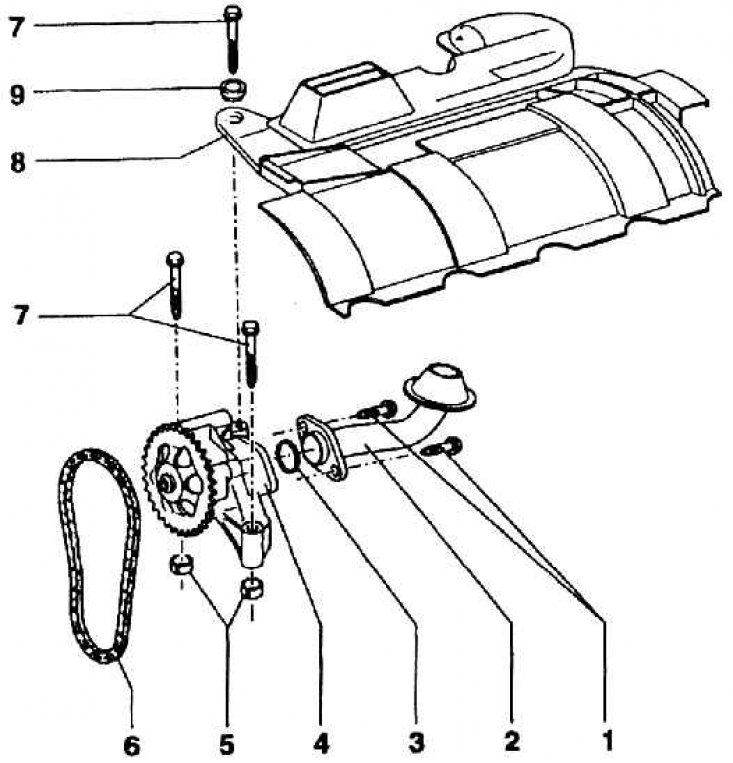
1 – suction tube mounting bolt; 2 – oil suction pipe; 3 – sealing washer; 4 – oil pump with drive sprocket; 5 – centering bushings; 6 – oil pump drive chain; 7 – oil pump mounting bolt; 8 – partition against oil overflow; 9 – compensating gasket
Lambda control in combination with a controlled catalytic converter is the most effective way to eliminate harmful substances from the exhaust products of a gasoline engine.
The activity of the triple-acting catalyst is optimal as long as the engine operates in a narrow region of the stoichiometric mixture ratio (weight), designated as lambda = 1. Lambda shows how much the actual value of the mixture ratio differs from the theoretical one. Therefore, a comparison is constantly made whether the exhaust gases contain excess fuel, which may appear there as a result of incomplete combustion.
The oxygen or lambda probe is located in the exhaust gas flow (in cars with a 1.8–92 kW engine, in the front cone of the catalytic converter). After starting the engine, it needs to warm up well to reach its operating temperature. It will reach this temperature in 20–30 seconds, and the entire lambda control system comes into play.
The ceramic material of the oxygen probe is permeable to oxygen ions at a temperature of at least 300°C. The outer surface of the ceramic is in the exhaust gases, while the inner part is in the normal atmosphere. The difference in the concentration of oxygen ions forms a signal, which is a measure of the oxygen content in the exhaust gases. In the control unit of the BOSCH-MOTRONIC system, this signal is used to change the injection time in such a way that the mixture ratio changes. In this way, the lambda signal = 1 (0.99–1.01) is maintained. The catalytic converter is a multi-link ceramic monolith, the surface layers of which are composed of three noble metals: platinum, palladium and rhodium in a ratio of 1:14:1. In order to heat the catalytic converter to operating temperature as quickly as possible after a cold start, the ignition point must be moved back by 15° of crankshaft rotation and the idle speed must be increased slightly. This means that more energy is released from the exhaust gases and the heating time is reduced by almost half.
The following components also belong to the engine assembly (see fig. Auxiliary parts and engine units).
The generator - power steering pump - air conditioning compressor bracket is located on the left side of the engine (from the front, when looking in the direction of travel). The generator and power steering pump are mounted on the bracket (see fig. Generator, power steering pump and air conditioning pump bracket).
The coolant pump is located in the crankcase cavity on the side of the valve timing gears and is driven by a toothed belt transmission together with them. The pump is a compact assembly unit and in case of a malfunction, it is also subject to replacement at a service center as a unit. The impeller of the pump is of the turbine type. It is attached to the engine crankcase with a flange, which is part of the pump. The flange is screwed with two M8 bolts into threaded holes in the crankcase, which simultaneously hold the protective casing behind the toothed belt transmission of the pump drive. The seal to the block is provided by a rubber washer. The pump bearings are filled with consistent grease.
The engine lubrication is circulation, under pressure, with full oil filtration. The amount of engine oil when changing it is 3.5 l. The recommended oil is given in the MAINTENANCE INSTRUCTIONS and here we can only add that the engine oil must meet the standard TL 52 107 (VW 50000 or VW 50101, ACEA A2). The dipstick is made from a steel strip and is inserted into a tube installed in a hole in the engine crankcase and attached at the top to the intake module.
The lubrication system contains a pressure switch - a baroscope, which acts as a reverse action switch. If there is no pressure on its contacts, the switch is on, the control lamp lights up. If the oil pressure rises by 0.015±0.01 MPa, the lamp goes out. The baroscope's operating range is from 0.015 to 0.035 MPa.
Deaeration of the engine crankcase is performed using an oil separator. It is made of plastic and is installed on the engine block-crankcase under the suction pipe. The oil separator is connected to the air filter tube by a hose. Thus, oil vapors get into the incoming air (see fig. Oil filter bracket with deaeration and auxiliary parts). Oil pump assembly (see Fig. Installation of oil pump and partition preventing rapid oil overflow) connected to the suction screen (located in the space between the partitions of the lower engine cover) hose. The pump is gear-driven and is driven by a roller chain from the crankshaft sprocket. At a pump speed of 1000 1/min. and an engine oil temperature of 80°C (oil 20 SAE) the recommended amount is 7.1 l (those. approximately 6 kg) per minute at a pressure of 0.4–0.5 MPa.
The pump is mounted in the lower part of the engine crankcase with the ability to set the chain tension when moving the pump. There is an excess pressure valve on the pump casing, which provides the ability to return oil at an excess pressure of 0.4–0.5 MPa. The mesh on the pump casing catches dirt and can be cleaned. The oil filter is intended for single use. It should always be changed at the same time as the engine oil. The filter is designed for a full oil flow (M = 15–20 Nm).
The lower engine cover is made of die-cast aluminum. The cover is attached to the engine block with seventeen M6 bolts. A sealing mastic is applied between the seating surfaces of the block and the cover. The oil drain plug has an M14 x 1.5 thread and a 19 mm Allen key. The plug is sealed with a metal washer, which is replaced each time the plug is tightened.
The cover has partitions that reduce oil overflow. Between them is the suction screen of the oil pump.