
Removal and installation of a cover of a larva of the lock of a forward door
Note: When removing the protective cover of the lock cylinder, the screwdriver must not be twisted or pried off with the screwdriver.
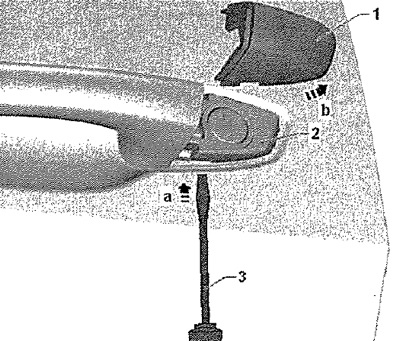
Remove door handle. Insert a thin screwdriver -3- with light force -arrow a- into the hole on the underside of the lock cylinder cover. Pull lock cylinder cover -1- together with a screwdriver on the underside away from the door -see Fig. arrow b-. Remove the cover from the lock cylinder by sliding it up.
Installation
Remove door handle -1-. Attach the cover -2- from above, deviating slightly from the vertical, arrow a- to the lock cylinder. Press lock cylinder cover -2- against door -see illustration. arrow b- so that the protective strip is fixed on the lock cylinder.

Removal and installation of the lock cylinder
Note: The lock cylinder is only available on the driver's door.
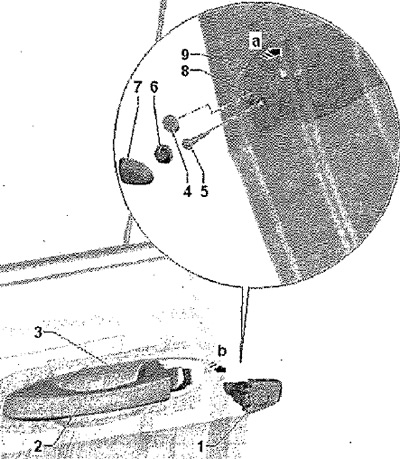
The lock cylinder cover has been removed. Remove covers -4 and 6- or cover -7-. Remove screw -5-. Loosen screw -8- as far as it will go so that it releases the lock cylinder. Remove door handle -2-. Remove the lock cylinder housing -1- at a right angle -arrow b- to the door from the handle housing -3-.
Installation
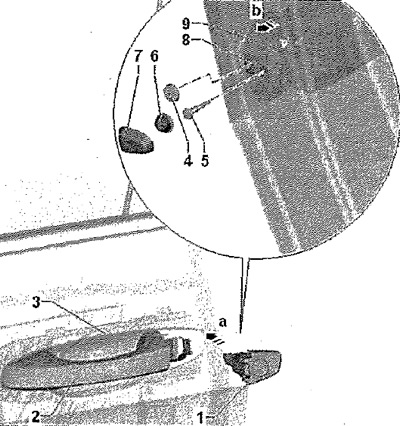
Remove door handle -2- -arrow a-. Insert lock cylinder housing -1- at a right angle -arrow b- to door into handle housing -3-. Screw screws -5 and 8- into handle housing. Tightening torque for screws -5 and 8- (2.2 Nm).
Note: During assembly, press the body of the lock cylinder against the outer door panel.
Installation in reverse order. Then be sure to check the operation of the lock with the door open.