Note: To adjust the door, the vehicle must be on wheels. The door is adjusted correctly if, in the closed position, the gap is the same around the entire perimeter, the door is not recessed and does not protrude. After installation or adjustment, perform anti-corrosion treatment of hinges and screws.
Adjust gaps
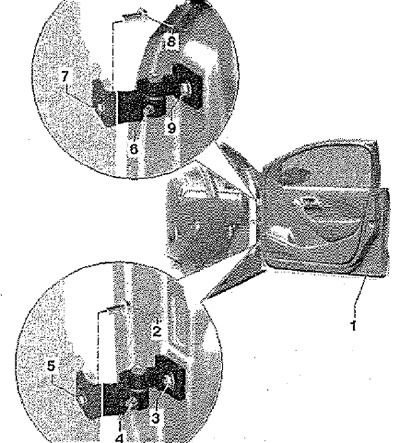
Loosen the screws -2, 5, 7, and 8- on the A-pillar in order to adjust the gaps correctly. To loosen the screw -5-, the bottom trim of the A-pillar must be removed: To loosen the screw -7-, the instrument panel on the driver's side must be removed. To loosen the screw -7-, the glove box on the passenger side must be removed. Loosen screws -3 and 9- to correctly adjust the door installation depth.
Note: Other adjustment methods, such as moving the door upwards, will not work. Subsequently, the door will still sag under its own weight.
Lock shackle adjustment
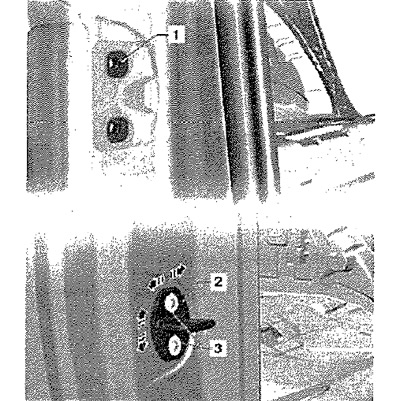
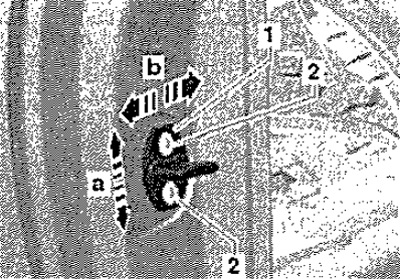
Note: The metal sheet covering the plate is permanently welded to the post. The ribs fixing the plate are subject to elastic deformation. More force is required to move the clip -2- with the screws -3- loosened. The door should not have play, and when closing, the door lock should snap into place completely without much effort. When adjusting the striker, do not press on the door from above or below.
Adjustment by changing the position of the lock bracket is made: when the front door is not flush with the rear door or sidewall. Loosen bracket -1- by releasing screws -2- on pillar B. By adjusting bracket -2- ensure that the front door in the closed position is flush with the rear (to reduce aerodynamic noise). Tighten screws -2- securing bracket -1-.
- Tightening torques: Screws 2-20 Nm.