
Removing and installing the glass cover
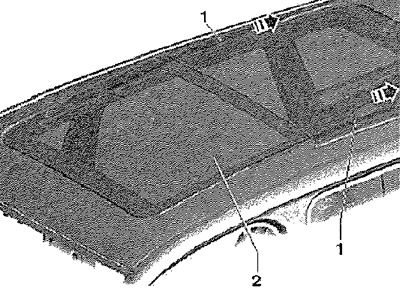
Open the glass lid -2- until the trims -1- are accessible. Move trim -1- from passenger compartment to rear in direction of -arrow-.
Note: Use a magnetized tool to loosen the screws so that the screws do not fall into the sliding sunroof mechanism.
Detach seal -3- from mounting frame. Release screws -2- of glass cover -1- on left and right. Pull glass cover upwards -arrows-.
Installation
Note: When installing the glass cover, use only new screws. Use a magnetized tool to screw in the screws to prevent the screws from falling into the sliding sunroof rail.
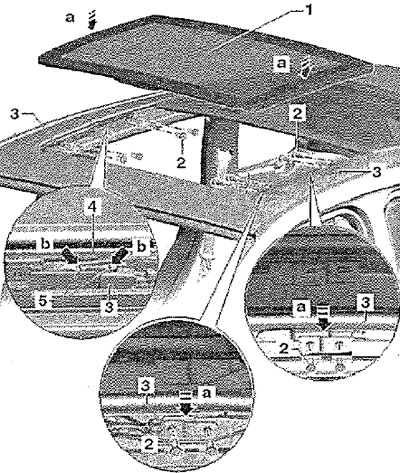
If necessary, move the sliding mechanism -3- on both sides until the markings -5- line up -arrows b-. Insert the glass cover -1- from above -arrows a- into the sliding mechanism -3-. Screw in screws -2-, but do not tighten. Adjust the front of the glass cover. Tighten screws -2-. Tightening torque - 7 Nm. Place trim -2- on glass cover -1- and push it onto the holder. After all work is completed, perform an installation run on the sliding sunroof motor.
Removing and installing the back of the glass cover
Note: Use a magnetized tool to loosen the screws so that the screws do not fall into the guide of the sliding sunroof.
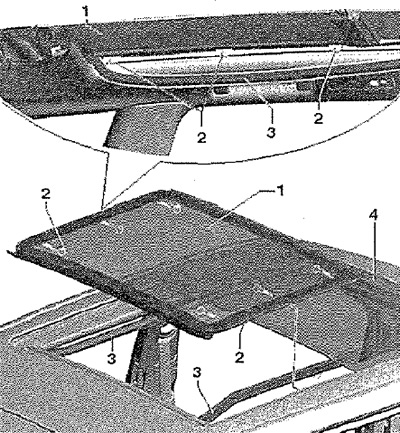
Detach seal -3- from mounting frame. Release screws -2- of glass cover -1- on left and right.

Slightly slide the rear part of the glass cover -1- under the front part -3- -arrow a-. Remove the rear part of the glass cover -1- from the opening -2- only in its rear part -arrows b-. Slide the rear part of the glass cover -1- diagonally upwards -arrow c- above the roof -2- and pull it out from under the front part of the glass cover -3-.
Installation
Note: When installing the glass cover, use only new screws. Use a magnetized tool to screw in the screws to prevent the screws from falling into the sliding sunroof rail.
Installation in reverse order. Place the rear part of the glass cover -1- diagonally from above under the front part of the glass cover -3-. Insert the rear part of the glass cover -1- downwards into the -rear part of the opening -2- and then push it back. Screw in screws -2-, but do not tighten. Adjust rear part of glass cover -1-. After adjusting the back of the glass cover, tighten the screws. Tightening torque - 7 Nm.
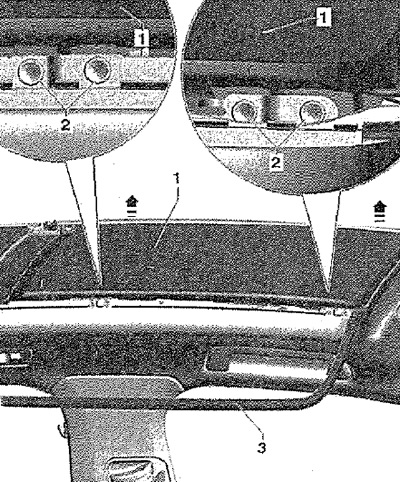
Height adjustment check
Note: The front part of the glass lid is only adjustable at the front edge, the rear part is only adjustable at the rear edge. To ensure the best view, make sure that the left and right side adjustments are as even as possible (symmetrically). The arrow shows the direction of movement.
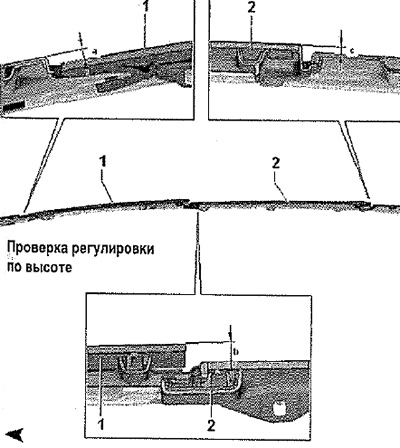
Using a depth gauge, check the adjustment of the front part of the glass cover -1- and the rear part of the glass cover -2-.
- Size -a-: 1.5 +1 mm
- Dimension -b-: 1 +1 mm
- Size -c-: 1±1 mm
If the measured values deviate from the specified values, the glass cover must be adjusted. Adjust the front of the glass cover. Adjust the back of the glass cover.