
Company vehicles Hyundai Company vehicles Kia Company vehicles Lada Company vehicles Mazda Company vehicles Mercedes-Benz Company vehicles Opel Company vehicles Mitsubishi
English Русский
Български
Беларускі
Український
Српски
Hrvatski
Română
Polski
Slovenský
Magyar
Articles   
Bookmark Contacts Sitemap
SkodaBook.ru


Fabia Rapid Octavia Superb Kodiaq Yeti Others
Kodiaq 1 (2016-2024)

Removal and installation a coil spring (Skoda Kodiaq NS7)

  • Main
  • Kodiaq
  • NS7 (2016-2024)
  • Chassis (running gear)
  • Rear suspension
  • Removal and installation a coil spring
0
Contents: Removal ⬇ Installation ⬇

Removal


1. Unscrew the wheel bolts.

2. Raise the car.

3. Remove the wheel.

4. Compress the petals (arrows) of the guide assembly (1) as shown in the figure below.

5. Remove the guide (1).
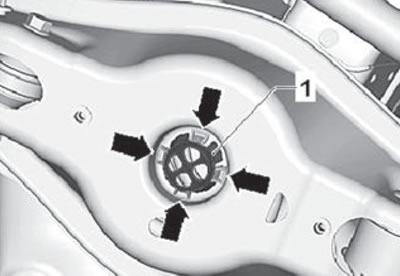
5. Remove the guide (1).


6. Install the suspension spring compressor (3) as shown in the figure below.

Caution: Ensure proper seating of the coil spring in the retainer -VAG 1752/ZA-2- (danger of accident).


7. Compress the spring assembly using a special tool.

Note: Use a wrench or ratchet to turn the tie rod screws.
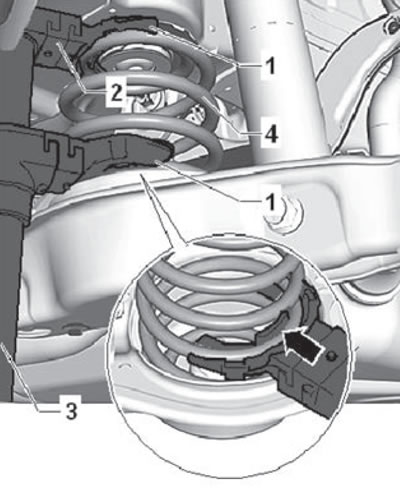

1. Capture «VAG 1752/ZA»; 2. Adapter «VAG…

1. Capture "VAG 1752/ZA"; 2. Adapter "VAG 1752/9"; 3. Suspension spring compressor "VAG 1752/1"; 4. Spring.


8. Install a special jack VAG 1383/A under the lower arm of the rear suspension and load it so that the shock absorber is compressed.


9. Remove the rear suspension spring (for more details, see the relevant section in this chapter).

10. Unscrew the nut (1) and remove the bolt (2) of the fastening (3), shown in the figure below.
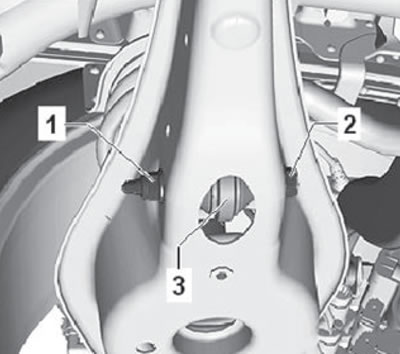
10. Unscrew the nut (1) and remove the bolt (2)…


11. Loosen the mounting nut (1) and remove the mounting bolt (2) of the shock absorber, shown in the figure below.

12. Loosen the mounting nut (3) and remove the mounting bolt (4) of the rear wheel axle, as shown in the figure below.

13. If necessary, disconnect the exhaust pipe from the suspension brackets.
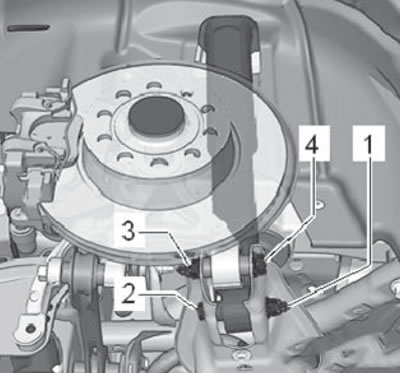
13. If necessary, disconnect the exhaust pipe…


14. Very carefully lower the jack together with the suspension arm.

15. Remove the rear suspension spring assembly.

Installation


1. Installation is carried out in reverse order. In this case, take into account the following:


  • Check if the lining is damaged.
  • Replace if necessary.
  • Place the lining on the lower coil of the spring. The end of the spring coil "arrow" should be adjacent to the stop of the lower spring gasket.
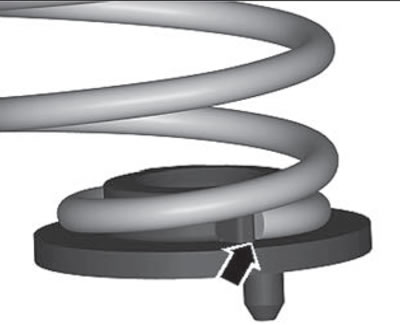
Place the lining on the lower coil of the spring.…

  • Install the spring together with the lining.
  • There is a cylindrical protrusion at the bottom of the lining.
  • This protrusion must be inserted into the hole in the lower control arm "arrow" as shown in the figure below.
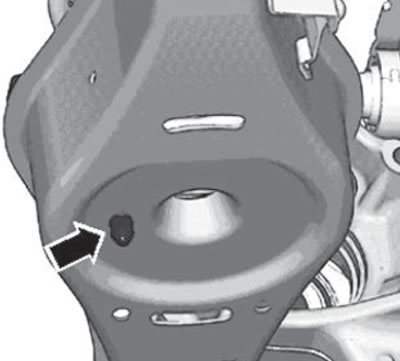
This protrusion must be inserted into the hole in…

  • Place the top lining on the top coil of the spring.
  • The flange of the upper lining "arrow" must fit against the spring in the correct position.
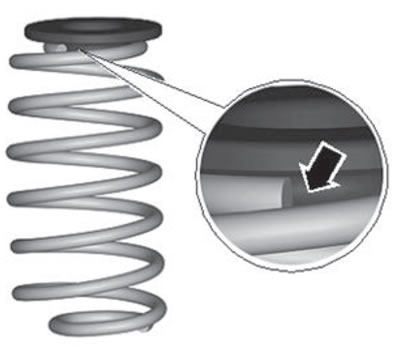
The flange of the upper lining «arrow» must fit…

  • Spread the jaws of the spring compressor until the recess in the upper spring pad aligns with the corresponding protrusion on the body.
  • Remove the spring compressor.
  • Install the wheel and tighten the wheel bolts.
This article is available at russian, bulgarian, belarusian, ukrainian, serbian, croatian, romanian, polish, slovak, hungarian
Article verified: Eleonora Afanasyeva
Share with friends:
◀ Previous
Skoda Kodiaq 1: Rear suspension
Next ►

Removal and installation the wheel hub bearing unit
Rear shock absorber — removal and installation
Rear suspension link assembly — removal and installation
Lower wishbone — removal and installation
Removal and installation the upper control arm
Removal and installation the rear wheel axle
Rear suspension trailing arm
Read similar articles on other Skoda models

➧ Removal and installation a coil spring Skoda Fabia 2 (2007-2014)
➧ Clutch pedal with booster spring — removal and installation Skoda Rapid 1 (2012-2022)
➧ Removal and installation a coil spring Skoda Octavia 3 (2013-2019)
➧ Removal and installation of front and driver knee airbags, as well as… Skoda Superb 2 (2008-2015)
➧ Removal and installation of front and driver knee airbags, as well as… Skoda Yeti (2009-2017)
➧ High Voltage Ignition Coil — Removal, Checking and Installation Skoda Favorit (1987-1994)
Link to this article in various formats
Reviews and comments of visitors
No comments yet


Add two numbers: 33 + 30


Kodiaq 1 (2016-2024) 
  • General information
  • User manual
  • Controls and instruments
  • Maintenance
  • Power unit
  • Petrol engine 1.4 l
  • Petrol engine 2.0 l
  • Diesel engine 2.0 l
  • Fuel and control (petrol)
  • Fuel and control (diesel)
  • Cooling system (petrol 1.4 l)
  • Cooling system (petrol 2.0 l)
  • Cooling system (diesel 2.0 l)
  • Lubrication system (petrol)
  • Lubrication system (diesel)
  • Intake and exhaust (petrol 1.4 l)
  • Intake and exhaust (petrol 2.0 l)
  • Intake and exhaust (diesel 2.0 l)
  • Transmission
  • Clutch
  • Manual gearbox
  • Automatic gearbox
  • Drive shafts
  • Chassis (running gear)
  • Front suspension
  • Rear suspension
  • Wheels and tires
  • Brake system
  • Steering system
  • Body and interior
  • Exterior (external elements)
  • Interior (internal elements)
  • Doors, locks and windows
  • Heating and air conditioning
  • Security systems
  • Electrical equipment
  • Power devices
  • Equipment and devices
  • Electrical circuits
  • Electrical circuits (petrol 2.0 l)
  • Electrical circuits (halogen headlights)
  • Electrical circuits (LED headlights)
  • Electrical circuits (Climatronic)
SkodaBook.ru © 2018–2026 | Mobile version | Articles on Skoda | Sitemap EN BG BY UA RS HR RO PL SK HU | Feedback | Site search | Bookmark
Fabia 1 (1999-2007) | Fabia 2 (2007-2014) | Rapid 1 (2012-2022) | Octavia 1 (1996-2004) | Octavia 3 (2013-2019) | Superb 2 (2008-2015) | Kodiaq 1 (2016-2024) | Yeti (2009-2017) | Favorit (1987-1994) | Felicia (1994-2001) |
By continuing to use the site, you agree to the use of cookies.