



Preparing for visual adjustment
The headlight adjustment must be checked in the following cases:
- When installing a new headlight capsule.
- If, during repair or maintenance of the front end of the vehicle, the headlights or their mountings were or could have been affected.
The headlight adjustment screen must meet the following criteria:
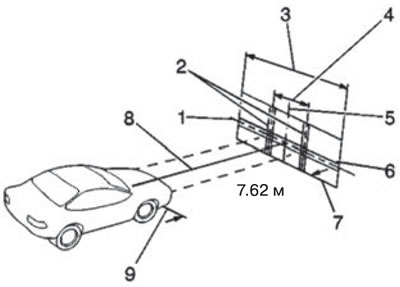
- To work, you need a flat horizontal area of sufficient size to accommodate the car and have an additional 7.62 m distance from
- surface of the headlights to the front surface of the adjustment screen.
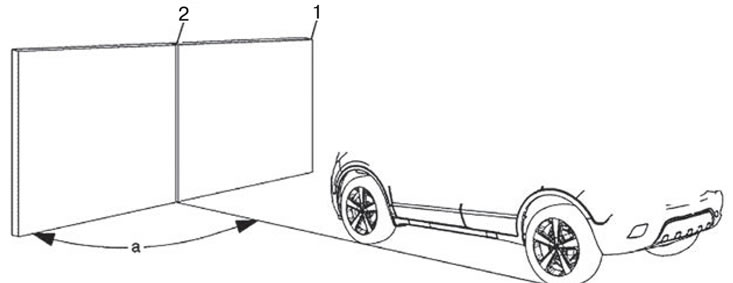
- The screen should be 1.52m high and 3.66m wide, with a matte white surface that is well shaded from ambient light. The screen must be properly adjusted relative to the surface on which the vehicle is parked. It is necessary to ensure that the screen is parallel to the car.
- The screen shall have a fixed vertical center line, two laterally adjustable vertical strips and one vertically adjustable horizontal strip.
- If a standard factory-made screen is not available, a vertical wall with a light, continuous surface approximately 1.83 m high and 3.66 m wide can be used as a screen. The surface must be painted with washable matt white paint.
- After installing the adjustment screen in a permanent place on
- draw a reference line on the floor directly under the headlights to indicate the correct position of the headlights during adjustment.
- Distance between headlights (1)
- Screen center line (2)
- Adjustable vertical pointer (3)
- Adjustable horizontal tape (4)
- Light screen diagram (5)
- Vertical center line in front of the right headlight indicator (6)
- 7.62 m (7)
- Car axle (8)
- Adjustable vertical pointer
- Horizontal center line of headlights
- The vertical center line in front of the left headlight
Before you begin adjusting your headlights, you must complete the following steps:
1. Clear the car of snow, ice and dirt.
2. The car's fuel tank must be full.
3. Stop all other work on the vehicle.
4. If any maintenance has been performed on the vehicle, ensure that all parts are in place.
5. The car must be on a horizontal surface.
Note: The car in the picture below is shown schematically.
6. The left tires of the vehicle must be parallel to the reference line coming from the screen when the headlights are installed along the reference line.
7. Do not load any cargo into the vehicle.
8. The driver's seat must have a load of approximately 75 kg.
9. Inflate the tires to the correct pressure.
10. If the vehicle is designed to carry heavy loads or tow a trailer, simulate loading the vehicle.
11. Rock the car to stabilize the suspension.
12. Turn on the headlights to low beam and watch the left and top edges of the high-light zone on the screen. The position of the edges of high-illumination zones must comply with the requirements.
The procedure for adjusting the direction of the headlight beam.
1. Open the hood.
2. Measure the distance from the floor to the center of the headlight bulb. Some headlights have a special dot on the lens for adjusting direction.
3. Measure the measured distance from the floor to the screen and place the horizontal tape at the measured distance.
4. Measure the distance from the reference line on the floor to the center line of the left headlight bulb.
5. Measure the measured distance from the reference line on the screen and place the vertical tape at the measured distance.
6. Measure the distance from the reference line at mid-point to the center line of the right headlight bulb.
7. Measure the measured distance from the reference line on the screen and place the vertical tape at the measured distance.
Caution: Do not cover the headlight. This may cause overheating.
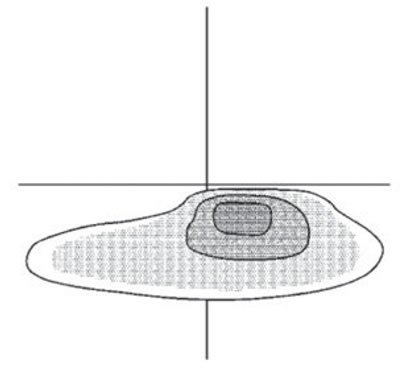
8. Turn on the low beam. Block the light beam between the passenger side headlight and the screen.
Please note: The headlights are not horizontally adjustable.
9. Adjust the headlight aim by turning the vertical and horizontal adjustment screw according to state and local regulations or as shown in step 8.
10. Repeat the procedure for adjusting the beam direction for the passenger side headlight, blocking the beam from the driver side headlight.
11. Turn off the headlights.
12. Close the hood.