Company vehicles Hyundai Company vehicles Kia Company vehicles Lada Company vehicles Mazda Company vehicles Mercedes-Benz Company vehicles Opel Company vehicles Mitsubishi
English Русский
Български
Беларускі
Український
Српски
Hrvatski
Română
Polski
Slovenský
Magyar
Articles   
Bookmark Contacts Sitemap
SkodaBook.ru


Fabia Rapid Octavia Superb Kodiaq Yeti Others
Octavia 1 (1996-2004) Octavia 3 (2013-2019)

Adjusting the hood (Skoda Octavia 5E)

  • Main
  • Octavia
  • 5E (2013-2019)
  • Body and interior
  • Exterior (external elements)
  • Adjusting the hood
0
Contents: Adjust setup buffers ⬇ Adjusting the hood lock ⬇ Adjusting the lock bracket ⬇
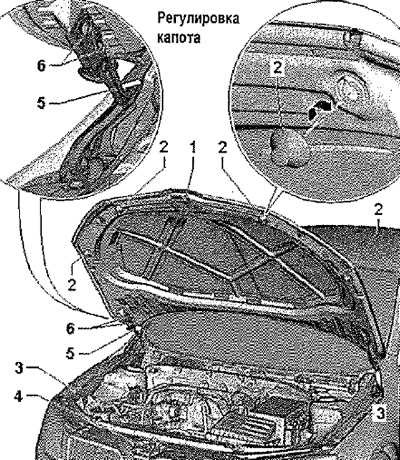
Note: To adjust the hood, the car must be on a level surface. Adjustable stops "2" on the left and right are not intended for adjustment. They are intended to stabilize or dampen the hood. The hood is adjusted correctly if it smoothly passes into other body panels, is not recessed inward or protruding outward, and has an even gap around the entire perimeter. The hood should be fixed in the lock without noticeable effort. Do not unscrew the screws, only loosen them.


Remove the lock bracket "1" by loosening the screws "6" on the hood hinges "5" on the left and right, the hood can be aligned relative to the wings. Make sure that the gaps are uniform.

Adjust setup buffers


Note: Insert buffers "2" on the left and right until they stop. If necessary, turn the installation buffers by 90° so that the bonnet lid has a slight support.


After the bonnet has been adjusted, the locking bracket "1" can be reinstalled and adjusted. The bonnet lock "4" can be used to adjust the height of the front of the bonnet relative to the front fenders. After the bonnet has been adjusted, the locking bracket installed and all connections tightened, the installation buffer can be unfolded if necessary. After adjustment work, apply anti-corrosion treatment to the hinges "5" and screws "6".
After the bonnet has been adjusted, the locking…


Adjusting the hood lock


Adjusting the hood lock


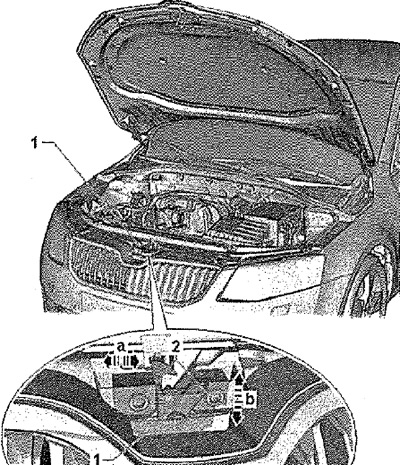
By loosening screws "2", you can adjust the position of lock "1" relative to the hood in the horizontal plane -arrows a- and in height -arrows b-. Tightening torque of screws (pos. 2): 12 Nm.

Adjusting the lock bracket
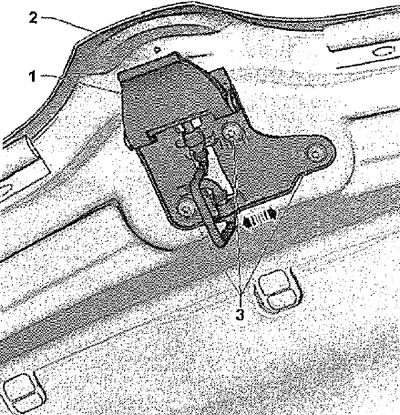


Adjusting the lock bracket


Loosen screws "3". Now bracket "1" can be adjusted by sliding it in the large holes. Tightening torque of screws (pos. 3): 10 Nm.
This article is available at russian, bulgarian, belarusian, ukrainian, serbian, croatian, romanian, polish, slovak, hungarian
Article verified: Anatoly Ovchinnikov
Share with friends:
◀ Previous
Skoda Octavia 3: Exterior (external elements)
Next ►

Removal and installation the hood release handle
Removal and installation the hood lock
Parts and components of the hood locking mechanism
Removal and installation the support rod
Removal and installation hood hinges
Trunk lid — design description
Removal and installation the trunk lid
Adjusting the trunk lid
Removal and installation the trunk lid lock
Removal and installation the gas-filled shock absorber of the trunk lid
Read similar articles on other Skoda models

➧ Hood — opening and closing Skoda Fabia 1 (1999-2007)
➧ Manual Air Conditioner — Adjusting the Unit Skoda Rapid 1 (2012-2022)
➧ Adjusting the rear view mirrors Skoda Superb 2 (2008-2015)
➧ Adjusting the gear shift mechanism Skoda Kodiaq 1 (2016-2024)
➧ Checking and adjusting the timing phases (setting TDC) Skoda Yeti (2009-2017)
➧ Adjusting valve clearance Skoda Favorit (1987-1994)
Link to this article in various formats
Reviews and comments of visitors
No comments yet


Add two numbers: 22 + 22


Octavia 3 (2013-2019) 
  • General information
  • User manual
  • Car driving
  • Maintenance
  • Petrol engines 1.2 l
  • Engine repair
  • Cooling system
  • Supply system
  • Petrol engines 1.4 l
  • Engine repair
  • Supply system
  • Petrol engines 1.8/2.0 l
  • Engine repair
  • Cooling system
  • Supply system
  • Diesel engines 1.6/2.0 l
  • Engine repair
  • Cooling system
  • Supply system
  • Transmission
  • Mechanical gearbox 02S
  • Automatic gearbox 0CW
  • Automatic gearbox 0D9
  • Chassis (running gear)
  • Front suspension
  • Rear suspension
  • Brake system
  • Steering
  • Body and interior
  • Doors, locks and windows
  • Exterior (external elements)
  • Interior (internal elements)
  • Ventilation and air conditioning
  • Electrical equipment
  • Equipment and devices
  • Headlights and lighting
  • Wiring diagrams (basic)
  • Wiring diagrams (comfort)
Octavia 1 (1996-2004) 
  • General information
  • Vehicle details
  • Maintenance
  • Power unit
  • Petrol engines 1.6 l AEE
  • Petrol engines 1.8 l AGN
  • Diesel engines 1.9 l AGR
  • Fuel system
  • Exhaust system
  • Cooling system
  • Transmission
  • Clutch
  • Car gearbox
  • Gearbox repair 02J
  • Gearbox repair 02K
  • Chassis (running gear)
  • Wheels and tires
  • Suspension and axles
  • Brake system
  • Body and interior
  • Exterior (external elements)
  • Interior (internal elements)
  • Doors, locks and windows
  • Electrical equipment
  • Equipment and devices
  • Electrical circuits
SkodaBook.ru © 2018–2026 | Mobile version | Articles on Skoda | Sitemap EN BG BY UA RS HR RO PL SK HU | Feedback | Site search | Bookmark
Fabia 1 (1999-2007) | Fabia 2 (2007-2014) | Rapid 1 (2012-2022) | Octavia 1 (1996-2004) | Octavia 3 (2013-2019) | Superb 2 (2008-2015) | Kodiaq 1 (2016-2024) | Yeti (2009-2017) | Favorit (1987-1994) | Felicia (1994-2001) |
By continuing to use the site, you agree to the use of cookies.