
Company vehicles Hyundai Company vehicles Kia Company vehicles Lada Company vehicles Mazda Company vehicles Mercedes-Benz Company vehicles Opel Company vehicles Mitsubishi
English Русский
Български
Беларускі
Український
Српски
Hrvatski
Română
Polski
Slovenský
Magyar
Articles   
Bookmark Contacts Sitemap
SkodaBook.ru


Fabia Rapid Octavia Superb Kodiaq Yeti Others
Octavia 1 (1996-2004) Octavia 3 (2013-2019)

Removal and installation the shift mechanism (Skoda Octavia 5E)

  • Main
  • Octavia
  • 5E (2013-2019)
  • Transmission
  • Automatic gearbox 0D9
  • Removal and installation the shift mechanism
0
Remove the shift mechanism cover. Remove the shift mechanism handle. Set the control lever to the "P" position. Turn off the ignition.

Note: When disconnecting and connecting the battery ground wire, additional work must be performed.


Disconnect the battery ground wire with the ignition off. Remove the ashtray or compartment from the gearshift mechanism. Remove the center console and air duct. Disconnect the vehicle wiring harness connector to the gearshift mechanism "1".
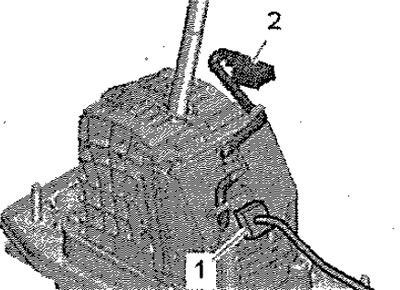
Disconnect the battery ground wire with the…


- Ignore position 2. Remove the engine cover. Remove the air filter. Unlock the lock washer "1" and remove it with an upward movement. Remove the lock washer "3" with an upward movement. Press the selector lever cable "2" away from the shift control lever/shaft in the "direction of the arrow" and move it upward.
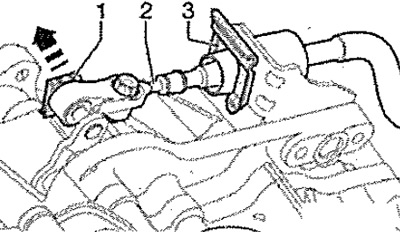
- Ignore position 2. Remove the engine cover.…


Note: The locking washer of the selector lever cable "3" must be replaced. Do not bend or break the control lever drive cable. Do not push the gear selector cable back out of the cable support. The gear selector cable is immediately removed from the cable support when removing the shift mechanism.


Raise the car. Remove the lower noise-insulating engine casing. Disconnect the rear "1" and front tunnel crossbars "2" from the body (if available). Disconnect the bracket "3" of the exhaust system from the bracket of the mounted units. Loosen the clamping sleeve "4".
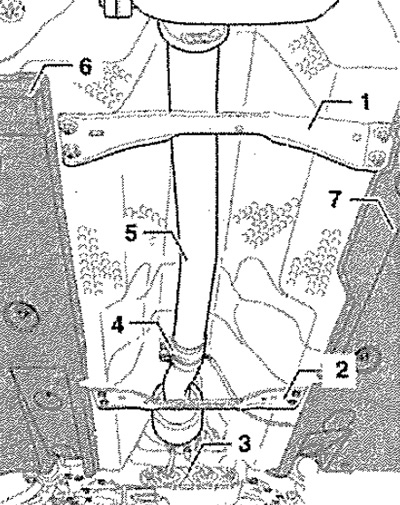
Raise the car. Remove the lower noise-insulating…


Note: The coupling element in the exhaust pipe must not be bent more than 10% - risk of damage. A second mechanic is required to remove the final silencer.


Disconnect the final muffler "5" from the clamping sleeve. Remove the underbody trim from the left "6" and right "7" sides of the body. Release the lambda probe wire from the clamps on the heat shield. Remove the heat shield under the shift mechanism by moving it backwards, to do this, disconnect the clamps "see arrows".
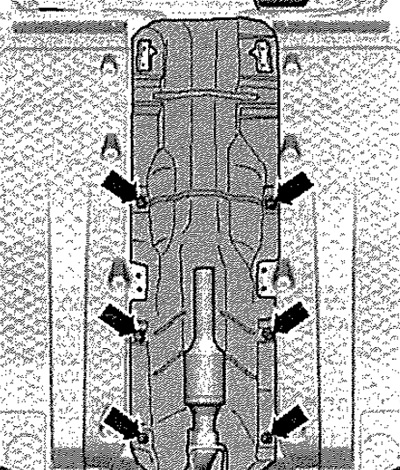
Disconnect the final muffler «5» from the…


Disconnect the "arrow" clamps and remove the heat shield under the shift mechanism by moving it backwards.


Note: When removing the shift mechanism underneath the vehicle, you will need the assistance of a 2nd mechanic.


Unscrew the nuts of the "arrow" in the car's interior. Remove the gearshift mechanism together with the selector lever cable by moving it downwards. At the same time, remove the gear selection cable from the cable support.
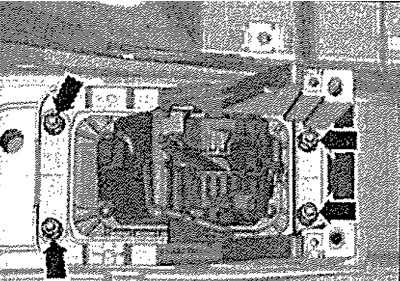
Unscrew the nuts of the «arrow» in the car's…


Note: Do not bend or break the selector lever cable.


Installation


Installation in reverse order.

Note: Do not bend or break the selector lever cable.


Install the center console and air duct. Install the ashtray or compartment in front of the shift mechanism. Install the shift knob and cover plate. Install a new lock washer "1" and a new selector lever cable lock washer "3".

Note: The selector lever cable lock washer "3" and lock washer "1" must be replaced. Do not bend or break the selector lever cable.


Connect the battery wire to ground.

Note: When disconnecting and connecting the battery ground wire, additional work must be performed.


Adjust the selector lever cable. Install the air filter. Check the shift mechanism. Install the heat shield and underbody trim. Install the exhaust system and align it without creating stress. Install the tunnel crossbars under the exhaust system. Install the lower engine soundproofing casing.
This article is available at russian, bulgarian, belarusian, ukrainian, serbian, croatian, romanian, polish, slovak, hungarian
Article verified: Anatoly Ovchinnikov
Share with friends:
◀ Previous
Skoda Octavia 3: Automatic gearbox 0D9
Next ►

General assembly diagram — gear shift mechanism
Switching mechanism — checking and adjustment
Replace the O-ring for the gear shift rod
Removal and installation the transmission oil pump
Removal and installation the transmission oil cooling radiator
Removal the CP
Installation of the control unit
Tightening torques
Replacing the transmission oil and filter of the DSG automatic…
Read similar articles on other Skoda models

➧ Gear shift mechanism Skoda Fabia 2 (2007-2014)
➧ Valve mechanism — external view (engine 1.2 TS) Skoda Rapid 1 (2012-2022)
➧ Work on the gear shift mechanism Skoda Superb 2 (2008-2015)
➧ Adjusting the gear shift mechanism Skoda Kodiaq 1 (2016-2024)
➧ Work on the gear shift mechanism Skoda Yeti (2009-2017)
➧ Valve mechanism — removal, inspection and installation Skoda Favorit (1987-1994)
Link to this article in various formats
Reviews and comments of visitors
No comments yet


Add two numbers: 19 + 33


Octavia 3 (2013-2019) 
  • General information
  • User manual
  • Car driving
  • Maintenance
  • Petrol engines 1.2 l
  • Engine repair
  • Cooling system
  • Supply system
  • Petrol engines 1.4 l
  • Engine repair
  • Supply system
  • Petrol engines 1.8/2.0 l
  • Engine repair
  • Cooling system
  • Supply system
  • Diesel engines 1.6/2.0 l
  • Engine repair
  • Cooling system
  • Supply system
  • Transmission
  • Mechanical gearbox 02S
  • Automatic gearbox 0CW
  • Automatic gearbox 0D9
  • Chassis (running gear)
  • Front suspension
  • Rear suspension
  • Brake system
  • Steering
  • Body and interior
  • Doors, locks and windows
  • Exterior (external elements)
  • Interior (internal elements)
  • Ventilation and air conditioning
  • Electrical equipment
  • Equipment and devices
  • Headlights and lighting
  • Wiring diagrams (basic)
  • Wiring diagrams (comfort)
Octavia 1 (1996-2004) 
  • General information
  • Vehicle details
  • Maintenance
  • Power unit
  • Petrol engines 1.6 l AEE
  • Petrol engines 1.8 l AGN
  • Diesel engines 1.9 l AGR
  • Fuel system
  • Exhaust system
  • Cooling system
  • Transmission
  • Clutch
  • Car gearbox
  • Gearbox repair 02J
  • Gearbox repair 02K
  • Chassis (running gear)
  • Wheels and tires
  • Suspension and axles
  • Brake system
  • Body and interior
  • Exterior (external elements)
  • Interior (internal elements)
  • Doors, locks and windows
  • Electrical equipment
  • Equipment and devices
  • Electrical circuits
SkodaBook.ru © 2018–2026 | Mobile version | Articles on Skoda | Sitemap EN BG BY UA RS HR RO PL SK HU | Feedback | Site search | Bookmark
Fabia 1 (1999-2007) | Fabia 2 (2007-2014) | Rapid 1 (2012-2022) | Octavia 1 (1996-2004) | Octavia 3 (2013-2019) | Superb 2 (2008-2015) | Kodiaq 1 (2016-2024) | Yeti (2009-2017) | Favorit (1987-1994) | Felicia (1994-2001) |
By continuing to use the site, you agree to the use of cookies.