
Company vehicles Hyundai Company vehicles Kia Company vehicles Lada Company vehicles Mazda Company vehicles Mercedes-Benz Company vehicles Opel Company vehicles Mitsubishi
English Русский
Български
Беларускі
Український
Српски
Hrvatski
Română
Polski
Slovenský
Magyar
Articles   
Bookmark Contacts Sitemap
SkodaBook.ru


Fabia Rapid Octavia Superb Kodiaq Yeti Others
Octavia 1 (1996-2004) Octavia 3 (2013-2019)

Switching mechanism — checking and adjustment (Skoda Octavia 5E)

  • Main
  • Octavia
  • 5E (2013-2019)
  • Transmission
  • Automatic gearbox 0D9
  • Switching mechanism — checking and adjustment
0
Contents: Examination ⬇ Adjustment ⬇
Caution! Before working with the engine running, set the lever to the "P" position and pull the handbrake.


Examination


Set the control lever to position "P". Switch off the ignition. Remove the engine casing. Remove the air filter. Unlock the lock washer "A" and remove it with an upward movement. Remove the lock washer "B" with an upward movement. Press the selector lever cable away from the shift control lever/shaft and move it upward. Position the control lever drive cable so that the end moves freely.
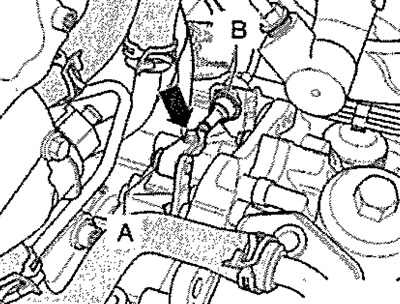
Set the control lever to position «P». Switch off…


Note: Do not bend or kink the selector lever cable.


Turn on the ignition and press the brake pedal. Switch the control lever from "P" to "S". Check the selector lever cable boot at the front of the shift mechanism for damage, replace the drive cable if necessary. The shift mechanism and the selector lever cable should move easily when shifting. Do not remove the selector lever cable from the shift mechanism (disconnect), it is replaced together with the shift mechanism as a single unit. Do not lubricate the spherical insert of the selector lever cable and the shift control lever/shaft. Carefully press the selector lever cable onto the shift control lever/shaft. Install the selector lever cable with new lock washers and a "loosened" clamping screw. Adjust the selector lever cable.


Adjustment


The selector lever cable should always be adjusted if: The selector lever cable was removed from the gearbox. The engine or gearbox was removed and installed. The components of the unit's support unit were removed and installed. The position of the engine/gearbox was changed, for example, they were installed in a free state, without internal stress.

Method of adjustment


New lock washers "A" and "B" are installed. The clamping screw "see arrow" is loosened. Switch the selector lever in the car to the "P" position. Press the lever on the gearbox "in the direction of the arrow" and set it to the "P" position. Turn the front wheels in one direction, for example, move the car forward so that the locking lever in the gearbox engages with the gearbox locking gear when parking and the wheels are locked (did not rotate together in the same direction).
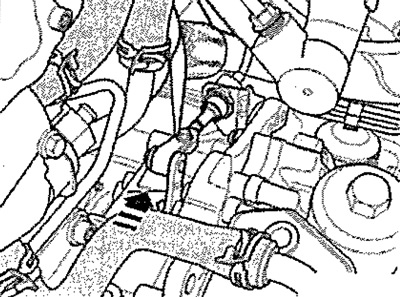
New lock washers «A» and «B» are installed. The…


Note: When the clamping screw "see arrow" is loosened, the selector lever must remain in the "P" position, otherwise the adjustment is incorrect.


Carefully and lightly move the selector lever forward and backward without switching the lever to another selector lever position. Smoothly tighten the clamping screw "see arrow" on the selector lever cable to a torque of 12 Nm.


Note: When tightening the clamping screw "see arrow", make sure that the selector lever cable does not move.


This completes the adjustment.

Check the selector lever cable adjustment


Move the selector lever from position "P" with the button pressed back approx. 5 mm and hold it, without switching to position "R". Release the selector lever. The selector lever should return to position "P" on its own. Adjust the selector lever if necessary. Set the selector lever to position "N". Move the selector lever from position "N" with the button pressed back approx. 5 mm and hold it, without switching to position "D". Release the selector lever. The selector lever should return to position "N" on its own. Adjust the selector lever if necessary. Move the selector lever from position "N" with the button pressed forward approx. 5 mm and hold it, without switching to position "R". Release the selector lever. The selector lever should return to position "N" on its own. Adjust the selector lever if necessary. Check the shift mechanism. Install the air filter. Install the engine cover.

Data taken from an online portal: Skodabook.ru
This article is available at russian, bulgarian, belarusian, ukrainian, serbian, croatian, romanian, polish, slovak, hungarian
Article verified: Anatoly Ovchinnikov
Share with friends:
◀ Previous
Skoda Octavia 3: Automatic gearbox 0D9
Next ►

Replace the O-ring for the gear shift rod
Removal and installation the transmission oil pump
Removal and installation the transmission oil cooling radiator
Installation of mechatronics for gearbox with double-disc clutch «J743»
Remove mechatronics for gearbox with double-disc clutch «J743»
General assembly diagram — gear shift mechanism
Removal and installation the shift mechanism
Removal the CP
Installation of the control unit
Tightening torques
Read similar articles on other Skoda models

➧ Checking the correct adjustment of the gear shift drive Skoda Fabia 1 (1999-2007)
➧ Checking the operation of the automatic retraction mechanism lock Skoda Rapid 1 (2012-2022)
➧ Removal and installation the clutch, checking the position of the… Skoda Superb 2 (2008-2015)
➧ Checking the oil Skoda Kodiaq 1 (2016-2024)
➧ Removal and installation the clutch, checking the position of the… Skoda Yeti (2009-2017)
➧ Checking and adjusting the clearance in the throttle drive mechanism Skoda Felicia (1994-2001)
Link to this article in various formats
Reviews and comments of visitors
No comments yet


Add two numbers: 46 + 21


Octavia 3 (2013-2019) 
  • General information
  • User manual
  • Car driving
  • Maintenance
  • Petrol engines 1.2 l
  • Engine repair
  • Cooling system
  • Supply system
  • Petrol engines 1.4 l
  • Engine repair
  • Supply system
  • Petrol engines 1.8/2.0 l
  • Engine repair
  • Cooling system
  • Supply system
  • Diesel engines 1.6/2.0 l
  • Engine repair
  • Cooling system
  • Supply system
  • Transmission
  • Mechanical gearbox 02S
  • Automatic gearbox 0CW
  • Automatic gearbox 0D9
  • Chassis (running gear)
  • Front suspension
  • Rear suspension
  • Brake system
  • Steering
  • Body and interior
  • Doors, locks and windows
  • Exterior (external elements)
  • Interior (internal elements)
  • Ventilation and air conditioning
  • Electrical equipment
  • Equipment and devices
  • Headlights and lighting
  • Wiring diagrams (basic)
  • Wiring diagrams (comfort)
Octavia 1 (1996-2004) 
  • General information
  • Vehicle details
  • Maintenance
  • Power unit
  • Petrol engines 1.6 l AEE
  • Petrol engines 1.8 l AGN
  • Diesel engines 1.9 l AGR
  • Fuel system
  • Exhaust system
  • Cooling system
  • Transmission
  • Clutch
  • Car gearbox
  • Gearbox repair 02J
  • Gearbox repair 02K
  • Chassis (running gear)
  • Wheels and tires
  • Suspension and axles
  • Brake system
  • Body and interior
  • Exterior (external elements)
  • Interior (internal elements)
  • Doors, locks and windows
  • Electrical equipment
  • Equipment and devices
  • Electrical circuits
SkodaBook.ru © 2018–2026 | Mobile version | Articles on Skoda | Sitemap EN BG BY UA RS HR RO PL SK HU | Feedback | Site search | Bookmark
Fabia 1 (1999-2007) | Fabia 2 (2007-2014) | Rapid 1 (2012-2022) | Octavia 1 (1996-2004) | Octavia 3 (2013-2019) | Superb 2 (2008-2015) | Kodiaq 1 (2016-2024) | Yeti (2009-2017) | Favorit (1987-1994) | Felicia (1994-2001) |
By continuing to use the site, you agree to the use of cookies.