
Company vehicles Hyundai Company vehicles Kia Company vehicles Lada Company vehicles Mazda Company vehicles Mercedes-Benz Company vehicles Opel Company vehicles Mitsubishi
English Русский
Български
Беларускі
Український
Српски
Hrvatski
Română
Polski
Slovenský
Magyar
Articles   
Bookmark Contacts Sitemap
SkodaBook.ru


Fabia Rapid Octavia Superb Kodiaq Yeti Others
Kodiaq 1 (2016-2024)

Timing chain installation (Skoda Kodiaq NS7)

  • Main
  • Kodiaq
  • NS7 (2016-2024)
  • Power unit
  • Petrol engine 2.0 l
  • Timing chain installation
0
1. Check and ensure that the crankshaft is set to the TDC position of the piston of the first cylinder. The marks (arrows) should be opposite each other, as shown in the figure below.

2. Apply a mark on the cylinder block as shown in the figure below using a special waterproof marker.
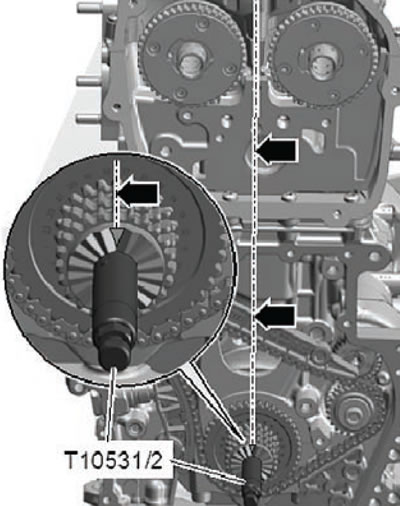
2. Apply a mark on the cylinder block as shown in…


3. Check and ensure that the camshaft sprockets are locked in the TDC position.

4. Apply arrow marks.

5. Using a waterproof marker, apply timing marks so that the factory marks are visible, as they will be partially hidden after the chain is installed.
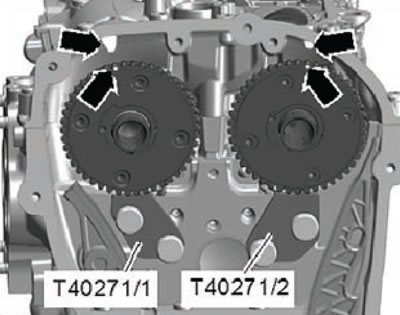
5. Using a waterproof marker, apply timing marks…


The original article can be found on the resource: www.SKODABOOK.ru

6. Hang the timing chain on the camshaft journals so that the marked links are directed as shown in the figure below.
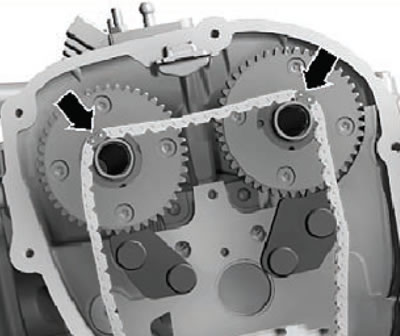


6. Hang the timing chain on the camshaft journals…


Note: Install the timing chain onto the camshaft drive sprockets so that the color-coded links are aligned with the timing marks on the sprockets, as shown in the illustration below.


7. Install the timing chain onto the intake camshaft sprocket.

8. Install the timing chain onto the exhaust camshaft sprocket.

9. Install the timing chain onto the crankshaft sprocket.
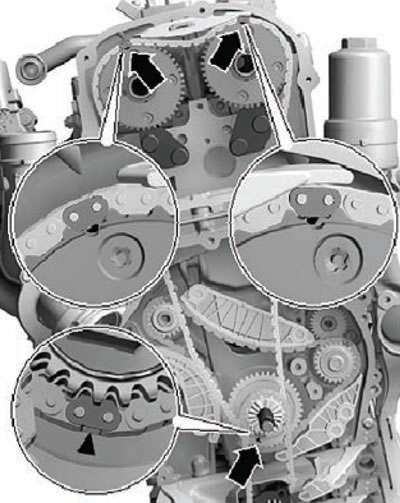
9. Install the timing chain onto the crankshaft…


10. Install the timing chain damper (2), then install and tighten its mounting bolts (1), as shown in the figure below.
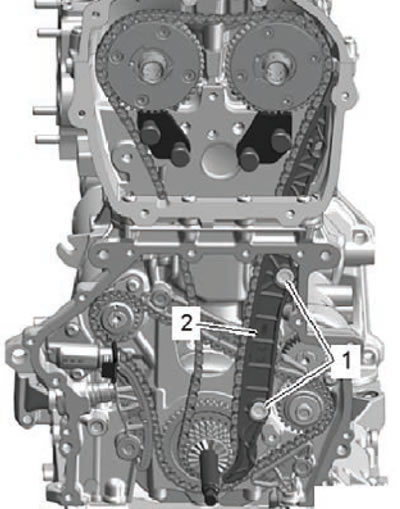
10. Install the timing chain damper (2), then…


11. Install the upper timing chain guide (1), install and tighten its mounting bolts as shown in the figure below.
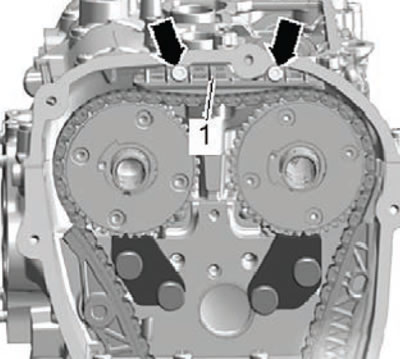


11. Install the upper timing chain guide (1),…


12. Turn the exhaust camshaft using the special adapter (10567) (4) in the direction of the arrow, at the same time disengage the special lock (T40271/1) (5) and remove it from the cylinder head by pulling it in the direction of arrow B. Unlock the camshaft assembly.

13. Turn the exhaust camshaft in the direction of arrow C until the timing chain touches the guide (3), as shown in the figure below.

14. Holding the camshaft in this position, install the tensioner rack (1) and tighten the installation pin (2).
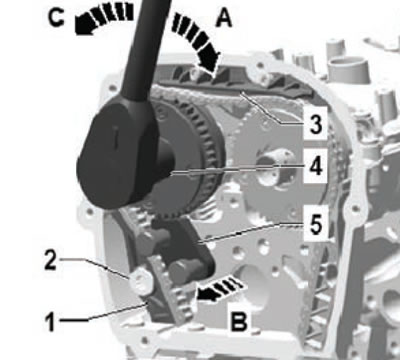
14. Holding the camshaft in this position,…


15. Turn the intake camshaft using the special adapter (10567) (1) in the direction of arrow A, at the same time disengage the special lock (T40271/2) (2) and remove it from the cylinder head by pulling it in the direction of arrow B. Unlock the camshaft assembly.


16. Remove the intake camshaft retainer from the cylinder head.
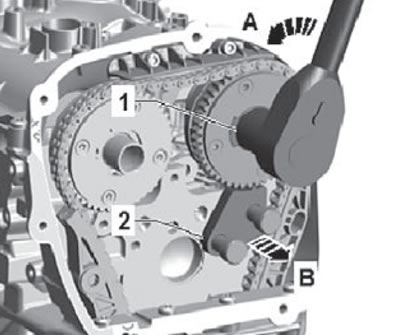
16. Remove the intake camshaft retainer from the…


17. Screw in and tighten the mounting screws (arrows) shown in the figure below.
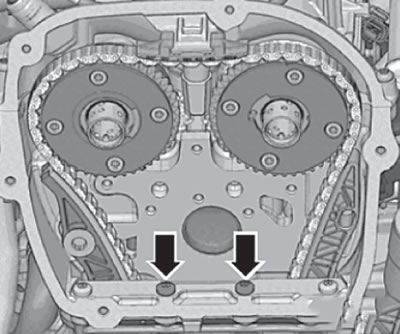
17. Screw in and tighten the mounting screws…


Note: Lubricate the holes (arrows) shown in the figure below with fresh engine oil.
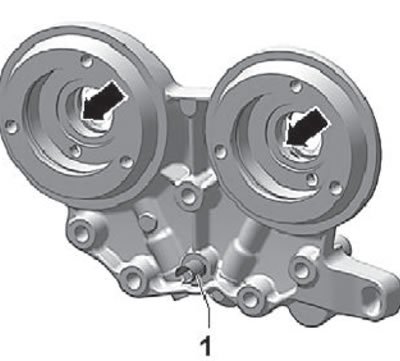

Note: Lubricate the holes (arrows) shown in the…


18. Install the camshaft position actuator cover, then install and tighten the cover mounting screws, hand tight only, as shown in the figure below.


19. Tighten the phase shifter cover mounting screws to the required tightening torque.

20. Install and hand tighten the phase shifter control valve mounting bolts.
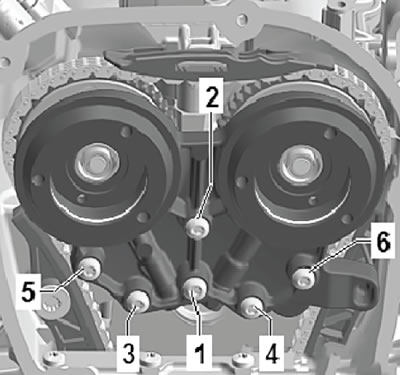
20. Install and hand tighten the phase shifter…


21. Install the chain tensioner (1) of the chain drive and tighten its mounting bolts (arrows) as shown in the figure below.
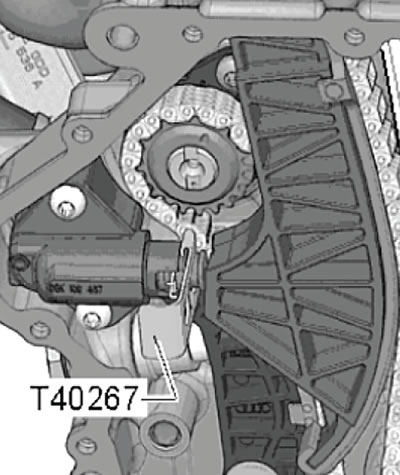
21. Install the chain tensioner (1) of the chain…


22. Tighten the phase shifter support mounting bolts completely, in the sequence shown in the figure below.
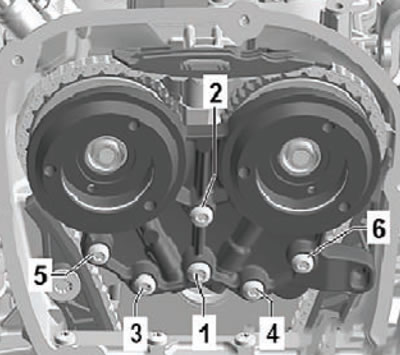
22. Tighten the phase shifter support mounting…


23. Install the chain tensioner (2) shown in the figure below. The locking pin (arrow) should rest against the top of the oil pan. Tighten the mounting bolt (1), then remove the locking tool (T40011).
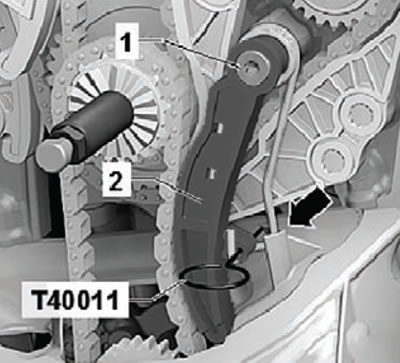


23. Install the chain tensioner (2) shown in the…


24. Check and ensure that the marked links of the drive chains match the marks on the sprockets (arrows), as shown in the figure below.
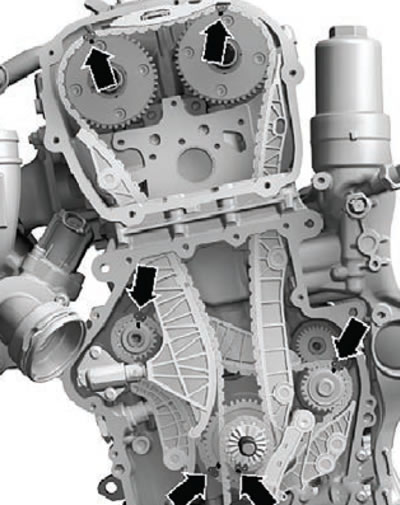
24. Check and ensure that the marked links of the…


25. Next, installation is carried out in the reverse order of removal.

26. Install the lower timing chain cover (for more details, see the relevant section in this chapter).

27. Install the upper timing chain cover (for more details, see the relevant section in this chapter).
This article is available at russian, bulgarian, belarusian, ukrainian, serbian, croatian, romanian, polish, slovak, hungarian
Article verified: Eleonora Afanasyeva
Share with friends:
◀ Previous
Skoda Kodiaq 1: Petrol engine 2.0 l
Next ►

Timing chain — removal
Lower timing chain cover
Upper timing chain cover
Gas distribution mechanism drive chain cover
Removal and installation the poly V-belt tensioner
Cylinder head
Valve mechanism
Oil separator and vacuum pump
Valve sizes
Crank mechanism
Read similar articles on other Skoda models

➧ Replacing the camshaft drive chain Skoda Fabia 1 (1999-2007)
➧ Timing chain — 1.2 MPI engine Skoda Rapid 1 (2012-2022)
➧ Timing chain casing parts and assemblies Skoda Octavia 3 (2013-2019)
➧ Replacing the rear crankshaft oil seal, removing and installing the… Skoda Superb 2 (2008-2015)
➧ Removal and installation the timing chain and oil pump drive chain Skoda Yeti (2009-2017)
➧ Removal, checking and installation the front cover, timing chain and… Skoda Felicia (1994-2001)
Link to this article in various formats
Reviews and comments of visitors
No comments yet


Add two numbers: 30 + 28


Kodiaq 1 (2016-2024) 
  • General information
  • User manual
  • Controls and instruments
  • Maintenance
  • Power unit
  • Petrol engine 1.4 l
  • Petrol engine 2.0 l
  • Diesel engine 2.0 l
  • Fuel and control (petrol)
  • Fuel and control (diesel)
  • Cooling system (petrol 1.4 l)
  • Cooling system (petrol 2.0 l)
  • Cooling system (diesel 2.0 l)
  • Lubrication system (petrol)
  • Lubrication system (diesel)
  • Intake and exhaust (petrol 1.4 l)
  • Intake and exhaust (petrol 2.0 l)
  • Intake and exhaust (diesel 2.0 l)
  • Transmission
  • Clutch
  • Manual gearbox
  • Automatic gearbox
  • Drive shafts
  • Chassis (running gear)
  • Front suspension
  • Rear suspension
  • Wheels and tires
  • Brake system
  • Steering system
  • Body and interior
  • Exterior (external elements)
  • Interior (internal elements)
  • Doors, locks and windows
  • Heating and air conditioning
  • Security systems
  • Electrical equipment
  • Power devices
  • Equipment and devices
  • Electrical circuits
  • Electrical circuits (petrol 2.0 l)
  • Electrical circuits (halogen headlights)
  • Electrical circuits (LED headlights)
  • Electrical circuits (Climatronic)
SkodaBook.ru © 2018–2026 | Mobile version | Articles on Skoda | Sitemap EN BG BY UA RS HR RO PL SK HU | Feedback | Site search | Bookmark
Fabia 1 (1999-2007) | Fabia 2 (2007-2014) | Rapid 1 (2012-2022) | Octavia 1 (1996-2004) | Octavia 3 (2013-2019) | Superb 2 (2008-2015) | Kodiaq 1 (2016-2024) | Yeti (2009-2017) | Favorit (1987-1994) | Felicia (1994-2001) |
By continuing to use the site, you agree to the use of cookies.