



Anti-corrosion protection layers
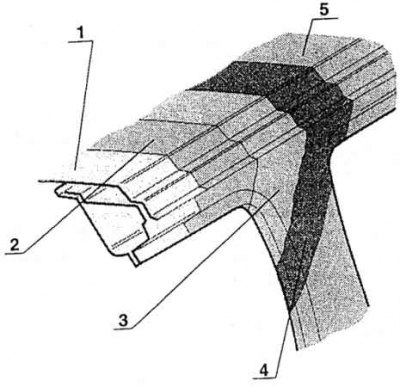
1 - sheet; 2 - tricationic phosphate; 3 – Catophoretic primer; 4 – filler; 5 – top coat varnish consisting of a pigment layer and a top colorless varnish
For good maintenance of the car's anti-corrosion coating, it is necessary to know what materials and technology the manufacturer used to apply the coating. First, it should be emphasized that "ŠKODA - JSC Automobile Plant" currently uses four-layer coating technology (three layers are formed by water-soluble materials). This technology is designed with the utmost consideration for the environment – both in the broadest sense of the word and in the workplace of the car manufacturer. The technological equipment is one of the most modern in Europe.
The high corrosion resistance of the coating is enhanced by the fact that the sheet metal stampings from which the body is made are made mainly of galvanized sheet. The coating itself is applied to the already semi-finished body, i.e. to the frame with installed doors, wings and hood.
In order for the coating to adhere properly to the body sheets, it is pre-prepared at the end of assembly. The first operation is thorough degreasing and activation of the surface, followed by phosphating the entire body. Layer of fine-crystalline tricationic phosphate (zinc, manganese, nickel) is formed when the body is completely submerged. This ensures the presence of a phosphate layer in all cavities and on the lower part of the body.
This is followed by chromium-free passivation and rinsing in baths with demineralized water.
Further, upon repeated immersion on the entire body due to the electrochemical process (cataphoresis) a layer of primer paint is released, namely on all surfaces and in the cavities of the body.
The applied primer has a uniform thickness everywhere, on the surface from 17 to 25 microns, in cavities not less than 12 microns. The specified layer ensures, firstly, perfect adhesion of the next layer, and secondly, excellent protection against corrosion.
The next operation is a waste-free wash with an ultrafiltrate made from the primer paint. This bath circulates between the wash space and the bath in which the cataphoretic paint on the body is released, namely the flow of the opposite direction. Then the body moves along the line, where, tilting it in the longitudinal direction and blowing with compressed air, the liquid excess of the bath is removed.
Finally, the resulting film is cured for 30 minutes at a body temperature of 180°C. This results in structuring (polymerization) resins contained in the coating. The primer paint isolated by cataphoresis is the carrier of anti-corrosion protection and allows, as one of the factors, to give a ten-year guarantee on the anti-corrosion resistance of the body. In the next part of the working line, a sealant is applied to each body without a solvent (plastisol based on plasticized PVC). In joints and gaps it is applied in the form of rollers, on the bottom of the floors and fenders by spraying. The edges of the doors and hood are sealed with plastisol further on the conveyor. Plastisol has excellent adhesion, high resistance to salt solutions and mechanical damage by abrasives. It also has a long service life. After applying plastisol, the body is subjected to preliminary gelatinization, which is a physical and chemical process of coating restructuring. It occurs at a temperature of 120°C for 15 minutes.
(The original article is available on SkodaBook.ru)
The end of the gelatinization process is then carried out simultaneously with the drying (firing) of the filler. It is applied at the next stage of the process. Before its application, of course, random defects on the surface parts of the body, which could have arisen during the selection of the primer by cathophoresis, are manually sanded.
The water-soluble filler is the second layer of the coating and is applied in three phases. The first is surface spraying, which is done by machines in rotating bells in an electrostatic field (ESTA). Interestingly, the rotation speed of the bell is from 20,000 to 40,000 revolutions per minute. This ensures uniform application of paint and minimal waste, since in the electrostatic field, charged paint particles are attracted to the body, and therefore are not sprayed into the surrounding space.
In the second stage, the surface between the doors and the inside of the cabin is sprayed manually. In the third stage, spraying is again done automatically in an electrostatic field. The filler used has four paint shades in accordance with the paint that will be used as the top coat. The filler is fired at a temperature of 165±5°C for 20 minutes. Subsequently, the filler is sanded either in a dry or wet process. After cleaning the body, the third layer of coating is sprayed, either based on UNT pigment (i.e. pigment without metallization effect), or with metallization. Both in the required paint shade. The paint shop of the ŠKODA automobile plant is capable of producing 14 paint shades. The pigment layer is again sprayed onto the outer surface with ESTA equipment and manually between the doors and inside the cabin. After the intermediate drying operation (removing water from this layer) at a temperature of 70°C, the last, fourth layer of coating is applied, which is a colorless varnish that does not contain solvent, giving the final effect - shine. The last layer of coating is fired for twenty minutes at a temperature of 140°C. The entire painting process occurs continuously, mostly in automatic mode.
The description of the technological process of applying coatings would be incomplete without mentioning the line where the preservation of body cavities with water-soluble wax is carried out. This operation is interesting because in different parts of the body there are openings for inserting nozzles that produce separate spraying of wax in different directions. After inserting the nozzles, the wax is sprayed into the cavities under high pressure using special equipment. Spraying is carried out airlessly.
The wax volume control system consists of injecting a pre-programmed amount of wax into the cavity at a pressure of 10 to 15 MPa, ensuring that the internal surfaces are coated with a layer of 25 to 40 µm. The wax has good penetrating ability and even reaches the capillary pores in the cavities, which protects these parts from corrosion damage.
Later, the finished vehicle can be subjected to a preservation spraying of the engine compartment or even the entire body surface at the customer's request and, therefore, according to the equipment specification. The preservation spraying serves for protection during transport or storage in a warehouse.
It is clear from the above that the Skoda car manufacturer really does carefully protect the car body from corrosion. However, it is clear that the coating, which must resist the effects of weather and can be accidentally damaged during driving, for example, by flying stones, etc., sometimes requires not only care with car cosmetics, but also careful monitoring, and in the event of damage to the paint layers - subsequent qualified repair. Repair of coatings should always be carried out by the Skoda service department, and no amateur activity in this area is allowed.