
Note: If necessary, empty the fuel tank.
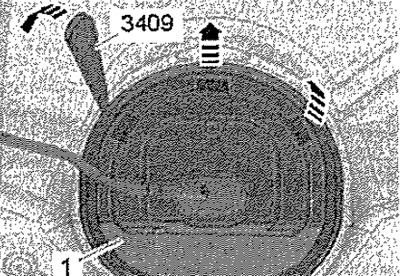
Move the front seats all the way forward. Switch off the ignition. Remove rear seat. Unlock retainers for cover -1- on right connecting flange using wedge -3409- -arrows-.
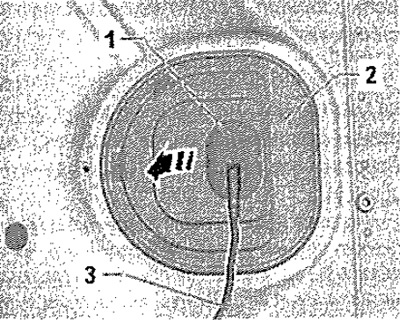
Remove sealing sleeve -1- from cover -2- towards bottom. Pull back cover -2- along wiring harness -3-.
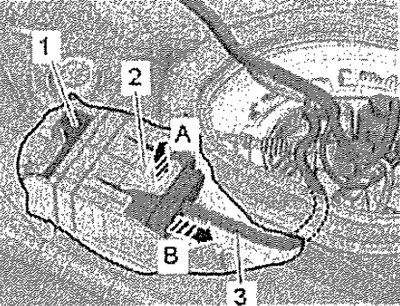
Disconnect the connectors -1, 2- from the connecting flange by releasing the connector locks.
Vehicles with auxiliary heater
Unplug electrical connector -3- for auxiliary heater metering pump -V54- at connecting flange. Unlock and disconnect connector -3- for auxiliary heater metering pump -V54-.

All
Press locking tab -2- upwards -arrow A- by grasping between underbody and fuel tank with finger. At the same time, carefully pull the fuel pump control unit -J538--1- out of the clip using the wiring harness -3- -arrow B-. Remove fuel pump control unit -J538- between fuel tank and support. Move fuel pump control unit -J538- to one side with wiring harness.
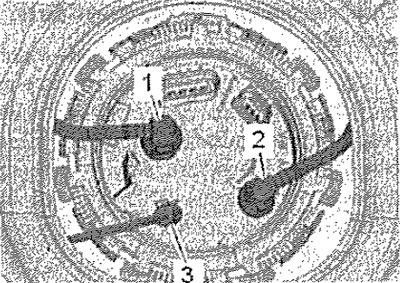
Detach fuel lines -1, 2- from connecting flange. Unlock and disconnect the quick coupler.
Vehicles with auxiliary heater
Open clamp and detach fuel line -3- from auxiliary heater metering pump from flange.
All
Note: Make sure that the connector bracket on the flange of the fuel delivery unit is not damaged when loosening the ring nut.
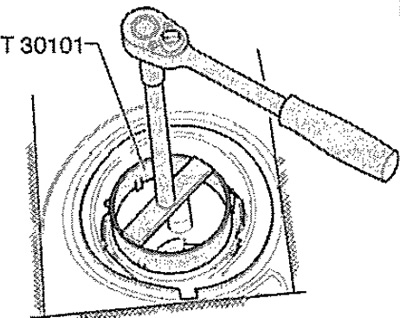
Unscrew the round nut using the key-T30101 (3087) -.
Slightly pull connecting flange -3- out of fuel tank opening. Remove gasket -1- from opening in fuel tank. Carefully remove connecting flange with fuel line -2- through opening in fuel tank.
Attention! Risk of fuel escaping from a still filled fuel delivery module. Place a rag to collect escaping fuel.
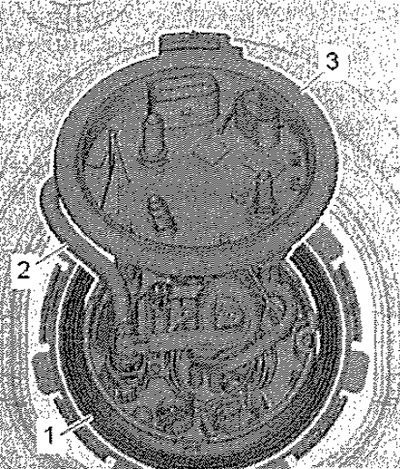
Carefully remove fuel delivery unit with fuel gauge sender -G- through opening in fuel tank by slightly turning and rocking.
Note: When removing the fuel delivery unit, take care not to bend the float lever of the fuel level sender -G-. If a fuel delivery unit needs to be replaced, the old fuel delivery unit must be emptied before disposal. Check fuel tank for contamination.
Installation
Installation in reverse order.
Note: Ensure that all nodes are in the correct position. Replace damaged O-ring. When installing the fuel delivery unit, take care not to bend the float lever of the fuel gauge sender -G-.
Install a new O-ring -1- for the connecting flange dry. Moisten sealing ring -1- on the inside with fuel. Carefully insert fuel delivery unit with fuel gauge sender -G- through opening in fuel tank. Press the connecting flange against the spring force and place it in the mounting position.

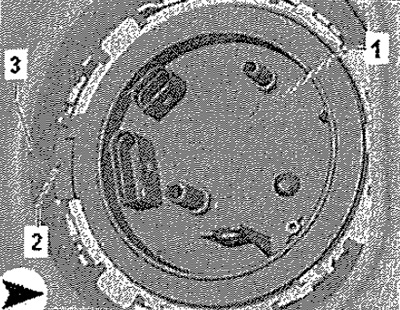
Lug -2- on connecting flange -1- must be opposite -arrow 3- on fuel tank.
Carefully! Danger of insufficient sealing. When installing the connecting flange, the gasket must not be damaged or pinched. Make sure that when tightening the ring nut, the connector bracket on the flange of the fuel delivery unit is not damaged.
Install the round nut and tighten it with the wrench -T30101 (3087) -. Insert fuel lines -1- and -2- until they click into place with a distinct sound. If fitted, connect fuel line -3- for auxiliary heater metering pump -V54- to flange. Once again press the fuel lines on the fittings, and then pull back to check that the quick coupling is correctly locked. Connect connectors -1- and -2-. If fitted, connect electrical connector -3- for auxiliary heater metering pump -V54- to connection flange. Check the fastening by pulling the connection in the opposite direction! After installing the fuel supply module, fill the vehicle with at least 5 liters of fuel.