
Note: The fuel lines are connected with quick couplings. Fuel hoses may only be secured with spring clips. It is recommended to use clamp pliers to install spring clamps. Observe safety regulations. Follow the rules for maintaining cleanliness. Diesel fuel has lubricating properties, so refueling with the wrong fuel (not diesel) may lead to significant (beyond repair) damage to high pressure system components. In particular, this applies to the TNVD. In this case, damage in the form of scuffing and the formation of wear particles can be expected. Loose metal particles contaminate the fuel system and injectors, causing other damage to occur, especially in the fuel pressure regulator and injectors.
Note: These instructions must be followed according to the block diagram, taking into account the different conditions for some work.
Did the engine start after refueling with the wrong fuel?
- Yes - "Stage 1, the engine was started with the wrong fuel".
- No - "Stage 2, the engine was not started on the wrong fuel".
Stage 1, the engine was started on the wrong fuel
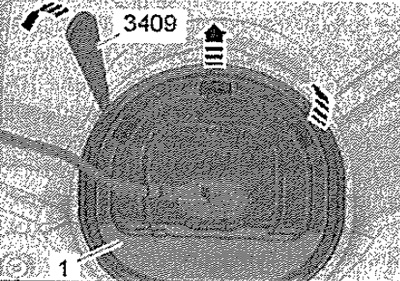
Extract as much fuel as possible from the tank through the filler neck using the fuel extraction device -VAS 5190-. Remove rear seat. Unlock cover -1- of connecting flange with wedge -3409- -arrows-.
Remove sealing sleeve -1- from cover -2- towards bottom. Pull back cover -2- along wiring harness -3-.
Attention! It should be noted that if the battery is connected, the fuel pump turns on when the door is opened. Fuel may leak from an open system.
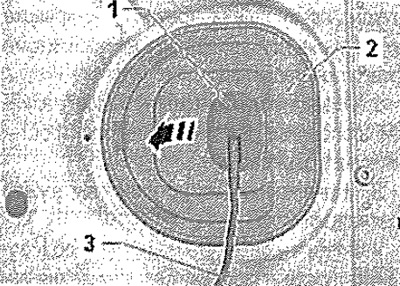
Detach fuel return line -2- at connecting flange. Unlock and disconnect the quick coupler. Connect connecting hose -VAS 6551/1- of pressure gauge to fuel return line. If necessary, extend connecting hose -VAS 6551/1- with connector -VAS 6551/5-1- and standard hose to line. Place free end of line/connecting hose -VAS 6551/1 - into a suitable container. Connect the tester to the car. Execute Empty Fuel Tank in Guided Functions.
Note: The fuel pump is switched on.
Repeat this process until there is no fuel left in the fuel tank. Remove the fuel delivery module. Check fuel tank for chips. Drain the fuel from the storage tank of the fuel supply module. Inspect the storage tank and the pre-filter for coarse dirt and chips.
Is there a string?
- Yes - "Stage 3, there are chips in the fuel delivery module and fuel tank".
- No - "Stage 4, no chips in the fuel delivery module and fuel tank".
Stage 2, the engine was not started on the wrong fuel
Extract as much fuel as possible from the tank through the filler neck using the fuel extraction device -VAS 5190-. Remove rear seat. Unlock cover -1- of connecting flange with wedge -3409- -arrows-. Remove sealing sleeve -1- from cover -2- towards bottom. Pull back cover -2- along wiring harness -3-.
Attention! It should be noted that if the battery is connected, the fuel pump turns on when the door is opened. Fuel may leak from an open system.
Detach fuel return line -2- at connecting flange. Unlock and disconnect the quick coupler. Connect connecting hose -VAS 6551/1- of pressure gauge to fuel return line. If necessary, extend connecting hose -VAS 6551/1- with connector -VAS 6551/5-1- and standard hose to line. Place the free end of the line/connecting hose -VAS 6551/1- in a suitable container, connect the tester to the vehicle, carry out Emptying the fuel tank in the guided functions.
Note: The fuel pump is switched on.
Repeat this process until there is no fuel left in the fuel tank. Fill the fuel tank with 5 liters of diesel fuel. Empty the fuel tank completely again as described above. Reconnect fuel return line -2-. Fuel filter replacement. Completely fill up the vehicle and carry out a test drive.
Stage 3, there are chips in the fuel delivery module and fuel tank
Clean fuel delivery unit and fuel tank using tool, eg -VAS 5226-. Install the fuel delivery module.
Vehicles with auxiliary heater
Check fuel line between fuel tank and metering pump -V54- for chips. Replace if necessary.
All
Fill the fuel tank with 5 liters of diesel fuel. Empty the fuel tank completely again as described above. Renew the following components of the high pressure fuel system: injection pump, high pressure fuel lines, fuel rail including fuel pressure regulator -N276- and fuel pressure sender -G247-, injectors, fuel return lines (drain fuel lines), fuel filter. Completely fill the vehicle. Remove air from the fuel system. Carry out a test drive.
Stage 4, no chips in the fuel delivery module and fuel tank
Fill the fuel tank with 5 liters of diesel fuel. Empty the fuel tank completely again as described above.
Attention! When removing the fuel metering valves from the high pressure pump, there is a risk of dirt entering the pump, which will lead to pump failure. For this reason, the fuel metering valves and the high-pressure pump must be thoroughly cleaned before removal, following the cleanliness rules when working on the injection system.
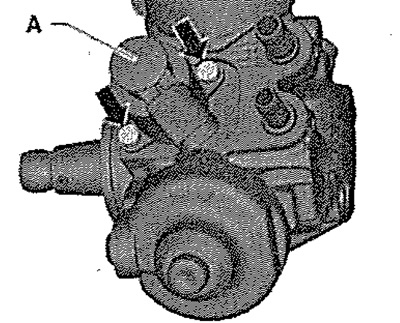
Disconnect the connector from the valve. Release screws -arrows- and carefully remove fuel metering valve -N290- -A- from high-pressure pump. Check fuel metering valve -N290- and injection pump for chips.
Is there a string?
- Yes - "Stage 5, there are metal chips in the injection pump".
- No - "Stage 6, no chips in injection pump".
Stage 5, there is metal shavings in the injection pump
Renew the following components of the high pressure fuel system: injection pump, high pressure fuel lines, fuel rail including fuel pressure regulator -N276- and fuel pressure sender -G247-, injectors, fuel return lines (drain fuel lines), fuel filter. Completely fill the vehicle. Remove air from the fuel system. Carry out a test drive.
Stage 6, no chips in injection pump
Attention! Avoid damaging O-rings for fuel metering valve -N290-. If the sealing ring is damaged, the injection pump must be replaced.
Lubricate lower sealing ring of fuel metering valve -N290- with fuel. Insert the valve into the injection pump, turning it slightly. Screw in screws - see arrows - only by hand. Pre-tighten screws to 3 Nm, then tighten to 7 Nm. Fuel filter replacement. Remove air from the fuel system. Completely fill up the vehicle and carry out a test drive.