
For vehicles with bottom part of oil pan made of plastic
Release screws -1...20-. Remove the lower part of the oil pan.
For vehicles with bottom part of oil pan stamped from sheet metal
Release screws -1...20-. Carefully separate the lower part of the oil pan from the bonding points.
Installation
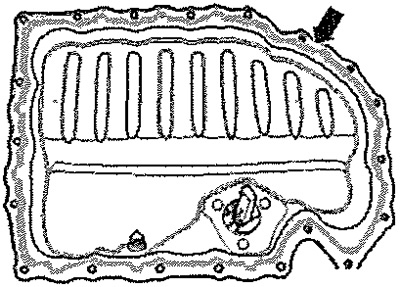
For vehicles with bottom part of oil pan stamped from sheet metal
Note: The sealant must not be expired (see expiry date). The oil sump must be installed within 5 minutes of applying the silicone sealant. Replace screws that are tightened to a certain angle. Replace gaskets, lip seals and self-locking nuts.
Apply a sealant remover to the mating surfaces and wait for it to take effect. Remove sealant residue on top of oil pan with a flat scraper. Remove sealant residue from cylinder block and oil pan with a chemical sealant remover. Clean and degrease mating surfaces. Cut off the tip of the sealant tube at the front mark (hole diameter about 3mm). Apply silicone sealant to the clean bonded surface of the upper part of the oil pan -arrow- as shown in the illustration. Sealant strip thickness: 2...3 mm.
Note: The oil sump must be installed within 5 minutes after applying the silicone sealant. The sealant strip should not be wider than prescribed, because otherwise, excess sealant will enter the oil sump and clog the strainer in the oil intake pipe.
Note: After installing the oil pan, allow the sealant to dry for approx. 30 minutes. Only after that you can fill in engine oil.
Immediately install the oil pan and tighten the screws, torque and tightening sequence.
All
Fill the engine with oil and check its level.