Company vehicles Hyundai Company vehicles Kia Company vehicles Lada Company vehicles Mazda Company vehicles Mercedes-Benz Company vehicles Opel Company vehicles Mitsubishi
English Русский
Български
Беларускі
Український
Српски
Hrvatski
Română
Polski
Slovenský
Magyar
Articles   
Bookmark Contacts Sitemap
SkodaBook.ru


Fabia Rapid Octavia Superb Kodiaq Yeti Others
Favorit (1987-1994) Felicia (1994-2001)

Removal and installation the steering column (Skoda Felicia)

  • Main
  • Skoda
  • Felicia (1994-2001)
  • Chassis (running gear)
  • Steering
  • Removal and installation the steering column
0
Contents: Removal ⬇ Installation ⬇
Note: On models equipped with a driver's airbag, the appropriate precautions must be taken (see Chapter On-board electrical equipment).


Removal


1. Disconnect the negative cable from the battery.

2. Remove the steering wheel (see section Removal and installation the steering wheel).

3. Remove the combination steering column switches from the top of the steering column (see Chapter On-board electrical equipment).

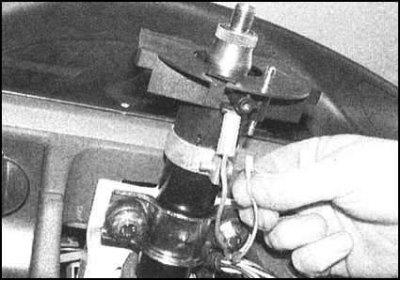
4. Disconnect the electrical wiring from the horn…


4. Disconnect the electrical wiring from the horn contacts on the steering column switch holder.

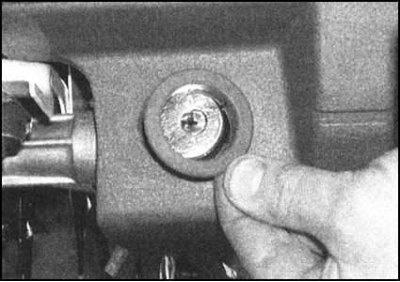
5. Carefully pry up and remove the ignition…


5. Carefully pry up and remove the ignition switch/steering wheel lock trim from the instrument panel.

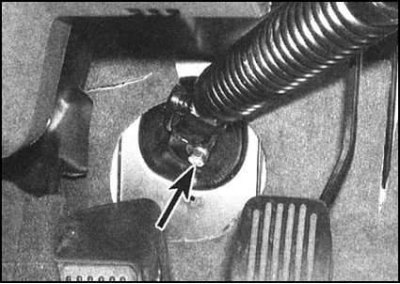
6. If equipped, fold back the carpet, then loosen the screw and nut securing the steering column base trim cover to gain access to the lower intermediate shaft universal joint.


5. Carefully pry up and remove the ignition…


5. Carefully pry up and remove the ignition…


7. Using paint or a marker, mark the position of…


7. Using paint or a marker, mark the position of the lower intermediate shaft universal joint relative to the steering rack pinion, then remove the U-joint pinch bolt.

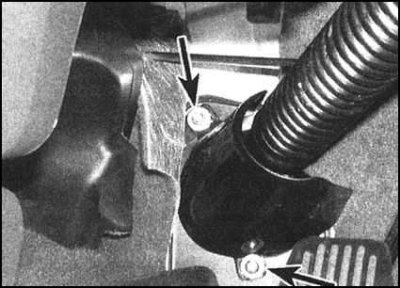
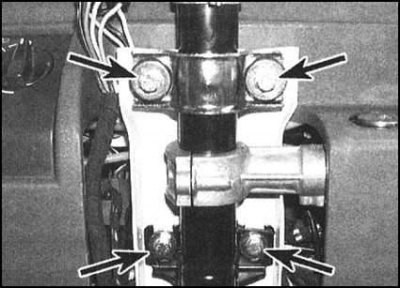
8. Remove the upper column mounting bolts...


8. Remove the upper column mounting bolts...


...try to remember the installation positions of…


...try to remember the installation positions of the spacer washers and rubber cushions. Remove the mounting clamp.

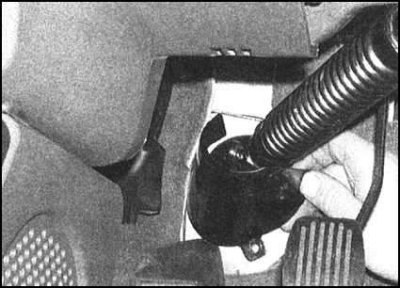
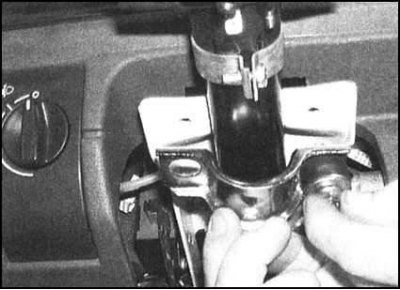
9. Remove the lower mounting bolts, spacer…


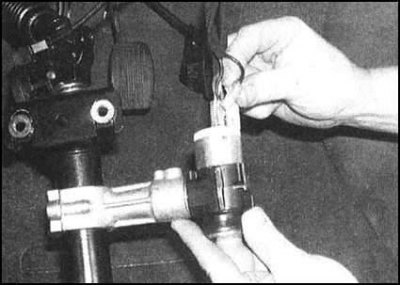
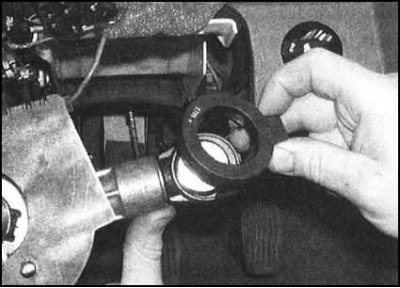
9. Remove the lower mounting bolts, spacer washers and rubber cushions, then lower the column slightly to provide access to the ignition switch. Remembering the order of connecting the connectors, disconnect the ignition switch wiring...

...on models equipped with an immobilizer,…


...on models equipped with an immobilizer, carefully release the sensor ring from the lock housing and move it away from the steering column.
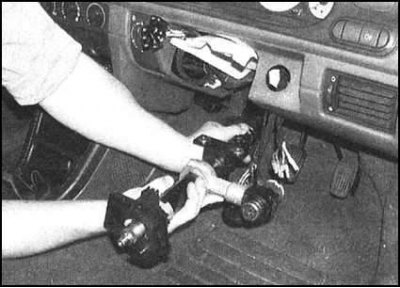


10. Separate the intermediate shaft from the…


10. Separate the intermediate shaft from the steering rack drive pinion and remove the steering column assembly from the vehicle.

11. Check the condition of the column supports, if signs of wear or deformation are detected, make the necessary replacements. Assess the tightness of the steering shaft fit in the column bushings. Check the condition of the universal joints and the proper functioning of the crosspiece bearings. If defects are detected in the shaft bushings or universal joints, the column should be repaired (see section Steering column overhaul).

Installation


1. Having achieved alignment of the mounting marks applied during dismantling, engage the intermediate shaft with the teeth of the drive gear of the rack and pinion mechanism.

2. Referring to the markings applied during dismantling, connect the electrical wiring to the ignition switch. If equipped, snap the immobilizer sensor ring into place.
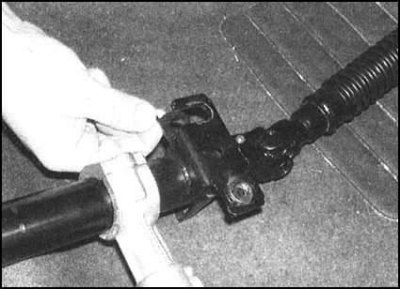
3. After making sure that the spacers and rubber…


3. After making sure that the spacers and rubber pads are installed correctly, place the steering column on the lower supports. Screw in the lower mounting bolts, then install the upper support clamp (again, check that the components are assembled correctly) and tighten it with bolts. Make sure the column is positioned correctly, then tighten all fasteners to the required torque.


4. Replace the intermediate shaft lower universal joint tie bolt and tighten to the specified torque. If equipped, install the column base trim cover by tightening the mounting screw and nut securely.

5. Further assembly is carried out in the reverse order of dismantling. Please note the following points:
  • a) Ensure that the electrical wiring is correctly laid and that the harnesses are securely fastened in all the provided intermediate fasteners;
  • b) The procedure for installing the steering wheel is described in Section Removal and installation the steering wheel;
  • c) Before installing the lower column cover, make sure there is a small gap between the steering wheel and the upper cover. If necessary, adjust the gap by loosening the clamp of the steering column paddle holder.

(Information published on the website: SKODABOOK)
This article is available at russian, bulgarian, belarusian, ukrainian, serbian, croatian, romanian, polish, slovak, hungarian
Article verified: Ekaterina Blinova
Share with friends:
◀ Previous
Skoda Felicia: Steering
Next ►

Removal and installation the steering wheel
Steering column overhaul
Removal and installation the ignition switch/steering wheel lock assembly
Removal, repair and installation of the steering gear
Replacing the rubber protective covers of the steering gear housing
Removal air locks from the hydraulic circuit of the power steering system
Read similar articles on other Skoda models

➧ Steering column adjustment Skoda Fabia 1 (1999-2007)
➧ Steering column assembly — external view Skoda Rapid 1 (2012-2022)
➧ Steering column assembly Skoda Octavia 1 (1996-2004)
➧ Steering column adjustment Skoda Superb 2 (2008-2015)
➧ Steering column — components Skoda Kodiaq 1 (2016-2024)
➧ Adjustment of seats, mirrors and steering column Skoda Yeti (2009-2017)
Link to this article in various formats
Reviews and comments of visitors
No comments yet


Add two numbers: 33 + 30


Favorit (1987-1994) 
  • General information
  • Maintenance
  • Troubleshooting
  • Power unit
  • Engine in car
  • Engine overhaul
  • Cooling and heating
  • Fuel and exhaust system
  • Fuel injection system
  • Ignition system
  • Transmission
  • Clutch
  • Manual gearbox
  • Drive shafts
  • Chassis (running gear)
  • Brake system
  • Car suspension
  • Steering
  • Body and interior
  • Exterior (external elements)
  • Interior (salon)
  • Electrical equipment
  • Equipment and devices
  • Power devices
  • Electrical circuits
Felicia (1994-2001) 
  • General information
  • Introduction to guide
  • User manual
  • Maintenance (petrol)
  • Maintenance (diesel)
  • Power unit
  • Petrol engine 1.3 l
  • Petrol engine 1.6 l
  • Diesel engine
  • Engine overhaul
  • Cooling system
  • Fuel system (carburetor)
  • Central injection (SPFI)
  • Multipoint injection (MPFI)
  • Diesel power system
  • Decreased toxicity
  • Engine electrics
  • Transmission
  • Clutch
  • Car gearbox
  • Drive shafts
  • Chassis (running gear)
  • Brake system
  • Car suspension
  • Steering
  • Body and interior
  • Exterior (external elements)
  • Interior (salon)
  • Doors, locks and windows
  • Electrical equipment
  • Equipment and devices
  • Headlights and lighting
  • Electrical circuits
SkodaBook.ru © 2018–2026 | Mobile version | Articles on Skoda | Sitemap EN BG BY UA RS HR RO PL SK HU | Feedback | Site search | Bookmark
Fabia 1 (1999-2007) | Fabia 2 (2007-2014) | Rapid 1 (2012-2022) | Octavia 1 (1996-2004) | Octavia 3 (2013-2019) | Superb 2 (2008-2015) | Kodiaq 1 (2016-2024) | Yeti (2009-2017) | Favorit (1987-1994) | Felicia (1994-2001) |
By continuing to use the site, you agree to the use of cookies.