
Company vehicles Hyundai Company vehicles Kia Company vehicles Lada Company vehicles Mazda Company vehicles Mercedes-Benz Company vehicles Opel Company vehicles Mitsubishi
English Русский
Български
Беларускі
Український
Српски
Hrvatski
Română
Polski
Slovenský
Magyar
Articles   
Bookmark Contacts Sitemap
SkodaBook.ru


Fabia Rapid Octavia Superb Kodiaq Yeti Others
Rapid 1 (2012-2022)

Checking the technical condition (if the starter was disassembled) (Skoda Rapid NH1)

  • Main
  • Rapid
  • NH1 (2012-2022)
  • Electrical equipment
  • Power devices
  • Checking the technical condition (if the starter was disassembled)
0
Contents: Checking the anchor ⬇ Starter brushes ⬇ Checking the brush holder ⬇ Checking the overrunning clutch ⬇

Checking the anchor


Attention. Depending on the year of manufacture and modification, some values given below may differ from the values of your vehicle's instruments.


1. Remove the starter assembly.

2. Disassemble the starter.

3. Check the anchor for wear or damage from contact with the permanent magnet.

4. Check the surface of the switch. If the surface is dirty or burnt, clean the surface with sandpaper.

5. Measure the commutator runout.

If the commutator runout is within the acceptable range, check the commutator for carbon dust or copper filings between the segments.

Article source: this website skodabook.ru

If the commutator runout is outside the permissible limits, replace the anchor.
  • Commutator beating (standard value): 0.02mm max.
  • Commutator beating (limit value): 0.05 mm.

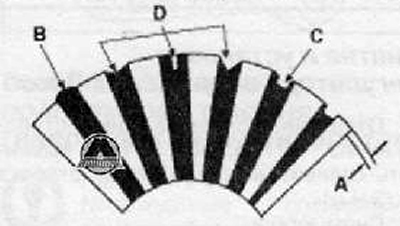
6. Check the groove depth (A) If the groove depth is too deep (B), trim it to the required depth with a hacksaw. Trim all grooves (C) between the anchor segments. The undercut should not be too shallow, too narrow or V-shaped (D). Standard groove depth: 0.5 mm, limit value 0.2 mm.
6. Check the groove depth (A) If the groove depth…


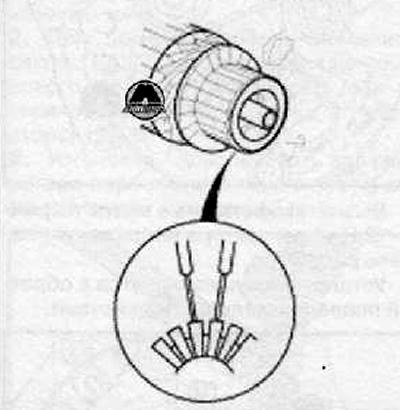
7. Check for continuity between the commutator segments. If there is a break in the circuit between any segment, replace the anchor.


7. Check for continuity between the commutator…


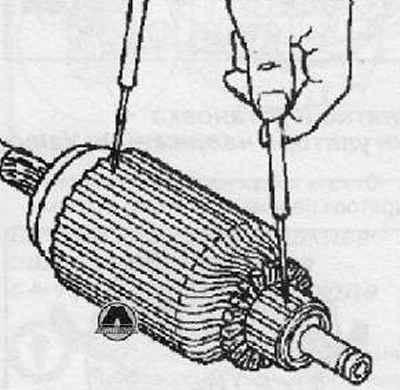
8. Use an ohmmeter to check for electrical continuity between the commutator and the core of the armature coil and between the commutator and the armature shaft. If there is continuity, replace the armature.
8. Use an ohmmeter to check for electrical…


Starter brushes


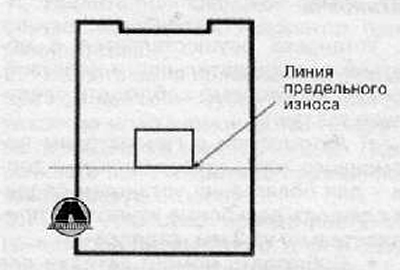
Worn or oily brushes must be replaced.
Worn or oily brushes must be replaced.


Checking the brush holder


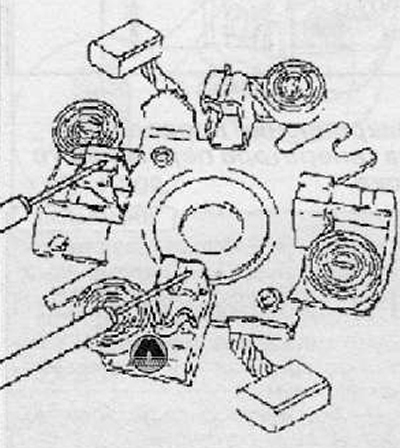
1. Check for continuity between the (+) brush mount (A) and the (-) brush mount (B). If there is no continuity, replace the brush mount assembly.


Please note: The drawing below is schematic and may differ from the actual one.

Please note: The drawing below is schematic and…


2. Lift each brush spring with a screwdriver, then position the brush about halfway to its mount and loosen the spring to secure it in place.

3. Install the anchor on the housing and install the brush mount. Next, lift each brush spring again and lower the brushes down until they rest on the commutator, then loosen the spring opposite the end of the brush.

Note: To install the brushes, place sandpaper between the commutator and each brush and rotate the armature slowly. The contact surface of the brushes will follow the contour of the commutator.


Checking the overrunning clutch


1. Move the overrunning clutch along the shaft. Replace the overrunning clutch if the clutch does not move smoothly.

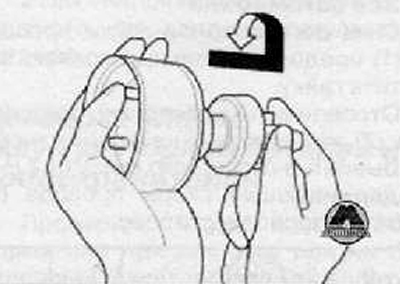
2. Turn the overrunning clutch in both directions. Lock it in one direction and turn it smoothly in the opposite direction. If it does not lock in either direction, replace the overrunning clutch
2. Turn the overrunning clutch in both…


3. If the starter pinion is worn or damaged, replace the overrunning clutch assembly (gear not available separately).

Check the flywheel or torque converter ring gear if the starter pinion teeth are damaged.
This article is available at russian, bulgarian, belarusian, ukrainian, serbian, croatian, romanian, polish, slovak, hungarian
Article verified: Anatoly Ovchinnikov
Share with friends:
◀ Previous
Skoda Rapid 1: Power devices
Next ►

Checking the starter cranking when the engine is cold
Checking the starter circuit
Checking the starter when running without load
Checking the operation of the starter pull-in and holding windings
Starter — removal and installation
Cleaning starter parts
Removal and installation the alternator
Securing the B+ wire to the alternator
Generator carbon brush control
Removal and installation the voltage regulator
Read similar articles on other Skoda models

➧ Checking the condition of the alternator belt Skoda Fabia 2 (2007-2014)
➧ Checking the condition of the ball joint Skoda Octavia 3 (2013-2019)
➧ Coolant — checking and adjusting the level and condition, identifying… Skoda Superb 2 (2008-2015)
➧ General procedures for checking the technical condition of the starter Skoda Kodiaq 1 (2016-2024)
➧ Checking the condition and replacing hoses and tubes in the engine… Skoda Yeti (2009-2017)
➧ Removal and checking the condition of the crankshaft Skoda Felicia (1994-2001)
Link to this article in various formats
Reviews and comments of visitors
No comments yet


Add two numbers: 19 + 19


Rapid 1 (2012-2022) 
  • General information
  • Faults en route
  • User manual
  • Maintenance and care
  • Power unit
  • Petrol engines
  • Diesel engines
  • Power and control system
  • Lubrication system
  • Cooling system
  • Intake and exhaust system
  • Transmission
  • Clutch
  • Mechanical gearbox
  • Automatic gearbox
  • Drive shafts
  • Chassis (running gear)
  • Front suspension
  • Rear suspension
  • Brake system
  • Steering
  • Body and interior
  • Exterior (external elements)
  • Interior (internal elements)
  • Doors, locks and windows
  • Heating and air conditioning
  • Security systems
  • Electrical equipment
  • Equipment and devices
  • Power devices
  • Electrical circuits
  • Electrical circuits (petrol)
  • Electrical circuits (diesel)
SkodaBook.ru © 2018–2026 | Mobile version | Articles on Skoda | Sitemap EN BG BY UA RS HR RO PL SK HU | Feedback | Site search | Bookmark
Fabia 1 (1999-2007) | Fabia 2 (2007-2014) | Rapid 1 (2012-2022) | Octavia 1 (1996-2004) | Octavia 3 (2013-2019) | Superb 2 (2008-2015) | Kodiaq 1 (2016-2024) | Yeti (2009-2017) | Favorit (1987-1994) | Felicia (1994-2001) |
By continuing to use the site, you agree to the use of cookies.