
Company vehicles Hyundai Company vehicles Kia Company vehicles Lada Company vehicles Mazda Company vehicles Mercedes-Benz Company vehicles Opel Company vehicles Mitsubishi
English Русский
Български
Беларускі
Український
Српски
Hrvatski
Română
Polski
Slovenský
Magyar
Articles   
Bookmark Contacts Sitemap
SkodaBook.ru


Fabia Rapid Octavia Superb Kodiaq Yeti Others
Rapid 1 (2012-2022)

Checking the technical condition of the generator (if disassembled) (Skoda Rapid NH1)

  • Main
  • Rapid
  • NH1 (2012-2022)
  • Electrical equipment
  • Power devices
  • Checking the technical condition of the generator (if disassembled)
0
Contents: Checking the rotor ⬇ Stator check ⬇ Checking the rectifier unit ⬇ Checking the brushes ⬇

Checking the rotor


1. Check the rotor winding for damage. Check the resistance between the generator rings.

If the resistance is low, then there is a short circuit in the rotor (short circuit). If there is no connection, then the rotor winding is broken.

Resistance value: approximately 3.1 ohms.
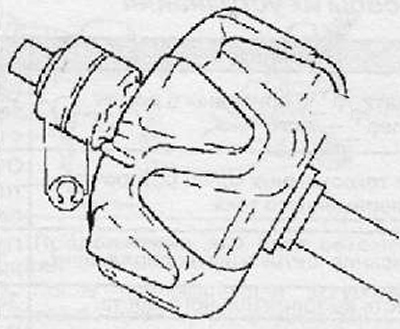
Resistance value: approximately 3.1 ohms.


2. Check the rotor winding for a short circuit to the housing. If the rotor winding is shorted to the magnetic circuit, then the rotor should be replaced.
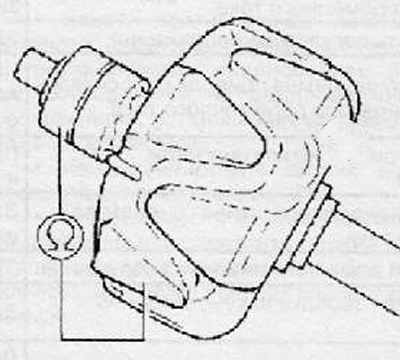
2. Check the rotor winding for a short circuit to…


Stator check


1. Measure the resistance between the stator winding terminals as shown in the figure below. If a winding break is detected, the stator should be replaced.
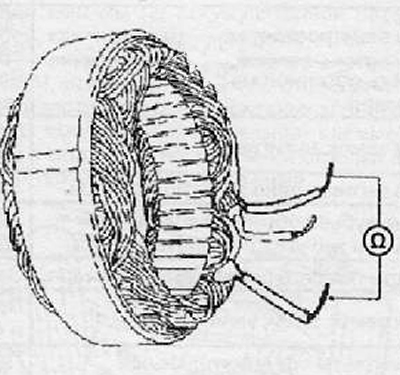


1. Measure the resistance between the stator…


2. Measure the resistance between the terminals of the stator phase windings and the magnetic circuit, as shown in the figure below. If a short circuit of the phase windings to the magnetic circuit is detected, the stator should be replaced.
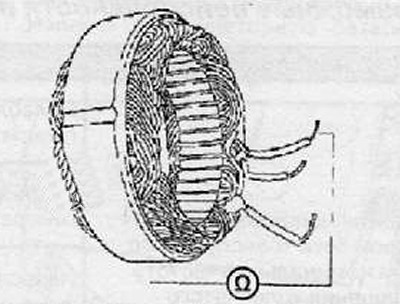
2. Measure the resistance between the terminals…


Checking the rectifier unit


1. Check the resistance between the positive plate of the heat sink and each of the stator winding connection points. If the "continuity" is carried out in both directions, then the corresponding diode is "broken". Replace the rectifier unit.

2. Check the resistance between the (-) heat sink plate and each of the stator winding connection points. If the "continuity" is carried out in both directions, then the corresponding diode is "broken". Replace the rectifier unit.


3. Check the condition of the three diodes. To do this, measure the resistance of each diode in the forward and reverse directions one by one. If the diode "rings" in both directions or "does not ring" in either direction, then such a diode is defective. If any of the diodes is defective, replace the rectifier unit.

Checking the brushes


1. Measure the brush protrusion as shown in the figure below. If the brush protrusion is less than 2 mm, the brush should be replaced.
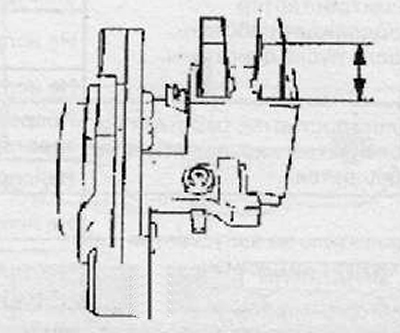
1. Measure the brush protrusion as shown in the…


2. Unsolder the connecting wire. Remove the old brushes.

3. Install new brushes into the brush holder as shown in the figure and solder the connecting wires.
This article is available at russian, bulgarian, belarusian, ukrainian, serbian, croatian, romanian, polish, slovak, hungarian
Article verified: Anatoly Ovchinnikov
Share with friends:
◀ Previous
Skoda Rapid 1: Power devices
Next ►

Checking the technical condition of the charging system
Removal and installation the alternator poly V-belt pulley
Removal and installation the voltage regulator
Generator carbon brush control
Securing the B+ wire to the alternator
Possible generator malfunctions and how to fix them
Disconnecting and connecting the battery
Removal and installation the battery
Removal and installation the battery holder
Warnings and safety instructions for working with batteries
Read similar articles on other Skoda models

➧ Checking the condition of the alternator belt Skoda Fabia 2 (2007-2014)
➧ Checking the condition of the ball joint Skoda Octavia 3 (2013-2019)
➧ Coolant — checking and adjusting the level and condition, identifying… Skoda Superb 2 (2008-2015)
➧ Checking the technical condition of the generator after disassembly Skoda Kodiaq 1 (2016-2024)
➧ Checking the condition and replacing hoses and tubes in the engine… Skoda Yeti (2009-2017)
➧ Removal and checking the condition of the crankshaft Skoda Felicia (1994-2001)
Link to this article in various formats
Reviews and comments of visitors
No comments yet


Add two numbers: 21 + 46


Rapid 1 (2012-2022) 
  • General information
  • Faults en route
  • User manual
  • Maintenance and care
  • Power unit
  • Petrol engines
  • Diesel engines
  • Power and control system
  • Lubrication system
  • Cooling system
  • Intake and exhaust system
  • Transmission
  • Clutch
  • Mechanical gearbox
  • Automatic gearbox
  • Drive shafts
  • Chassis (running gear)
  • Front suspension
  • Rear suspension
  • Brake system
  • Steering
  • Body and interior
  • Exterior (external elements)
  • Interior (internal elements)
  • Doors, locks and windows
  • Heating and air conditioning
  • Security systems
  • Electrical equipment
  • Equipment and devices
  • Power devices
  • Electrical circuits
  • Electrical circuits (petrol)
  • Electrical circuits (diesel)
SkodaBook.ru © 2018–2026 | Mobile version | Articles on Skoda | Sitemap EN BG BY UA RS HR RO PL SK HU | Feedback | Site search | Bookmark
Fabia 1 (1999-2007) | Fabia 2 (2007-2014) | Rapid 1 (2012-2022) | Octavia 1 (1996-2004) | Octavia 3 (2013-2019) | Superb 2 (2008-2015) | Kodiaq 1 (2016-2024) | Yeti (2009-2017) | Favorit (1987-1994) | Felicia (1994-2001) |
By continuing to use the site, you agree to the use of cookies.