



Front door hinges and safety pin
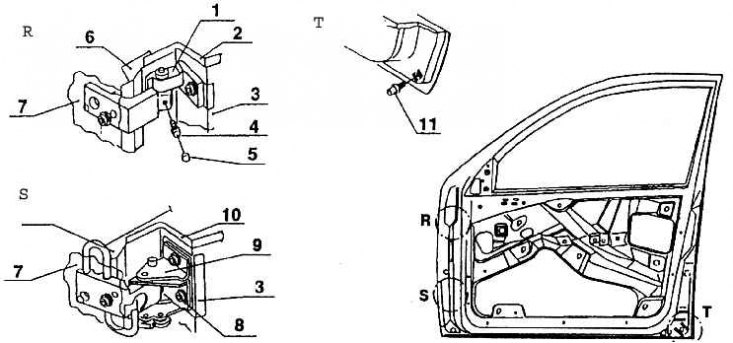
1 – upper door hinge; 2 – stiffening rib of the upper loop; 3 – inner surface of the door; 4 – bolt; 5 – cork; 6 – outer surface of the door; 7 – rack; 8 – hinge bolt; 9 – bottom door hinge; 10 – stiffening rib of the lower loop; 11 – safety pin
Rear door hinges and safety pin
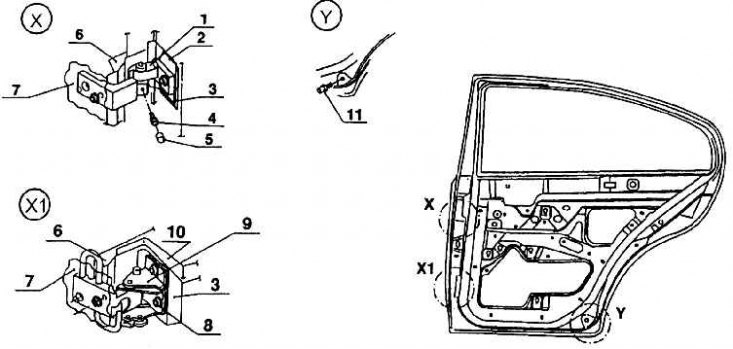
1 – upper door hinge; 2 – stiffening rib of the upper loop; 3 – inner surface of the door; 4 – bolt; 5 – cork; 6 – outer surface of the door; 7 – rack; 8 – hinge bolt; 9 – lower door hinge: 10 – lower hinge stiffener; 11 – safety pin
View the original on the website: skodabook.ru
The doors are independent assembly units of the body. Each door consists of stampings of the outer and inner surfaces and various stiffening ribs. The outer and inner sheets are connected along the contour by flanging (using adhesive mastic). The remaining parts are welded. The rationally placed stiffeners, pressed into the outer and inner sheets, give the doors considerable strength. It is further increased by the stiffeners welded to the door frame in the spaces under the window openings. The stiffeners prevent the doors from warping in the event of a frontal impact, the so-called frontal displacement, and in the event of a side impact. In addition, the doors are equipped with round steel tubes made of high-strength steel against side impacts. The front door has one tubular stiffener in the upper part, and the second in the lower part. The rear door has only one stiffener. The mounting screws of the tubular stiffeners have star-shaped slots (THORX) for a special screwdriver.
The doors are suspended from the body frame, each with two hinges. The door hinges are very rigid, strong and their design allows for relatively easy removal of the doors from the body without disturbing the fit. There are only left and right upper hinges and they are the same for the front and rear doors. The lower hinges are combined with the door stop and at first glance are also the same for the front and rear doors. But in fact, this is not so. They cannot be changed during installation, since the arresting spring of the stop on the rear doors has a different value than the spring of the stop on the front doors. This is because the rear doors have a smaller mass compared to the front ones.
The movable hinge leaf is screwed to the door, the fixed one to the body pillar. The fixed part of the hinge moves during installation so that the door can be adjusted to the body surface. After removing the safety elements, the hinges can be removed from the axles and put back on.
To prevent the doors from jamming in the event of a vehicle collision, and therefore to allow them to be opened and passengers to be released, steel pins are installed in the lower part of the doors. When the doors are closed, they are pushed into the holes in the reinforced receivers in the threshold parts of the door frames.
The above-mentioned welded doors are part of a stamped body, i.e. a body that forms a welded frame with installed and fitted removable parts, and in this form they are sent to the surface preparation and varnishing process. Only internal tubular stiffeners and, of course, hinges are installed in welded doors.
Soundproofing film for front and rear doors (door section)
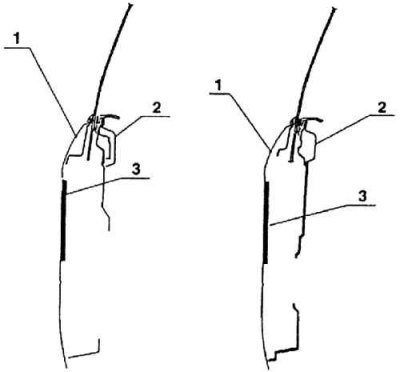
1 – outer surface of doors; 2 – inner surface of doors; 3 – soundproofing film
During the surface preparation process after applying primer paint (but before applying the putty) a magnetic film is applied to the inner surface of the surface sheets of all doors, which adheres to the surface during further varnishing of the body. The film performs a soundproofing function. The rest of the door equipment is mounted on the varnished doors and the installation of the door design and equipment occurs on the doors removed from the car (what is a technological innovation for Skoda cars) at a separate workstation (parallel to the car assembly line). Only a fully assembled door is hung back on the same body. Since the doors are individually fitted to the frame, they are tied to each other.
The design and equipment of the doors includes glass, its seals and glass lowering devices, the locking system, door panels, and, for the front doors, the external rear-view mirror.
The individual mounting sub-kits are described in the following chapters.
The body doors are sealed along the contour with three types of seals. The inner one is fixed to the body frame pillar, the outer upper one is glued into the recess of the body door frame pillar, but only in the upper part of the frame. This seal prevents water from penetrating into the space between the doors. The next, third seal is glued into the recess of the lower part of the door and seals the surface in contact with the body threshold. The contour seal of the door is tubular. The elastic profile of the seal has, in addition to the annular sealing part, a part that strengthens the general surface with metal reinforcement, poured into the rubber lining. The reinforcement is flexible, which allows it to be profiled in the transverse direction, adapting it to the body frame pillar on which the seal is mounted. In a free state, the seal forms a closed circle. After installation on the body frame pillar during preliminary assembly, the reinforcement is pressed with a special device. Thus, the seal is secured (rOLFORM system).
The seals issued as spare parts have a different reinforcing part, adapted for installation by hammering with a rubber hammer. This decision was made by the manufacturer due to the fact that not all workshops have a clamping device.
Sealing the door to the body frame
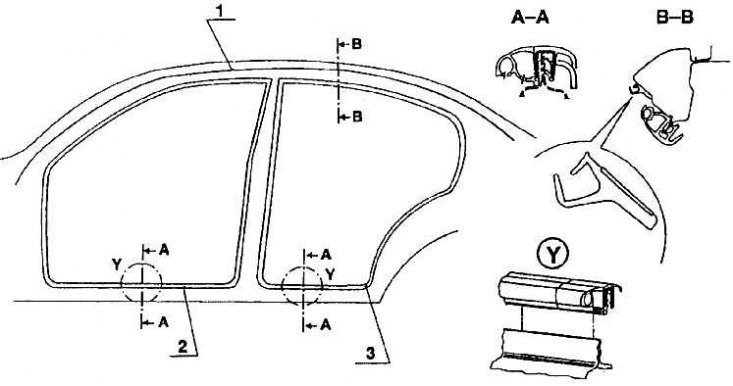
1 – external door seal; 2 – sealing of front doors; 3 – rear door seal
External lower door seal
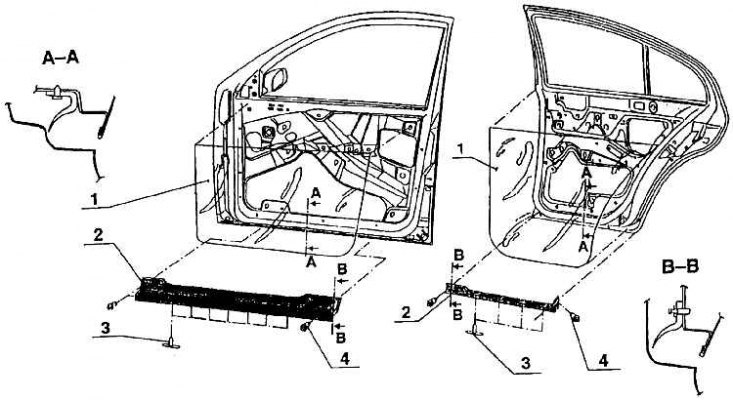
1 – protective film (front, back); 2 – outer lower door seal (front, back); 3 – caps (7x) + (4x); 4 – caps (4x) + (2x)
The annular sealing part of the seal contains small holes that allow air to escape from the tubular seal, thereby reducing the deformation between the sealing surfaces. Therefore, the force required to close the doors is relatively small, even with significant sealing pressure.
To prevent water from leaking into the space between doors (between the outer surface of the door and the tubular seal) on top, on the outer side of the rack along the contour of the door frame, a tongue rubber seal is glued in the upper part of the contour. And the lower part of the door is sealed twice. On the horizontal rack of the inner sheet of the door and the lower part, a tubular seal is glued, covering the edge of the threshold after closing the door.