
Company vehicles Hyundai Company vehicles Kia Company vehicles Lada Company vehicles Mazda Company vehicles Mercedes-Benz Company vehicles Opel Company vehicles Mitsubishi
English Русский
Български
Беларускі
Український
Српски
Hrvatski
Română
Polski
Slovenský
Magyar
Articles   
Bookmark Contacts Sitemap
SkodaBook.ru


Fabia Rapid Octavia Superb Kodiaq Yeti Others
Octavia 1 (1996-2004) Octavia 3 (2013-2019)

Removal and installation the oil pan (Skoda Octavia 5E)

  • Main
  • Octavia
  • 5E (2013-2019)
  • Transmission
  • Automatic gearbox 0D9
  • Removal and installation the oil pan
0
Contents: Removal the oil pan ⬇ Installing the oil pan ⬇
Caution! Do not start the engine with the oil pan removed or without transmission oil, and do not tow the vehicle. Observe the topic "contaminated oil" and the instructions for replacing the oil filter. When changing the transmission oil, it is not always necessary to replace the transmission oil filter. Therefore, it is necessary to follow the instructions for when to replace the transmission oil filter and when not to. Lubricate the O-rings and O-rings with transmission oil. Other lubricants lead to malfunctions of the hydraulic control of the gearbox. When disconnecting and connecting the battery ground wire, additional work must be performed.


Removal the oil pan


The engine is stopped. Disconnect the battery ground wire with the ignition off. Remove the lower noise-insulating engine casing. Unscrew the nuts "2" securing the holder "1" to the oil pan and remove the holder from the stud on the oil pan.
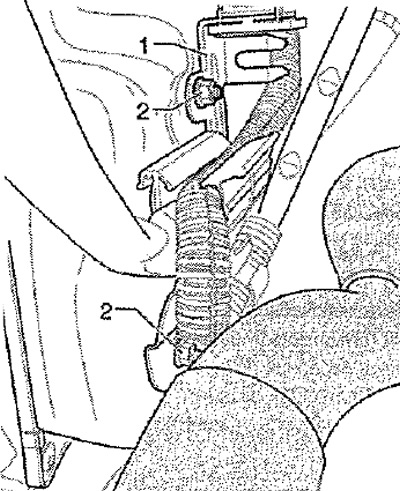
The engine is stopped. Disconnect the battery…


Note: The stud is welded to the front of the gearbox to the oil pan.


Remove protective cover "A" from the bottom of the gearbox "see arrows" if present. Install an oil collection pan under the gearbox.
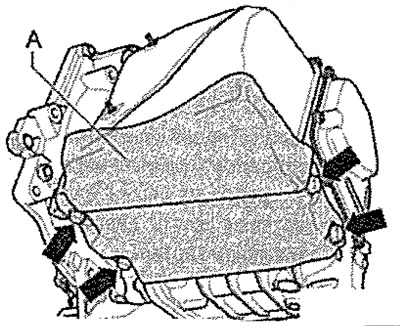


Remove protective cover «A» from the bottom of…


Unscrew the plug of the threaded hole for checking the oil level "see arrow" next to the stabilizer bar strut.
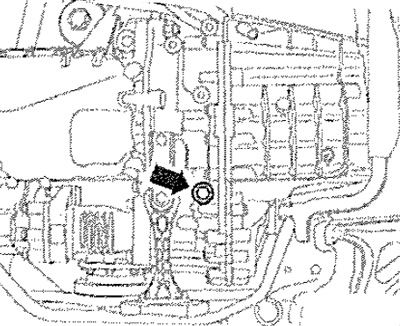
Unscrew the plug of the threaded hole for…


Note: Behind this plug there is a plastic bypass tube, which is tightened with an 8 mm Allen key to a torque of 3 Nm. The length of the bypass tube determines the oil level in the gearbox; when replacing this tube, observe the part number.


Remove the bypass tube. Approx. 5.0 l of oil flows out. Leave the oil collection pan under the gearbox. Screw on the bypass tube and tighten to the specified torque. Touch it with your hand (without gloves) to the ground to remove the electrostatic charge.
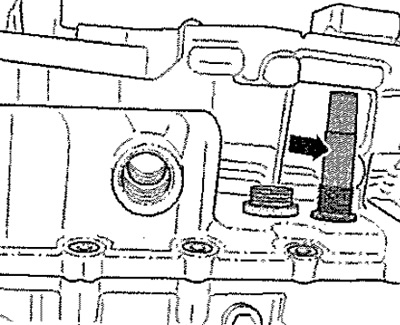
Remove the bypass tube. Approx. 5.0 l of oil…


Caution! The mechatronics for the dual clutch gearbox "J743" may only be handled or touched after the electrostatic charge has been discharged via a grounded object, such as the main contact to ground. Never touch the plug-in contacts in the gearbox connector with your hands, so that static discharge does not damage the ZBU and mechatronics.


Turn the bayonet lock "1" of the connector to the left and disconnect the connector from the gearbox.
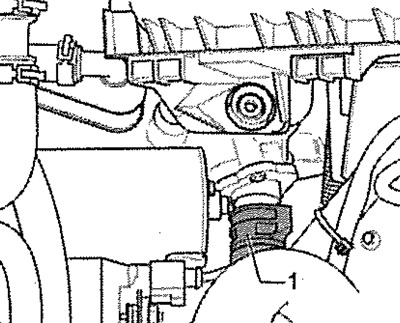
Turn the bayonet lock «1» of the connector to the…


Loosen the screws "see arrows" of the oil sump attachment "A" and turn them out in a cross order.
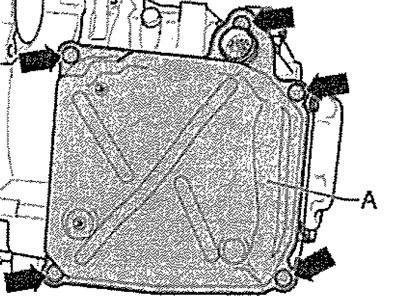
Loosen the screws «see arrows» of the oil sump…


Note: There is still transmission oil in the oil pan, as it cannot drain away without leaving any residue.


Remove the oil pan with the oil pan seal. Replace the oil pan gasket.

Installing the oil pan


Installation in reverse order. Replace both O-rings "see arrows" at the mechatronics connection. Lubricate the O-rings with DSG oil. Clean the sealing surfaces and remove any remaining oil. Make sure the new oil pan seal is correctly positioned. Install the oil pan. Do not pinch the wires and pipes. Screw in the new oil pan mounting screws and tighten them crosswise in several stages to the specified torque.
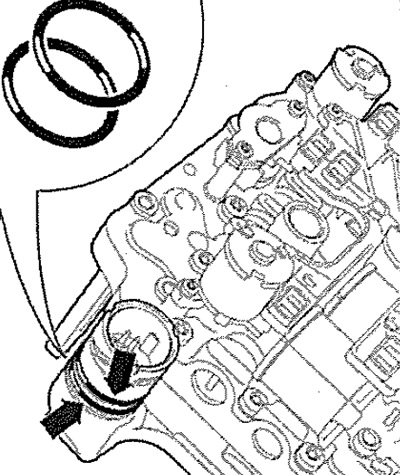


Installation in reverse order. Replace both…


Connect the connector "A" of the mechatronics as follows: Arrows "D" on the mechatronics "B" and on the connector "A", as well as the protrusion "C" should be in line and point upwards, Then carefully connect the connector "A" until it stops and lock the shutter by turning it to the right "in the direction of the arrow". Fill with transmission oil.
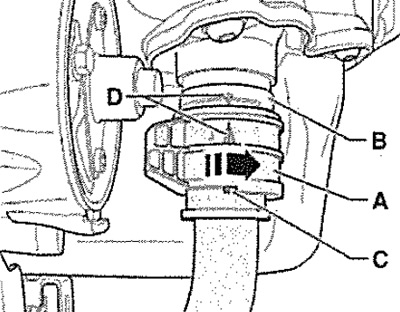
Connect the connector «A» of the mechatronics as…


Note: When disconnecting and connecting the battery ground wire, additional work must be performed.


Connect the battery wire to ground.
This article is available at russian, bulgarian, belarusian, ukrainian, serbian, croatian, romanian, polish, slovak, hungarian
Article verified: Anatoly Ovchinnikov
Share with friends:
◀ Previous
Skoda Octavia 3: Automatic gearbox 0D9
Next ►

Oil pan, mechatronics, transmission oil pump — general installation…
Electrical/electronic components and their installation locations, DSG…
Clutch installation and adjustment
Preparing for Clutch Installation
Removal the clutch
Remove mechatronics for gearbox with double-disc clutch «J743»
Installation of mechatronics for gearbox with double-disc clutch «J743»
Removal and installation the transmission oil cooling radiator
Removal and installation the transmission oil pump
Replace the O-ring for the gear shift rod
Link to this article in various formats
Reviews and comments of visitors
No comments yet


Add two numbers: 50 + 14


Octavia 3 (2013-2019) 
  • General information
  • User manual
  • Car driving
  • Maintenance
  • Petrol engines 1.2 l
  • Engine repair
  • Cooling system
  • Supply system
  • Petrol engines 1.4 l
  • Engine repair
  • Supply system
  • Petrol engines 1.8/2.0 l
  • Engine repair
  • Cooling system
  • Supply system
  • Diesel engines 1.6/2.0 l
  • Engine repair
  • Cooling system
  • Supply system
  • Transmission
  • Mechanical gearbox 02S
  • Automatic gearbox 0CW
  • Automatic gearbox 0D9
  • Chassis (running gear)
  • Front suspension
  • Rear suspension
  • Brake system
  • Steering
  • Body and interior
  • Doors, locks and windows
  • Exterior (external elements)
  • Interior (internal elements)
  • Ventilation and air conditioning
  • Electrical equipment
  • Equipment and devices
  • Headlights and lighting
  • Wiring diagrams (basic)
  • Wiring diagrams (comfort)
Octavia 1 (1996-2004) 
  • General information
  • Vehicle details
  • Maintenance
  • Power unit
  • Petrol engines 1.6 l AEE
  • Petrol engines 1.8 l AGN
  • Diesel engines 1.9 l AGR
  • Fuel system
  • Exhaust system
  • Cooling system
  • Transmission
  • Clutch
  • Car gearbox
  • Gearbox repair 02J
  • Gearbox repair 02K
  • Chassis (running gear)
  • Wheels and tires
  • Suspension and axles
  • Brake system
  • Body and interior
  • Exterior (external elements)
  • Interior (internal elements)
  • Doors, locks and windows
  • Electrical equipment
  • Equipment and devices
  • Electrical circuits
SkodaBook.ru © 2018–2026 | Mobile version | Articles on Skoda | Sitemap EN BG BY UA RS HR RO PL SK HU | Feedback | Site search | Bookmark
Fabia 1 (1999-2007) | Fabia 2 (2007-2014) | Rapid 1 (2012-2022) | Octavia 1 (1996-2004) | Octavia 3 (2013-2019) | Superb 2 (2008-2015) | Kodiaq 1 (2016-2024) | Yeti (2009-2017) | Favorit (1987-1994) | Felicia (1994-2001) |
By continuing to use the site, you agree to the use of cookies.