
Removing
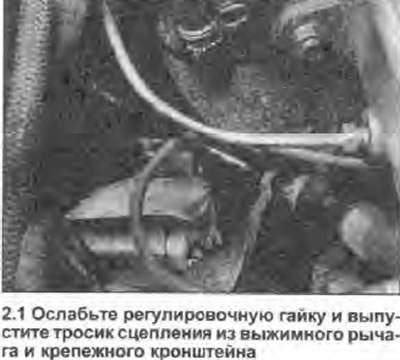
1. Working in the engine compartment, turn the clutch adjusting nut counterclockwise to obtain maximum cable play. Remove the compression spring. Unhook the cable from the clutch release lever and release the cable cover from its mounting bracket (see photo).
2. Moving along the cable, release it from all ties and clips.
3. While working in the cabin, move the carpet floor away from the top end of the clutch pedal to access the end of the cable.
4. Depress the locking bracket and release the cable from the upper end of the pedal.
5. Return to the engine compartment and pass the cable into it through the bulkhead, paying attention to the rubber O-ring at the end of it.
Inspection
6. Inspect the cable for fraying. Check the tips for wear and damage to the shroud. Check the operation of the cable - it should move easily and smoothly in the casing, without jerking. Remember that a cable that works well outside the vehicle may be much more difficult to dislodge in its working position in the engine compartment. Replace the cable if it is damaged or shows signs of serious wear by replacing the adjusting nut, washers and rubber seals from it with a new cable.
Installation
7. Apply some multi-purpose grease to the cable lugs. Install the rubber o-ring on the end of the cable facing the pedal and pass the cable through the bulkhead of the engine compartment.
8. Working in the cabin, install the cable on the clutch pedal pin and attach it to the locking bracket.
9. Working in the engine compartment, make sure the cable is routed correctly, then thread the bottom end through the mounting bracket and attach the cable to the clutch release lever. Attach the cable along the length with all ties and clamps.
10. Adjust the cable length as described in Section 1.