
Company vehicles Hyundai Company vehicles Kia Company vehicles Lada Company vehicles Mazda Company vehicles Mercedes-Benz Company vehicles Opel Company vehicles Mitsubishi
English Русский
Български
Беларускі
Український
Српски
Hrvatski
Română
Polski
Slovenský
Magyar
Articles   
Bookmark Contacts Sitemap
SkodaBook.ru


Fabia Rapid Octavia Superb Kodiaq Yeti Others
Favorit (1987-1994) Felicia (1994-2001)

Installing piston rings (Skoda Felicia)

  • Main
  • Skoda
  • Felicia (1994-2001)
  • Power unit
  • Engine overhaul
  • Installing piston rings
0
1. Make sure that the pistons are seated correctly on their connecting rods and the piston rings are in their grooves (see section Removal, condition check and installation of connecting rod and piston assemblies).

2. Before installing the rings on the pistons, it is necessary to check the size of the gaps in their locks.

3. Lay the piston assemblies and their ring sets on a clean work surface. Lay the cylinder block on its side on the workbench, ensuring access to both its top and bottom.

4. Insert the upper compression ring of the corresponding piston into the first cylinder of the engine. Use the bottom of the piston to push the ring into the lower part of the cylinder. Remove the piston.
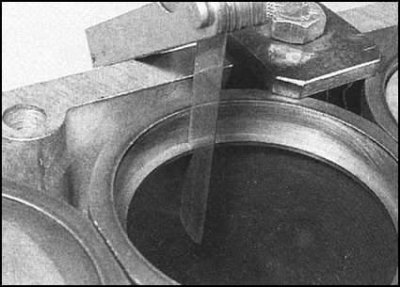
5. Using a blade type feeler gauge, measure the…


5. Using a blade type feeler gauge, measure the gap in the ring lock - the blade is of the required thickness (see Specifications) should slide tightly between the end surfaces of the ring in its lock. Before rejecting the ring, make sure that you have not confused it with the lower one. Repeat the procedure for the remaining rings.

6. When using brand new piston rings, the probability that the gaps in their locks will be too small is extremely small - remember that closing the locks during thermal expansion of the rings is fraught with engine jamming and irreversible failure. If necessary, the gap should be adjusted by gradually grinding the ends of the ring on a file clamped in a vice - tightly put the ring with the lock on the file and pull it towards you (under no circumstances away from yourself to avoid the risk of breaking the ring when closing the lock). If the measurement result exceeds the permissible value (which is highly unlikely in the case of new rings), before you reject a ring, make sure you have purchased a set of rings that match the engine size of your vehicle.
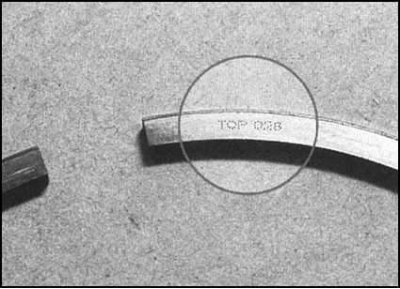


7. After completing the check and adjustment of…


7. After completing the check and adjustment of the gaps in the locks of all the rings, you can begin to put them on their pistons. The technology for putting the rings on the piston is similar to that used for their removal. First of all, the spring expander of the lower part is inserted into its groove on the piston (oil scraper) rings, then both of its side sections are installed. Note that both the expander and the side sections of the oil scraper ring can be installed with either side up. The second and upper compression rings have different cross-sections and can be distinguished from each other by the markings applied to their upper sides. Make sure that the rings are installed on the piston with the markings facing up.

8. After finishing installing the rings on the piston, check that they rotate freely in their grooves, then turn the locks at 120° to each other.

Note: In case of discrepancies, installation of rings should be carried out in accordance with the instructions of their manufacturers.


Data copied from the portal: skodabook.ru
This article is available at russian, bulgarian, belarusian, ukrainian, serbian, croatian, romanian, polish, slovak, hungarian
Article verified: Ekaterina Blinova
Share with friends:
◀ Previous
Skoda Felicia: Engine overhaul
Next ►

Installing the crankshaft and checking the main bearing clearances
The procedure for assembling the engine after a major overhaul
Checking and selecting liners of main and connecting rod bearings of the…
Cleaning and checking the condition of the cylinder block/engine crankcase
Removal and checking the condition of the crankshaft
Installing connecting rod and piston assemblies and checking connecting…
Initial engine start after completion of overhaul
Read similar articles on other Skoda models

➧ Setting the piston of the first cylinder to the TDC position Skoda Fabia 1 (1999-2007)
➧ Installing the timing chain tensioner (1.2 MPI engine) Skoda Rapid 1 (2012-2022)
➧ Installing the wheel, shock absorber, propeller shaft and brake Skoda Octavia 1 (1996-2004)
➧ Replacing the rear crankshaft oil seal, removing and installing the… Skoda Superb 2 (2008-2015)
➧ Connecting rod and piston group Skoda Kodiaq 1 (2016-2024)
➧ Replacing crankshaft seals, removing and installing flywheel and… Skoda Yeti (2009-2017)
Link to this article in various formats
Reviews and comments of visitors
No comments yet


Add two numbers: 11 + 27


Favorit (1987-1994) 
  • General information
  • Maintenance
  • Troubleshooting
  • Power unit
  • Engine in car
  • Engine overhaul
  • Cooling and heating
  • Fuel and exhaust system
  • Fuel injection system
  • Ignition system
  • Transmission
  • Clutch
  • Manual gearbox
  • Drive shafts
  • Chassis (running gear)
  • Brake system
  • Car suspension
  • Steering
  • Body and interior
  • Exterior (external elements)
  • Interior (salon)
  • Electrical equipment
  • Equipment and devices
  • Power devices
  • Electrical circuits
Felicia (1994-2001) 
  • General information
  • Introduction to guide
  • User manual
  • Maintenance (petrol)
  • Maintenance (diesel)
  • Power unit
  • Petrol engine 1.3 l
  • Petrol engine 1.6 l
  • Diesel engine
  • Engine overhaul
  • Cooling system
  • Fuel system (carburetor)
  • Central injection (SPFI)
  • Multipoint injection (MPFI)
  • Diesel power system
  • Decreased toxicity
  • Engine electrics
  • Transmission
  • Clutch
  • Car gearbox
  • Drive shafts
  • Chassis (running gear)
  • Brake system
  • Car suspension
  • Steering
  • Body and interior
  • Exterior (external elements)
  • Interior (salon)
  • Doors, locks and windows
  • Electrical equipment
  • Equipment and devices
  • Headlights and lighting
  • Electrical circuits
SkodaBook.ru © 2018–2026 | Mobile version | Articles on Skoda | Sitemap EN BG BY UA RS HR RO PL SK HU | Feedback | Site search | Bookmark
Fabia 1 (1999-2007) | Fabia 2 (2007-2014) | Rapid 1 (2012-2022) | Octavia 1 (1996-2004) | Octavia 3 (2013-2019) | Superb 2 (2008-2015) | Kodiaq 1 (2016-2024) | Yeti (2009-2017) | Favorit (1987-1994) | Felicia (1994-2001) |
By continuing to use the site, you agree to the use of cookies.