
Company vehicles Hyundai Company vehicles Kia Company vehicles Lada Company vehicles Mazda Company vehicles Mercedes-Benz Company vehicles Opel Company vehicles Mitsubishi
English Русский
Български
Беларускі
Український
Српски
Hrvatski
Română
Polski
Slovenský
Magyar
Articles   
Bookmark Contacts Sitemap
SkodaBook.ru


Fabia Rapid Octavia Superb Kodiaq Yeti Others
Kodiaq 1 (2016-2024)

Gearbox mechatronics module — removal (Skoda Kodiaq NS7)

  • Main
  • Kodiaq
  • NS7 (2016-2024)
  • Transmission
  • Automatic gearbox
  • Gearbox mechatronics module — removal
0

Removal


1. Move the gear selector to position "P".

2. Disconnect the negative terminal from the battery.

3. Remove the soundproofing coating.

4. Remove the front left wheel arch liner (for more details, see the corresponding section in the chapter "Body").

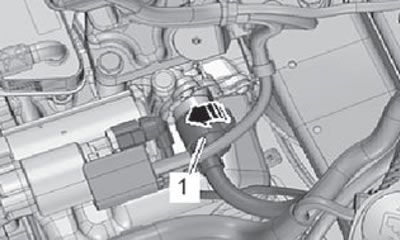
5. After unlocking the mechatronics wiring harness connector lock (1) by turning it to the left, disconnect the wiring harness connector from the gearbox, as shown in the figure below.
5. After unlocking the mechatronics wiring…


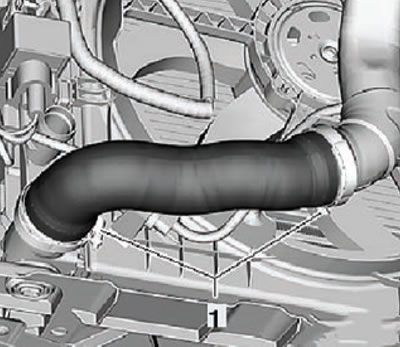
6. Loosen the clamps and disconnect the connecting hose between the discharge pipe and the intercooler as shown in the figure below.
6. Loosen the clamps and disconnect the…


7. Disconnect the lower water hose from the radiator (for more details, see the corresponding section in the chapter "Cooling system").


Models with diesel engines


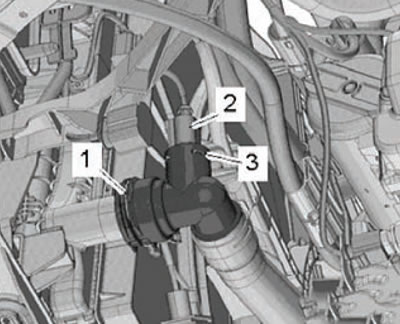
8. Open the clamp (arrow), disconnect the lower left hose from the radiator and drain the coolant into a pre-prepared container.
8. Open the clamp (arrow), disconnect the lower…


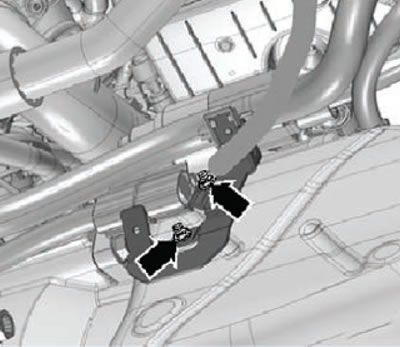
9. Unscrew the mounting nuts from the holder on the oil pan, remove the holder from the threaded pins, as shown in the figure below.

Note: Threaded pins are welded to the front of the transmission to the oil pan.

Note: Threaded pins are welded to the front of…


10. Move the wiring harness to the side.

11. Install a special device under the gearbox assembly.

12. Loosen the oil pan mounting screws (arrows) (A) crosswise and unscrew them as shown in the figure below.

Note: There is still oil in the oil pan, as it is possible that not all of it was drained.


13. Remove the oil pan together with the seal.


14. The oil pan seal should always be replaced.
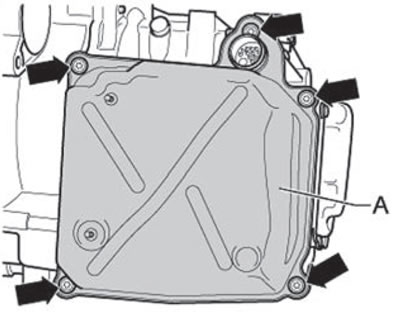
14. The oil pan seal should always be replaced.


15. Replace the oil filter if necessary.

16. Unscrew the fastening screws (arrows) shown in the figure below, remove the transmission oil pump cover (A).

17. Touch the ground (body) of the vehicle with your bare hand, which will discharge the electrostatic charge.

Attention. The mechanical electronics of the DSG "J743" automatic transmission may only be touched or removed after the electrostatic charge has been removed by touching a grounded object, such as a "mass" (body), with your bare hand a car.

Do not touch the contacts in the gearbox socket with your hands, as the electrostatic charge may damage the control unit and, consequently, the mechatronics.
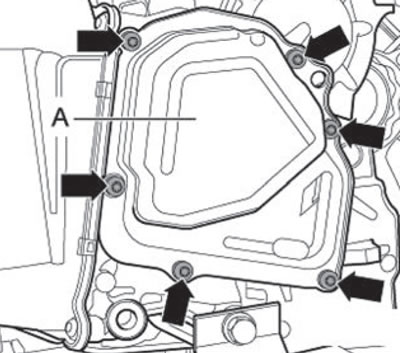

Do not touch the contacts in the gearbox socket…


18. Release the wiring harness from the clips (arrows), first the upper clamp, then the lower one.


(Data taken from this portal: SkodaBook)

Note: Do not apply force to the wire.
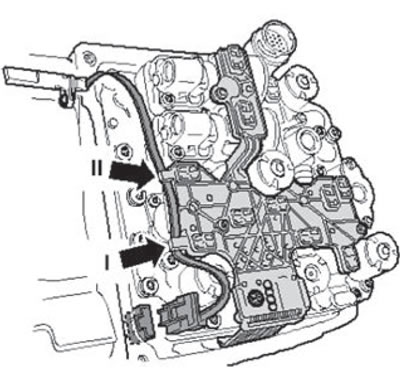

Note: Do not apply force to the wire.


19. Loosen and remove the support screws (1) to (10) in the order shown, as shown in the figure below.
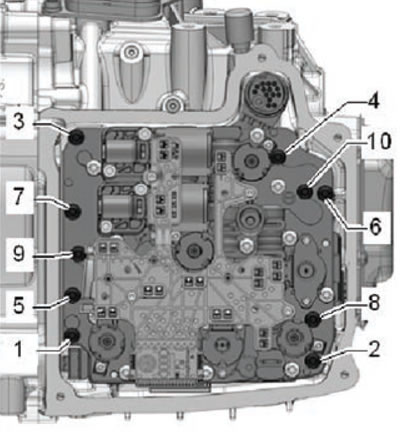
19. Loosen and remove the support screws (1) to…


20. Remove the mechatronics module from the gearbox housing until the sensor lever (B) on the rear side is already outside the gearbox, as shown in the figure below.

21. Carefully move the mechatronic control unit of the DSG automatic transmission "J743" downwards, as shown in the figure below.
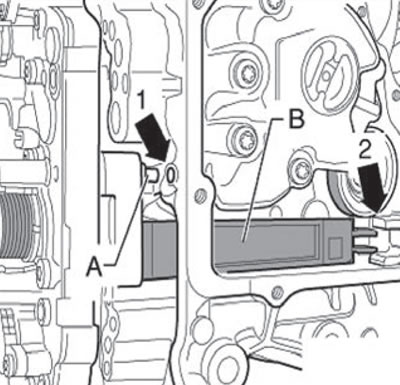
21. Carefully move the mechatronic control unit…


22. Remove the mechatronics of the DSG automatic transmission "J743", as shown in the figure below.


Caution: Never lift the mechatronics by the sensor lever or place it on it.
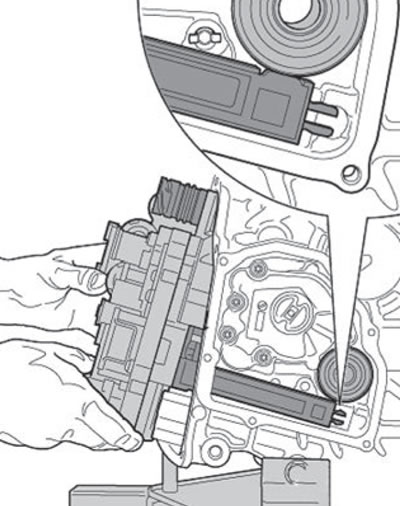

Caution: Never lift the mechatronics by the…


23. Move and place the mechatronics module as shown in the figure below.
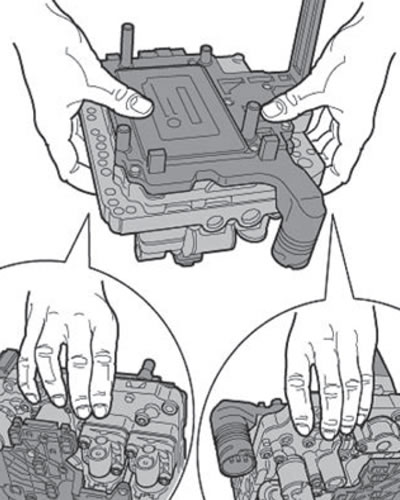
23. Move and place the mechatronics module as…


24.When handling mechatronics, care must be taken especially with regard to the long sensor lever (arrow) shown in the figure below (if the lever is damaged, the mechatronics must be replaced).
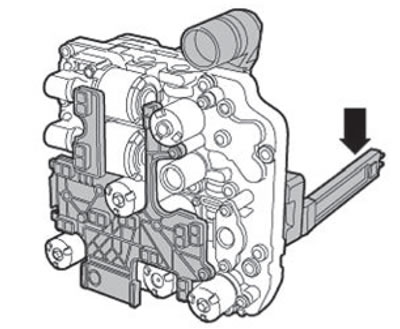
24.When handling mechatronics, care must be taken…
This article is available at russian, bulgarian, belarusian, ukrainian, serbian, croatian, romanian, polish, slovak, hungarian
Article verified: Eleonora Afanasyeva
Share with friends:
◀ Previous
Skoda Kodiaq 1: Automatic gearbox
Next ►

Oil pan — removal and installation
Oil pan, mechatronics module
Gearbox assembly — installation
Gearbox assembly — removal
Maintenance Recommendations and Warnings
Gearbox mechatronics module — installation
Transmission Oil Cooler — removal
Transmission Oil Cooler — installation
Gearbox oil pump — removal
Transmission oil pump for gearbox — installation
Read similar articles on other Skoda models

➧ Removal and installation the gearbox Skoda Fabia 1 (1999-2007)
➧ Mechatronics of 7-speed gearbox — external view Skoda Rapid 1 (2012-2022)
➧ Removal the mechatronics for the dual clutch gearbox «J743» (gearbox… Skoda Octavia 3 (2013-2019)
➧ Using a manual gearbox (MT) and an automatic transmission (DSG) Skoda Superb 2 (2008-2015)
➧ Using a manual gearbox (MT) and an automatic transmission (DSG) Skoda Yeti (2009-2017)
➧ Checking the gearbox oil level Skoda Favorit (1987-1994)
Link to this article in various formats
Reviews and comments of visitors
No comments yet


Add two numbers: 50 + 26


Kodiaq 1 (2016-2024) 
  • General information
  • User manual
  • Controls and instruments
  • Maintenance
  • Power unit
  • Petrol engine 1.4 l
  • Petrol engine 2.0 l
  • Diesel engine 2.0 l
  • Fuel and control (petrol)
  • Fuel and control (diesel)
  • Cooling system (petrol 1.4 l)
  • Cooling system (petrol 2.0 l)
  • Cooling system (diesel 2.0 l)
  • Lubrication system (petrol)
  • Lubrication system (diesel)
  • Intake and exhaust (petrol 1.4 l)
  • Intake and exhaust (petrol 2.0 l)
  • Intake and exhaust (diesel 2.0 l)
  • Transmission
  • Clutch
  • Manual gearbox
  • Automatic gearbox
  • Drive shafts
  • Chassis (running gear)
  • Front suspension
  • Rear suspension
  • Wheels and tires
  • Brake system
  • Steering system
  • Body and interior
  • Exterior (external elements)
  • Interior (internal elements)
  • Doors, locks and windows
  • Heating and air conditioning
  • Security systems
  • Electrical equipment
  • Power devices
  • Equipment and devices
  • Electrical circuits
  • Electrical circuits (petrol 2.0 l)
  • Electrical circuits (halogen headlights)
  • Electrical circuits (LED headlights)
  • Electrical circuits (Climatronic)
SkodaBook.ru © 2018–2026 | Mobile version | Articles on Skoda | Sitemap EN BG BY UA RS HR RO PL SK HU | Feedback | Site search | Bookmark
Fabia 1 (1999-2007) | Fabia 2 (2007-2014) | Rapid 1 (2012-2022) | Octavia 1 (1996-2004) | Octavia 3 (2013-2019) | Superb 2 (2008-2015) | Kodiaq 1 (2016-2024) | Yeti (2009-2017) | Favorit (1987-1994) | Felicia (1994-2001) |
By continuing to use the site, you agree to the use of cookies.